Showing posts with label tutorial. Show all posts

Saturday, July 11, 2020

Simple Dice Bags with Lining

All dice need a home. Why not make them one yourself?


(Let’s all conveniently ignore the fact that these dice bags are not holding dice. I misplaced my set and haven’t got around to ordering new ones because all the games I play are online anyway!)


This pattern comes in two sizes: medium and large.


The medium bag will comfortably hold a single set of dice, plus or minus a few pieces. Do you have just one set of dice that you use for everything? Maybe you have many sets, but you prefer to keep them nicely organized. Or perhaps one of your dice sets is so special it needs its own handmade container. If so, this is the bag for you.


On the other hand, are you a DM who routinely needs to make five initiative rolls at once? Are you the player that everyone looks to when the warlock casts Circle of Death and deals 8d6 damage to 6 creatures simultaneously? Or perhaps you just love dice, and don’t care whether or not they’re sorted by color. If so, you may want the large bag, which easily holds 5+ sets of loose dice.


Materials


25-75 yards (23-70 meters) of lace weight yarn or size 10 crochet thread.

Scrap of quilting cotton or other medium-weight woven fabric, for lining (optional)

Thread matching the fabric color


Supplies


US size 1 steel crochet hook (2.35 mm)

Stitch marker (optional, to mark beginning of round)

Tapestry/yarn needle

Sewing needle, for lining (optional)


Abbreviations


(Note: this pattern uses US crochet terminology)

sc: single crochet

hdc: half double crochet

inc: increase

ch: chain

sl st: slip stitch

st: stitch

tbl: through back loop


Instructions- Size Medium


Base


Round 0: sc 6 in magic circle. Do not join. (6 sts)

Round 1: inc each st around (12 sts)

Round 2: *1 sc, inc* around (18 sts)

Round 3: *2 sc, inc* around (24 sts)

Round 4: *3 sc, inc* around (30 sts)

Round 5: *4 sc, inc* around (36 sts)

Round 6: *5 sc, inc* around (42 sts)

Round 7: *6 sc, inc* around (48 sts)

Sl st into next st


Sides


Note: You can substitute any other stitch you want for hdc in rounds 2-14. Work your rounds until the sides measure 2.5” (6.5 cm) tall, then proceed to round 15. Some stitch patterns may benefit from joining at the ends of rounds, instead of continuous rounds as written. In this case, at the end of each round, sl st to first stitch in round, and ch 1-3, depending on the height of your chosen stitch.


Round 1: sc tbl, *hdc tbl* around

Round 2-14: hdc around

Round 15: *2 hdc, ch1, skip 1 st, 3 hdc* around (8 ch1 spaces)

Round 16-18: hdc around

sc 1, sl st 1, tie off yarn, weave in ends


Instructions- Size Large


Base


Round 0: sc 6 in magic circle. Do not join. (6 sts)

Round 1: inc each st around (12 sts)

Round 2: *1 sc, inc* around (18 sts)

Round 3: *2 sc, inc* around (24 sts)

Round 4: *3 sc, inc* around (30 sts)

Round 5: *4 sc, inc* around (36 sts)

Round 6: *5 sc, inc* around (42 sts)

Round 7: *6 sc, inc* around (48 sts)

Round 8: *7 sc, inc* around (54 sts)

Round 9: *8 sc, inc* around (60 sts)

Round 10: *9 sc, inc* around (66 sts)

Round 11: *10 sc, inc* around (72 sts)


Sl st into next st


Sides


Note: You can substitute any other stitch for hdc in rounds 2-25. Work your rounds until the sides measure 4.5” (10 cm) tall, then proceed to round 26. Some stitch patterns may benefit from joining at the ends of rounds, instead of continuous rounds as written. In this case, at the end of each round, sl st to first stitch in round, and ch 1-3, depending on the height of your chosen stitch.


Round 1: sc tbl, *hdc tbl* around

Round 2-25: hdc around

Round 26: *2 hdc, ch1, skip 1 st, 3 hdc* around (12 ch1 spaces)

Round 27-31: hdc around

sc 1, sl st 1, tie off yarn, weave in ends


Drawstring – Both Sizes


The drawstring for this bag can be made of many things. Shown  above are an I-cord (small white bag), a ribbon (large bag), and a braid (small pink bag). Drawstrings should measure approximately 10” (25 cm) long for the medium bag, or 14” (35 cm) long for the large bag.


To insert the drawstring, weave one end into and out of the holes produced in round 15/26. The ends of the drawstring should end up outside the bag.


Lining (Optional) – Both Sizes


A fabric lining can easily be sewn into these dice bags for added strength and stability. Recommended fabrics are any medium-weight woven fabric, especially quilting cottons. A ¼” (0.5 cm) seam allowance is used throughout.


For the medium size, cut out a circle measuring 3” (7.5 cm) in diameter and a 3.5” x 8.25” (9 x 21 cm) rectangle. For the large size, cut out a circle measuring 4” (10 cm) in diameter and a 6” x 11.5” (15.25 x 29.25 cm) rectangle.


With right sides facing, sew the short sides of the rectangle together by machine or by hand. Optionally, press the seam open using an iron.


Using a pencil, fabric marker, or chalk, make 4 equidistant marks on the edge of the circle, separating it into equal quarters. Do the same thing with one of the long raw edges of the rectangle (now a tube).


Using a long stitch, sew a gathering stitch around the circle about ⅛” (0.25 cm) from the edge. Pull on the thread to gather the edges. Insert the circle into the tube, with right sides facing. Match up the marks on the circle to the marks on the tube and pin in place. Then, add pins to the area between each mark, adjusting the easing as necessary to fit the curves to each other. Sew together, by machine or by hand.


Trim the excess fabric of the new seam to about ⅛” (0.25 cm), and clip the seam to allow the bottom to lie flat. Be careful not to cut your stitches! Finally, fold the top raw edge over ¼” (0.5 cm) on the wrong side (you may find it helpful to press this fold in with an iron). Insert the lining into your crocheted bag so that the right side of the fabric faces inwards (aka, the part you will see when you open the bag) and use a whipstitch to secure the top edge to the top edge of the crocheted bag.


And there you have it: your very own dice bag! It's a great way to use up leftover bits of yarn, and this pattern is very easy to riff on, so feel free to make your own. If you do, comment below with pictures, or head over to my Ravelry (MeadowlarkLace) or my Instagram (@_meadowlarklace_) and show me there. And until next time, stay crafty my friends!


Monday, March 2, 2020

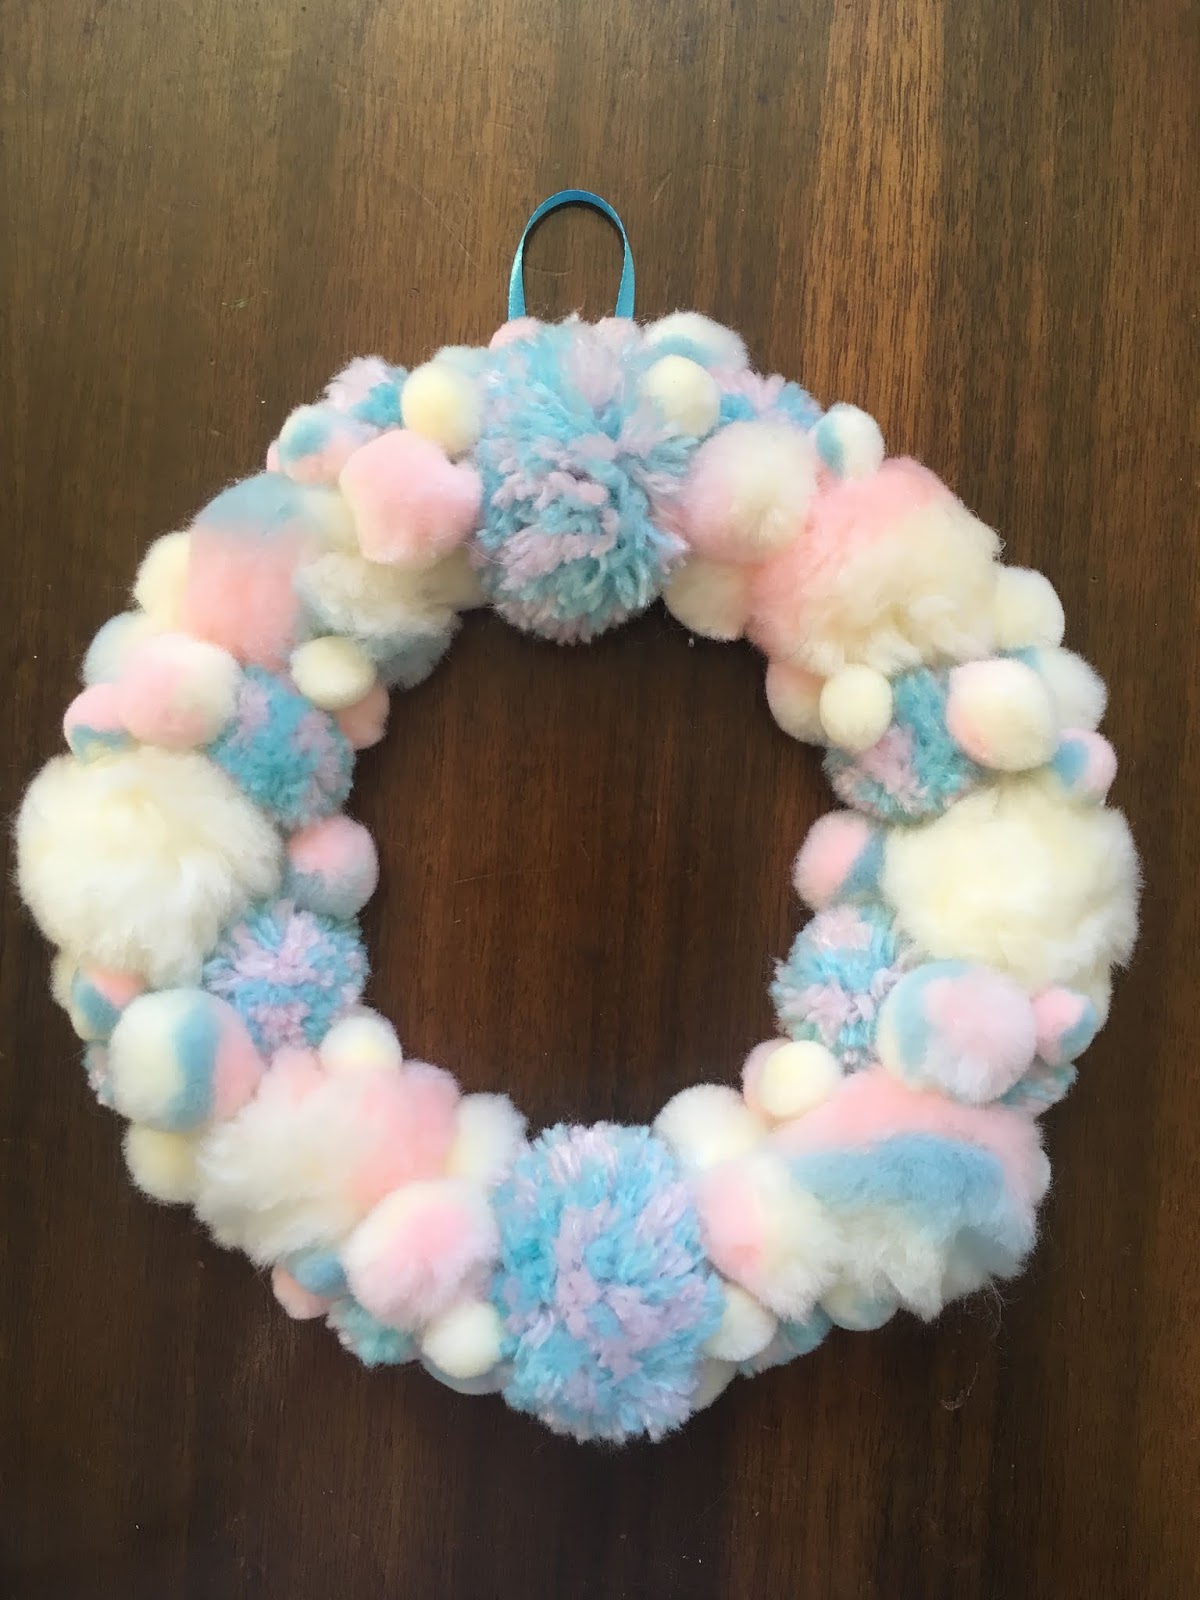
Tutorial: Pompom Wreath


I love wreaths. Indoor or outdoor, on windows or doors or simply hung over the mantle, they always add a nice touch to the decor. Most wreaths are made of foliage and intended for the fall and winter months. But when we have the power to make our own, why limit ourselves to that style? Wreaths can be made of almost anything, and can decorate at any time of year.

 So why am I making a pompom wreath? The explanation requires a little bit of story time. You see, I have pretty curly hair, and when I was a teenager it was fairly short. This caused it to stick out from my head in a consistent orb of fluff. It was... well, it was definitely a look. And among my friends, that look earned me the nickname “Pompom.” I eagerly embraced my pompomness (pompomosity?) by changing all my profile pictures to photos of fluffy yarn balls. Eventually I grew my hair out of the orb-shape, but even now, a few of my accounts have pompom avatars. I have a fondness for pompoms. And I can’t think of a softer, friendlier way to decorate my front door!


If you too would like a poofy door decoration, these wreaths are super easy and quick to make. The materials you’ll need are:

  •  Pompoms
  • Cardboard
  • Cardstock, in a similar color to the pompoms (optional)
  • Scrap of ribbon
  • Craft glue (optional)
  • Hot glue
Once you’ve gathered all your materials, it’s time to determine the size of your wreath. I found it useful to pile my pompoms into a rough donut, in order to get a feel for how much space I could fill. From that shape, I measured the inner and outer diameter of the ring. Make your dimensions a little bit smaller than you think you have the pompoms for: a small dense wreath will look nicer than a large, sparse one.

(Note: your wreath doesn’t have to be circular. Experiment with other shapes too!)

Once you have the size of the wreath, trace the inner and outer circle onto a piece of cardboard, and cut out the ring. It should look something like this:


As an optional step, you can trace the same ring onto a piece of cardstock and glue that onto the cardboard. This will prevent the color of the cardboard from peeking through if your pompoms aren’t densely packed enough. If you’ve got plenty of pompoms to cover the area, though, the cardstock won’t be seen, and you can skip it. I erred on the side of caution and covered my wreath base with some pale pink cardstock.


Next is the fun part: the pompoms! Get a bunch of pompoms in a variety of sizes and colors. My pompoms happen to be sort of sherbet-colored, which I love, and they came in multi-size packs. You may find it helpful to sort them by size before you start.


Turn on your hot glue gun, and spread your workspace with newspaper or something else to catch glue drips. (Trust me, it’s worth the extra minute of setup!) While it heats up, take the biggest pompoms you have and space them evenly around your base. I had eight large pompoms, but the exact number isn’t crucial: what is important is covering the wreath as evenly as possible.

When your glue gun is ready, it’s time to start attaching the pompoms. If you’ve used a glue gun before, you know the drill. Put a dab of glue on the pompom...


And press it to the wreath where you want it to stick.


Alternatively, you can put the glue on the wreath first, and then place the pompom. I switched between the two over the course of the project, and both methods work fine.

Once you’ve gotten your biggest pompoms glued down, move on to the medium-sized ones. Here, your goal is to fill in the spaces left between the big pompoms. I found it helpful to arrange each round of pompoms before gluing them down, in order to space them well.


Continue using smaller and smaller pompoms to fill in the spaces. Don’t be afraid to squeeze pompoms into small crevices! That’s what will give the wreath its plush look and texture. Most pompoms will be glued directly to the base, but you can also stack pompoms on top of one another to round out the shape. When you’ve added your last pompom, the wreath should look something like this:


(Yes, it is as soft as it looks)

Finally, we need some way to hang our creation up. Take a small scrap of ribbon (a few inches long will work), fold it in half, and hot glue it to the back of the cardboard base, at the top of the wreath.


And there you have it! A fluffy cuddly pompom wreath to decorate any door or window you like!


The colors of my wreath would make it a good Easter decoration (though it’s a bit early for that), but your wreath can be any color, or any combination! Make a bunch of wreaths for every season. Make a wreath for each day of the week, and swap them out each morning! With how quick these are to whip up, the possibilities really are endless. In fact, I think I’ll pick up some more pompoms next time I’m at the craft store...

Well, it seems I have some shopping to do, so until next time, stay crafty!

Sunday, November 17, 2019

I'm All (Elf) Ears

Hello again, crafters! In my endeavor to dress up as the entirety of the TAZ cast, I've been working on completing my Taako cosplay. Or, well. It's already finished, I wore it for Halloween and stuff. But I haven't finished writing about it here, so for all intents and purposes, it's not done yet. I've made quite a few things in order to embody this elf wizard, but I'm missing some key components. He's an elf wizard, so I need elf ears!
I've never dipped my proverbial toe into the world of prosthetics, so the first order of business was to do some research. How are they made? Are there multiple techniques? And can I do any of them at home, on a grad student budget?
Well, most of your professional grade prosthetics are made from latex, molded to the shape of the wearer's ears and kept on with special adhesives and whatnot. This is definitely the most natural looking option, though due to a combination of the skills required to make them and the supplies I'd need, it was out of the question for me. I also saw lots of stylized, wire ears. These aren't meant to look realistic at all, just pretty. That was more in my skillset, since I have some experience with wirework from jewelry, but it wasn't quite the look I wanted. So I turned to the third option: clip-ons.
This class of ear prosthetics differs from the professional variety in that they're not meant to fit perfectly over the wearer's ear, leaving no seam. Instead, they clip over the ear like a cuff, or onto the hair, and are worn that way. They might be made of silicone, latex, even fabric or cardboard. Because they don't require precise fitting, I felt like this type of ear was doable. I planned to wear a wig that would hide the clips (and my actual ears) anyway, so a bit of disconnect wasn't an issue. After fiddling around with techniques for a bit, I came up with an inexpensive, easy pair of ears to DIY for my costume!
Because this is a construction method I came up with myself (only very loosely inspired by things I saw online), I'll do my best to provide a tutorial that you can follow along with yourself. Assuming you already have a hot glue gun and some spare paint lying around, you can make a few pairs of these ears in a few days for under $4. So go forth, and make yourself some ears!

Speaking of supplies, here's what you'll need:

  • One 12" x 18" sheet of craft foam, preferably in something close to your skin tone
  • Acrylic paint, in your skin tone
  • Two pairs of clip-on earring backs (note: it might be possible to use regular post earring backs if you have piercings in the right places, but as I don't have pierced ears, I couldn't test that out)
  • Hot glue
  • Regular craft glue
  • Scissors
First, in order to make your ears, you need to know what shape your ears will be. Take a piece of paper and draw out your ideal ear, making sure that the base of the ear (the part closest to your head) is just about as tall as your actual ear. This project works best with the large, exaggerated ears. In order to get a more realistic shape, you can plan out a few layers of depth in your drawing. Ears have an outer rim that give them a cupped shape, and then they funnel in towards the head. In my drawing below, I've labeled the three layers that I'm going to use with numbers. Each layer will have its own piece of foam.


Now, use your paper pattern to cut out your foam. If you want two ears, don't forget to cut each layer out twice! Here you can see the three layers I've made, showing the differences in depth. The outer rim is most raised, and the inner part near the head is the deepest. Notice also that I put a slight curve in the foam at the base of the ear. This is to match the curve of my head, when I put the fake ear behind my real ear (like where you hand goes when you cup your ear to hear better). The better your foam ear fits into this groove, the better it will stay on overall.


Now, glue your pieces together and let them dry completely. I used regular craft glue for this, but you could try hot glue if you're in a hurry. Just make sure it doesn't ooze out of the seams too much.


All right, it's looking like an ear! If you want things to look a little less boxy, you can take a pair of scissors and round out the edges of the ears. 

Now, here comes the hard part. In order to get these things to stay on, we're going to use clip-on earring backs, two for each ear. The first will clip onto the earlobe, in the same place as most vanilla ear piercings are. The second will clip to the very top of the ear (this is why it's important that your foam ear is the same height as your actual ear). Put a dab of hot glue onto the back of the foam ear and place your earring backs and the bottom and top of the ear, orienting them so that they will clip over both the foam ear and your actual ear, sandwiching them between the two pars of the earring. Look at the pictures for help. Once the glue is dry, check to see that the earring backs are actually in the right position to clip onto your ear. It may take several tries. Fortunately, you can easily pop the earring backs out of the glue, re-melt it with the nozzle of the glue gun, and try again. When you're satisfied with the positioning, put another dab of hot glue onto the earring back to keep it from coming off. (Please ignore that I already painted these, you're going to want to save the painting until the end. I just forgot to photograph the next few steps before painting.)

(This view is of the back of the ear. Note the hot glue keeping the earring back in place)


(And here's a front view. The earring back clips over the edge of the ear.)

(When worn, the earring backs clip over both the foam ear and your real ear, pinning the two together. If you spend time positioning them right, this can be quite a sturdy arrangement!)

The ears are now perfectly functional. But if you're like me, you couldn't find any foam that really matched your skin tone. Fortunately, foam is paintable! Grab one or more acrylic paints that match your skin, mix them together if needed, and give your foam ears a few coats of paint! Since the foam is porous, you'll need multiple coats: 3 should do the trick. Then let them dry completely (unless you want paint in your hair), and you're done!


I have to say, I'm pretty proud of these. For a first time prosthetic-maker, I think they turned out well! They're not the most comfortable things in the world to wear (if you've ever worn clip-on earrings, you know the feeling), and they're not quite sturdy enough to survive something like a LARP session, but they certainly stay on well enough to walk around a convention! And if you have a wig or long hair to hide the hardware, they actually look pretty convincing from a distance! I'm seriously considering getting another sheet of foam and making myself a whole set of wacky-shaped ears. Who knows, maybe I'll use them for next Halloween!

With this project in the bag, I inch ever closer to the completing of the Taako look. If you're interested in seeing more of that, stay tuned, and stay crafty!

Monday, May 27, 2019

Tutorial: Beaded Necklace Design

Hello hello! It's back to the regular schedule again, hooray! As promised, I come to you with my methods for designing beaded jewelry. Like I said last week, I've been beading for quite some time now (and beading well for at least a year or two!), so I have some insights to share on the subject of creating a necklace.

Now, the "tutorial" in the title is a little bit misleading, since I won't be showing you a specific technique or walking you through concrete steps that you must follow in order to get a nice finished product. Unlike knitting and crochet, there isn't really much of a technical barrier to making a simple beaded necklace. As long as you can string beads onto a thread and use a pair of pliers, you have the skills. The trick is in selecting and arranging the beads into a pleasing pattern in the first place, and that's not something I can teach you how to do step by step. There are, in fact, countless ways to make a beautiful finished product! With that in mind, I'll be showing you just one way: my way. Pick and choose ideas that you like from it, and I hope it'll help spark some beading creativity in you!

Enough of that exposition nonsense, though. Onwards, to crafting!

Most of my beading projects start with a seed idea. Maybe it's an outfit that I'm designing jewelry for, or a particular color palette I like, or a flower I thought was pretty. Oftentimes, though, it's a particularly interesting bead or pendant that I want to incorporate. For this project, I dug up a whole bunch of beads that looked like this:


Pretty, right? They actually came off of an old necklace I got at a garage sale. I have no idea where they come from, but I love the detailed, colorful flower on the black background. It was exactly what I needed for inspiration.

The reason I had taken the original necklace apart was that, while the beads were pretty, it was composed of all the same bead, just strung in a loop. There was no variety in size, shape, color, nothing. It made these beautiful beads look downright boring! I learned from this mistake and decided that I needed a set of beads that contrasted my focal beads, for variety. I settled on these gold-colored metal beads.


The different shape and different finish would lend some interest to the necklace, I hoped. And yet, these beads still had something in common, too: the flowers on the focal beads were outlined in gold, which matched the color of my contrast bead! Similarly, the contrast bead had some aging done to it that left a blackish patina in the crevices. So far, so good!

I was happy with just the two beads as the main notes in the necklace, but there was still a lot of space to fill. Some beaded jewelry is composed solely of large beads, but I prefer a more delicate style. And what else to use for that than seed beads?


Seed beads are minuscule and incredibly useful, so I tend to keep a lot around in these little plastic containers. For color choice, I used the focal bead as reference and took out any seed bead I could find that matched the colors of the focal bead. It ended up being quite a nice spread: that's the beauty of using an already-pretty item as your inspiration!

Now that I had all my components lined up, it was time to start thinking about the design in earnest. I knew I wanted to make a lariat necklace, which is a long, ropelike necklace with no clasp. Instead of latching it at the back of your neck, you wrap it a few times around your neck and let the ends dangle in front. Some lariats have a loop at one end to thread the other end through, while others might be tied or just left loose. I decided to go with the first option, and have one end of the strand terminate with a loop.

Since my lariat wasn't going to have a central pendant or anything, I started playing around with simple sequences of beads, laying them out on my workspace to get a feel for how they would look in a finished necklace. I ended up liking this quite a lot:


The 2:1 ratio of focal bead to accent bead keeps the focus on the focal beads, I think. I liked it in any case, so I kept it! The next step was to design the seed bead pattern to fill the space in between the larger beads. A single strand of seed beads looked too plain to me, so I decided to make a double stranded chain-type pattern instead. This took a little bit of fiddling around with to get right, though. First, I laid out seed beads just like I did with the larger beads.


Then, I got out a short length of thread and a needle and strung those beads on in that pattern. The two-by-two chain ended up looking a little too stilted and stiff for my tastes, though, so I tried again with a three-by-one chain and got much more pleasing results.


With everything planned out like this, I was just about ready to start when I had an idea. What if the size of the focal/accent beads tapered off at the non-loop end of the lariat so that it was easier to thread that end through the loop? I didn't have different sizes of my focal beads, though, so I dug around some more in my stash and came up with thematically similar surrogates.


Okay, now we're ready to start. With everything figured out like this, beading is very simple and actually quite a relaxing process. It goes by quickly once you have the pattern memorized, and I was at the end of my beads sooner than expected!


The far end needed no finishing whatsoever, but I still needed to secure the threads on the working end of the necklace and add a loop. To make the loop, I bent a gold-colored ring into shape and added a jump ring as a connector. Then, I just threaded the loose ends of the threads through a crimp bead and around the jump ring to attach it. If you don't know how to use crimp beads, there are plenty of resources out there. Suffice to say, it's an easy way of securing threads without having to make knots! The end of the necklace then looked like this.


And really, that was all there was left to do! Lariats are nice and simple that way: no need to worry about fiddly clasps falling breaking and spilling your hard work everywhere. I stuck the finished necklace onto my display bust to take a couple pictures.


And there you have it! This is basically how I make necklaces. Sometimes I use a bead board with curved ditches to lay out bead patterns, but other than that, you saw every trick I use. While you're certainly entitled to your own opinion about the end result, I personally like it a lot. So much so that I actually made a second identical necklace with the beads I had left over! I'm not sure what I'll wear it with: maybe it'll spice up an otherwise monochrome black outfit? The future is full of possibilities with this colorful piece!

What did you think of this pseudo-tutorial? Did you like seeing my thought process in detail, or was it a bit boring and rambly? I'd love to hear your thoughts in the comments! If people like this sort of thing, then I might do more of it for some of the other crafts where I don't follow a pre-made pattern. Regardless, I hope you enjoyed the break from yarn-craft as we move into summer. I'll be coming back to knitting, crochet, and the like shortly though, don't worry. Until then, stay crafty!

Friday, November 2, 2018

Piercing Gaze

I don't have any piercings. Not even on my earlobes. Something about getting holes stabbed through my body just doesn't appeal... but that's a personal choice! To be honest, I think a lot of piercings actually look super cool: I'm just not going to get any myself.

That being said, Aubrey is described in the podcast as having piercings, so I have to figure out some way to fake them. Enter my two friends: wire and pliers!


Seriously, this is all you need to fake some piercings. A note: if you're going to do this yourself, make sure you're not allergic to the wire! Lots of wire used for jewelry has nickel in it, which many people are allergic to. Nickel rashes are no fun, so if you're sensitive to the metal, make sure your wire doesn't have any of it (this goes for any jewelry, not just fake piercings). I personally am not allergic to nickel, but I played it safe with this copper-plated aluminum wire.

But back to the task at hand! Many piercings are some variation of a circle, which at one point goes through the skin to keep it on the face. We can mimic that last part by having loops of wire that pinch or clip, or stay on the face in other ways. One of the easiest piercings to fake is the septum piercing, a.k.a. the nose ring. Start by wrapping the wire once around a round object that's the same size as your desired ring.


Cut it off and fold the raw edges over. That way, you're not getting pinched with sharp metal ends, and there's space for your un-pierced septum to go.


I'm not going to show you a close-up of my nostrils to demonstrate how to put this one on, but it's pretty intuitive. position in where you want it on the fleshy part in between your nostrils, and squeeze gently to affix it. This one is actually pretty comfortable to wear, and stays in well.

Next, let's try an ear cuff. This one will mimic the look of a few piercings up at the top edge of the ear. Begin like the septum piercing, by wrapping the wire around a round object once. Only, instead of cutting the wire, use the pliers to bend it into a U-turn.


Wrap the wire around the round object again in the opposite direction, and then cut it off. File down the sharp cut points of the wire to make it more comfortable to wear. You should get something that looks roughly like this.


To wear it, simply slide it over the rolled top edge of your ear. This "piercing" had a tendency to slide around on my ear, ruining some of the effect, but overall it stayed on. If you don't have piercings in your earlobe, you can make a one-wrap version of this one to mimic them. To wear, position the ring over the fleshy part of your earlobe and pinch it closed to keep it in place. Of all of the jewelry I made, these were the least comfortable to wear, as you have to pinch relatively hard to get them to stay on. That said, they were also the most convincing: I had a friend comment that she thought she just hadn't noticed my ears were pierced before!

Lastly, let's try a facial piercing that can't just be pinched on. Eyebrow piercings can be pretty convincingly mimicked with a simple half-circle of wire, but no amount of pinching is going to keep it on your face. Instead, just dab some skin-safe adhesive onto each (filed-smooth) edge and hold it to your brow until the glue dries. When I say skin-safe, I mean something meant to go on your face, like eyelash glue or SFX makeup supplies. Let's be honest, though, I didn't have any of that and so I used Elmer's glue.


Pretty good, eh? This one stays on as long as you don't forget it's there and try to scratch an itch on your forehead! If you're even in need of some extra piercings to accompany a costume, there's no need to go get a needle. A bit of wire and some ingenuity will work too!

And with that, I've completed all the component parts of my Aubrey cosplay. All that's left is to put it all together! But since I neglected to take pictures on Halloween, you'll have to stay tuned until I find a photoshoot opportunity!

Tuesday, September 18, 2018

Tutorial: Pine Guard Patch

So... remember when I said there would definitely not be any more patches for a while?

I lied.

After all, what's a TAZ Amnesty cosplay without the all-important Pine Guard patch! It lets everyone know that Aubrey, Duck, and Ned mean business! (And, you know, keeps them from going crazy while they're in Sylvain). I can't complete an Aubrey cosplay without one. And if any of you want to be part of this abomination-fighting society, you can make one too.

Supplies:

  • Black felt
  • Small embroidery hoop (not technically necessary, but it'll make your life so much easier, trust me)
  • Embroidery needle
  • Embroidery thread in green, yellow, yellow-orange, orange, red, and dark red
  • Small piece of chalk
  • Scissors
Instructions:

First, put the felt in the embroidery hoop. Make sure that the entire inside of the hoop is covered in felt: this will keep the fabric taut and let you maintain an even tension with the thread. You can still do this without an embroidery hoop, but it'll be a lot harder to do.


Next, take your chalk and draw a sketch of the patch. For the Pine Guard, this is a pine tree in front of a retro-style gradient. I went with a very geometric, simplified design, but if you have the skills and/or the patience, go ahead and make it more detailed. At this stage, you'll want to make sure that your circles are circular and your lines are straight, or else they'll be crooked in the final product.


All pretty obvious so far, right? Well, if you've never embroidered before, this next one is a step you might've skipped over. Next, you'll want to go over all of your chalk lines with a simple back stitch, in colors that match (or are similar to) the ones you'll use for the fills. It doesn't have to be super pretty, as long as it makes a neat outline. These are the lines you're really going to use to guide your embroidery. 


Then start filling! It's best to use 2-3 strands of the embroidery floss, instead of the whole six-stranded piece: the fill will come out more even. Use the satin stitch to fill in the areas bordered by your backstitched lines, taking care to ensure that each stitch is parallel and runs the full length of the area. I started with the tree first, since it made the most sense to me to work from the inside out.


You don't need to knot each thread as you add it: just leave an inch or two of tail and hold it in place until you've made a few stitches. When you're done with the thread, weave each end into the back of the piece and snip off the excess. And try to orient the direction of the stitches so that no individual stitch is longer than about half an inch. They tend not to lie flat to the fabric if they're too long, ruining all your nice detail work. For this patch, this meant that the tree threads ran horizontally, while the background threads ran vertically. 


When you're finished, you should have a pretty little pine-tree patch!


Remove the embroidery hoop and cut the felt so that there's a small border around the embroidery. This is why we used felt: you can cut as close as you like, and it won't fray. Be careful not to snip the embroidery thread though! Weave in any remaining threads, and your patch is ready to wear! Here's the back of the finished product:


And the (much nicer) front!


And with that, you've now been inducted into the Pine Guard. Who knew it was that easy? Now we just have to find some abominations to fight!