Showing posts with label other crafts. Show all posts

Thursday, April 2, 2020

Butterfly Away

Hey everyone. I hope you all are doing well, given the unpleasant situation we find ourselves in. Pandemic is a scary thing that seemed like it was tucked away into the history books, but I suppose we were mistaken about that. I won’t belabor the point here, but I just want to encourage you to practice good hygiene and social distancing, and to listen to what the experts in virology, epidemiology, and infectious disease have to say. And during this strange time, I hope you will join me in taking comfort in the small joys of crafting and creating something beautiful.

I hardly need an incentive to start new crafts, but being stuck at home, untempted by all the new supplies that I could buy at the store, makes me want to follow through with some unfinished projects that have been lying dormant for months. To that end, I began with one of my newer craft skills: linocut.

Some of you may remember that I made my first foray into the world of linoleum block printing during New Years 2019, where I made a design for some festive new years cards. Shortly after that, I bought another larger block... and couldn’t figure out what to do with it. 5 x 7” is a lot of space when you only have one color to work with, and I wanted a design that would be useful for longer than a single holiday. There were plenty of beautiful lino prints online to see, but I didn’t want to simply copy someone else’s work, either. It wasn’t until early fall that I hit upon a topic I really liked: butterflies. Their large wings and dramatic patterns would make a perfect candidate for a print, I thought. So I set to work.

I’m not much of an artist when it comes to realistic sketches, so I turned to the internet to help me find a good image to use. I wanted this butterfly to be realistic in terms of proportion and patterning. I came across the Smithsonian National Museum of Natural History’s online collection of pinned insects, which includes detailed photos of a wide variety of butterflies. The best butterfly for this one-block project would have just a two colors on its wings (the ink color and the paper color), so I scrolled down the list and settled on the meadow fritillary. It’s a bit less mainstream than, say, a monarch, but just as beautiful.


With that, I printed out the image in a size compatible with my linoleum block and got to tracing! Tracing this image wasn’t quite so simple as following every line I saw: I had to be conscious of which areas would be the ink color, and which would be removed to show the background color. Unlike in real life, there are no subtle gradients in a linocut like this. Still, it was much easier than trying to draw such a detailed butterfly freehand! After tracing, I got an image that looked pretty similar to the original butterfly, only simplified.


Then it was time to transfer the image to the linoleum. Linoleum takes pencil marks well, so I used the old trick of flipping the pencil drawing over on the linoleum and rubbing a spoon on the back of the paper to transfer the marks. Then I darkened the marks on the linoleum itself with some pencil, just to make sure I’d be able to see well while cutting.


If you’ve never done it before, cutting linoleum is kind of weird. It’s not like wood because it doesn’t really have a grain, but it’s not quite as soft and pliable as soap or wax. Honestly the closest thing I can think of is those hard pink school erasers. I spent a lot of time digging my thumbnail into those things in order to make designs. Then, I’d take my pencil and slowly work a hole into the center of the rubber, all while completely ignoring whatever was going on in the class!

Anyway, back to linoleum. My first few prints didn’t turn out so great. It seems that the bigger the block, the harder it is to get a good clean print. I made the mistake of putting waaaaay too much ink on the block, and everything turned out blobby and undefined.


But practice and learning from your mistakes does wonders! It took a lot of tries, but eventually I got to a point where the prints were turning out pretty nicely.


They’re still not perfect, but honestly I think that imperfection is charming. And the block will be there for me if I learn a new printing trick and want to try it out. For now though, I’m happy with what I have, and I made a few of my best prints into a wall hanging!
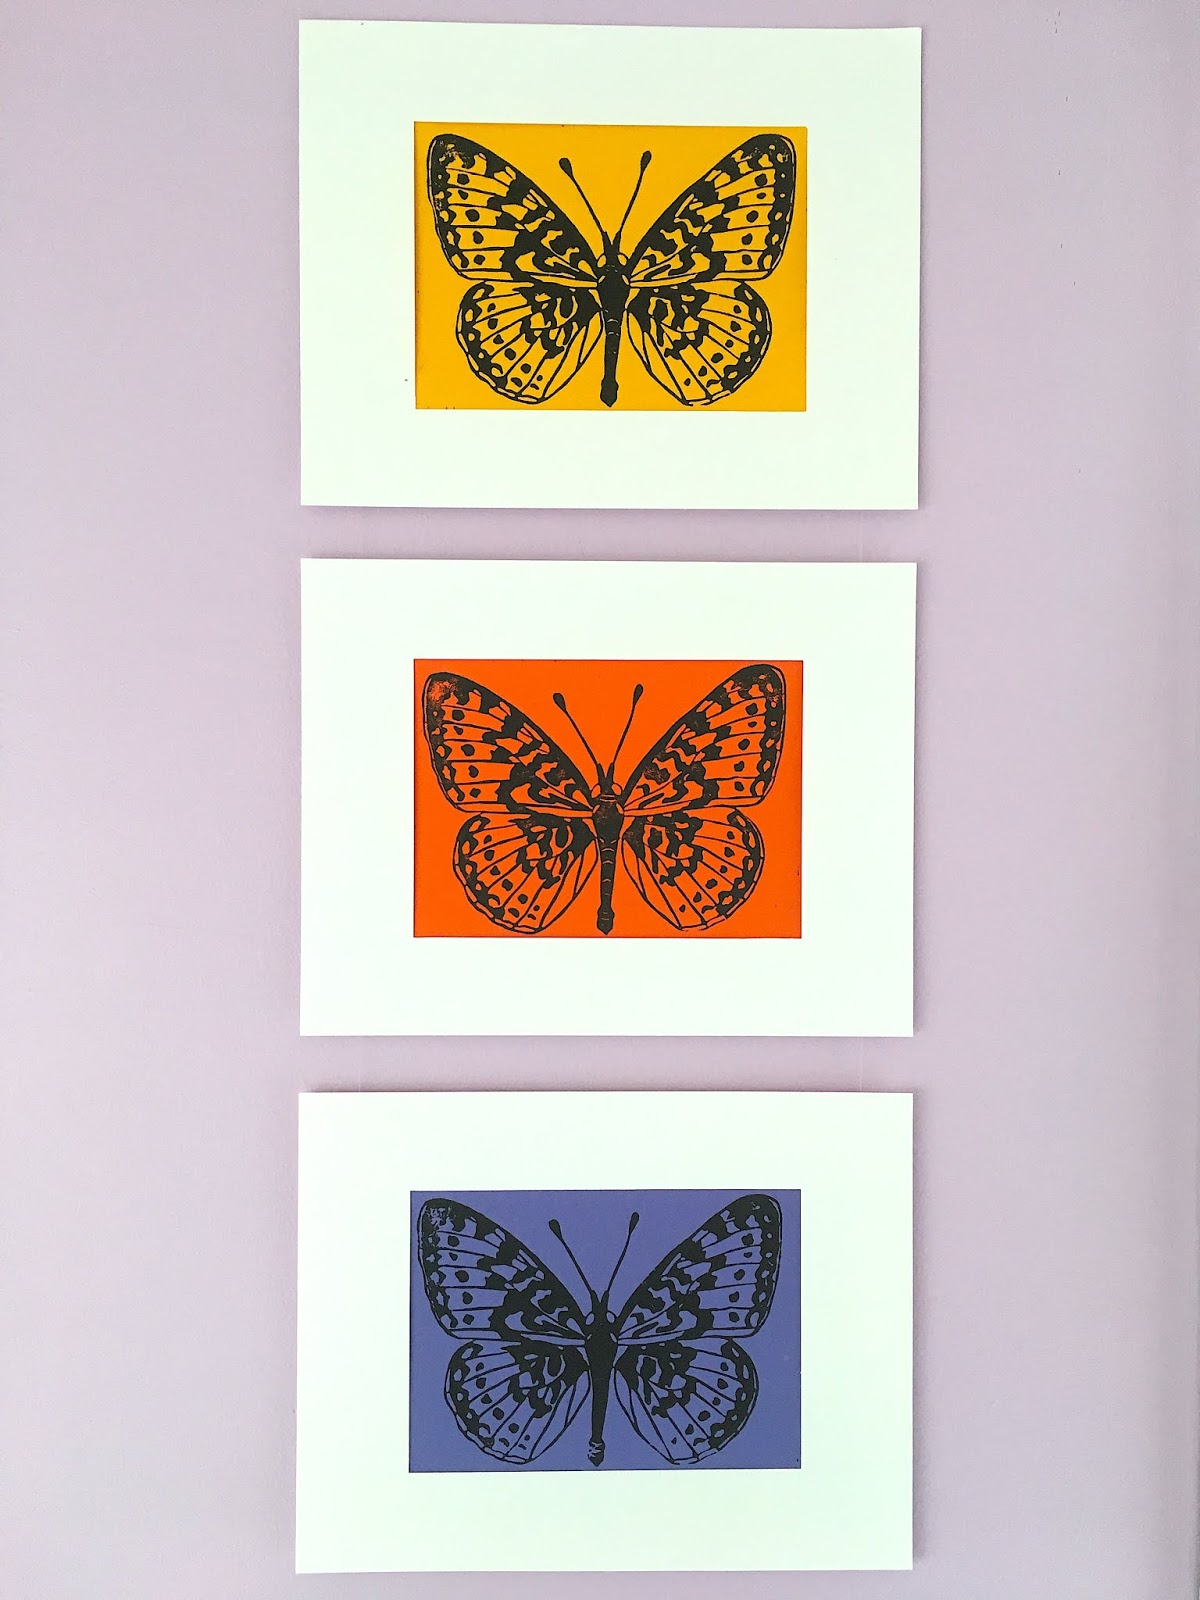

My apartment walls are still rather bare, and these butterflies will do well to liven up the place a bit. Maybe I should make a whole insect linocut series! Regardless of what I end up doing next, I do hope you’ll stick around to see it. Until next time, stay safe, stay well, and stay crafty.

Monday, March 2, 2020

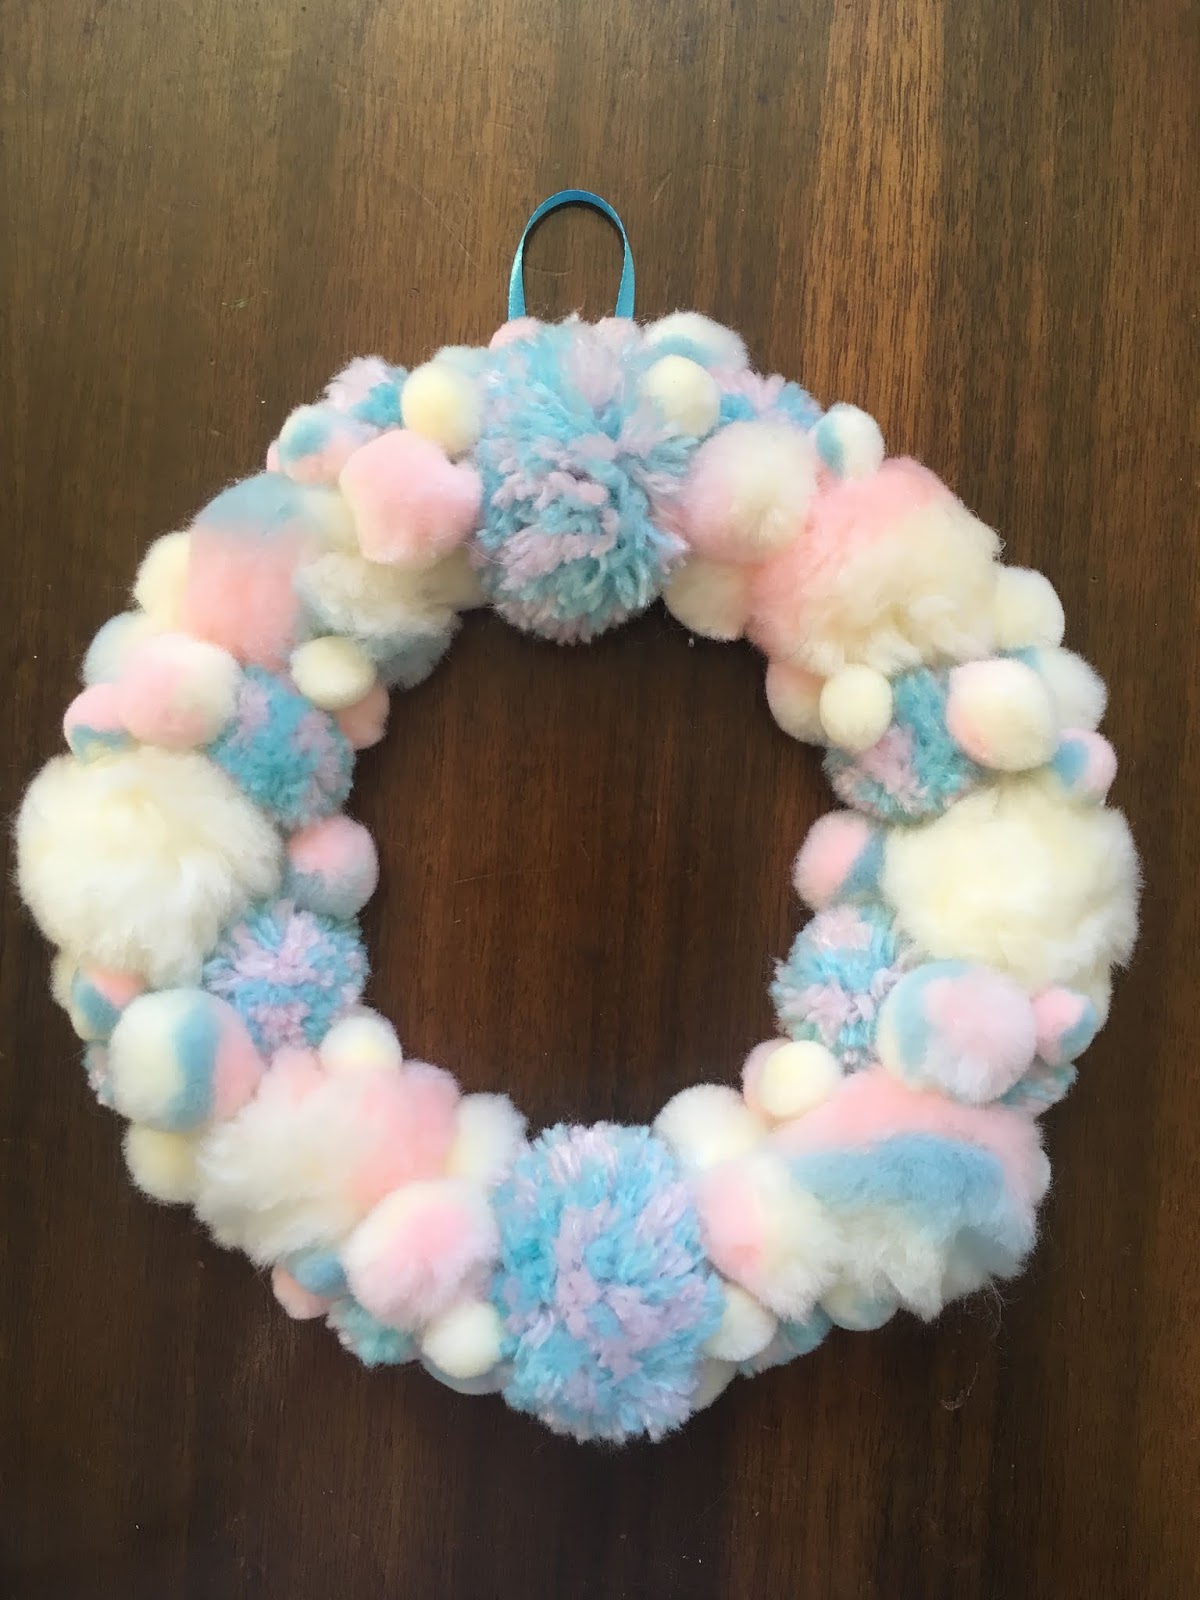
Tutorial: Pompom Wreath


I love wreaths. Indoor or outdoor, on windows or doors or simply hung over the mantle, they always add a nice touch to the decor. Most wreaths are made of foliage and intended for the fall and winter months. But when we have the power to make our own, why limit ourselves to that style? Wreaths can be made of almost anything, and can decorate at any time of year.

 So why am I making a pompom wreath? The explanation requires a little bit of story time. You see, I have pretty curly hair, and when I was a teenager it was fairly short. This caused it to stick out from my head in a consistent orb of fluff. It was... well, it was definitely a look. And among my friends, that look earned me the nickname “Pompom.” I eagerly embraced my pompomness (pompomosity?) by changing all my profile pictures to photos of fluffy yarn balls. Eventually I grew my hair out of the orb-shape, but even now, a few of my accounts have pompom avatars. I have a fondness for pompoms. And I can’t think of a softer, friendlier way to decorate my front door!


If you too would like a poofy door decoration, these wreaths are super easy and quick to make. The materials you’ll need are:

  •  Pompoms
  • Cardboard
  • Cardstock, in a similar color to the pompoms (optional)
  • Scrap of ribbon
  • Craft glue (optional)
  • Hot glue
Once you’ve gathered all your materials, it’s time to determine the size of your wreath. I found it useful to pile my pompoms into a rough donut, in order to get a feel for how much space I could fill. From that shape, I measured the inner and outer diameter of the ring. Make your dimensions a little bit smaller than you think you have the pompoms for: a small dense wreath will look nicer than a large, sparse one.

(Note: your wreath doesn’t have to be circular. Experiment with other shapes too!)

Once you have the size of the wreath, trace the inner and outer circle onto a piece of cardboard, and cut out the ring. It should look something like this:


As an optional step, you can trace the same ring onto a piece of cardstock and glue that onto the cardboard. This will prevent the color of the cardboard from peeking through if your pompoms aren’t densely packed enough. If you’ve got plenty of pompoms to cover the area, though, the cardstock won’t be seen, and you can skip it. I erred on the side of caution and covered my wreath base with some pale pink cardstock.


Next is the fun part: the pompoms! Get a bunch of pompoms in a variety of sizes and colors. My pompoms happen to be sort of sherbet-colored, which I love, and they came in multi-size packs. You may find it helpful to sort them by size before you start.


Turn on your hot glue gun, and spread your workspace with newspaper or something else to catch glue drips. (Trust me, it’s worth the extra minute of setup!) While it heats up, take the biggest pompoms you have and space them evenly around your base. I had eight large pompoms, but the exact number isn’t crucial: what is important is covering the wreath as evenly as possible.

When your glue gun is ready, it’s time to start attaching the pompoms. If you’ve used a glue gun before, you know the drill. Put a dab of glue on the pompom...


And press it to the wreath where you want it to stick.


Alternatively, you can put the glue on the wreath first, and then place the pompom. I switched between the two over the course of the project, and both methods work fine.

Once you’ve gotten your biggest pompoms glued down, move on to the medium-sized ones. Here, your goal is to fill in the spaces left between the big pompoms. I found it helpful to arrange each round of pompoms before gluing them down, in order to space them well.


Continue using smaller and smaller pompoms to fill in the spaces. Don’t be afraid to squeeze pompoms into small crevices! That’s what will give the wreath its plush look and texture. Most pompoms will be glued directly to the base, but you can also stack pompoms on top of one another to round out the shape. When you’ve added your last pompom, the wreath should look something like this:


(Yes, it is as soft as it looks)

Finally, we need some way to hang our creation up. Take a small scrap of ribbon (a few inches long will work), fold it in half, and hot glue it to the back of the cardboard base, at the top of the wreath.


And there you have it! A fluffy cuddly pompom wreath to decorate any door or window you like!


The colors of my wreath would make it a good Easter decoration (though it’s a bit early for that), but your wreath can be any color, or any combination! Make a bunch of wreaths for every season. Make a wreath for each day of the week, and swap them out each morning! With how quick these are to whip up, the possibilities really are endless. In fact, I think I’ll pick up some more pompoms next time I’m at the craft store...

Well, it seems I have some shopping to do, so until next time, stay crafty!

Sunday, November 17, 2019

Brace Yourself

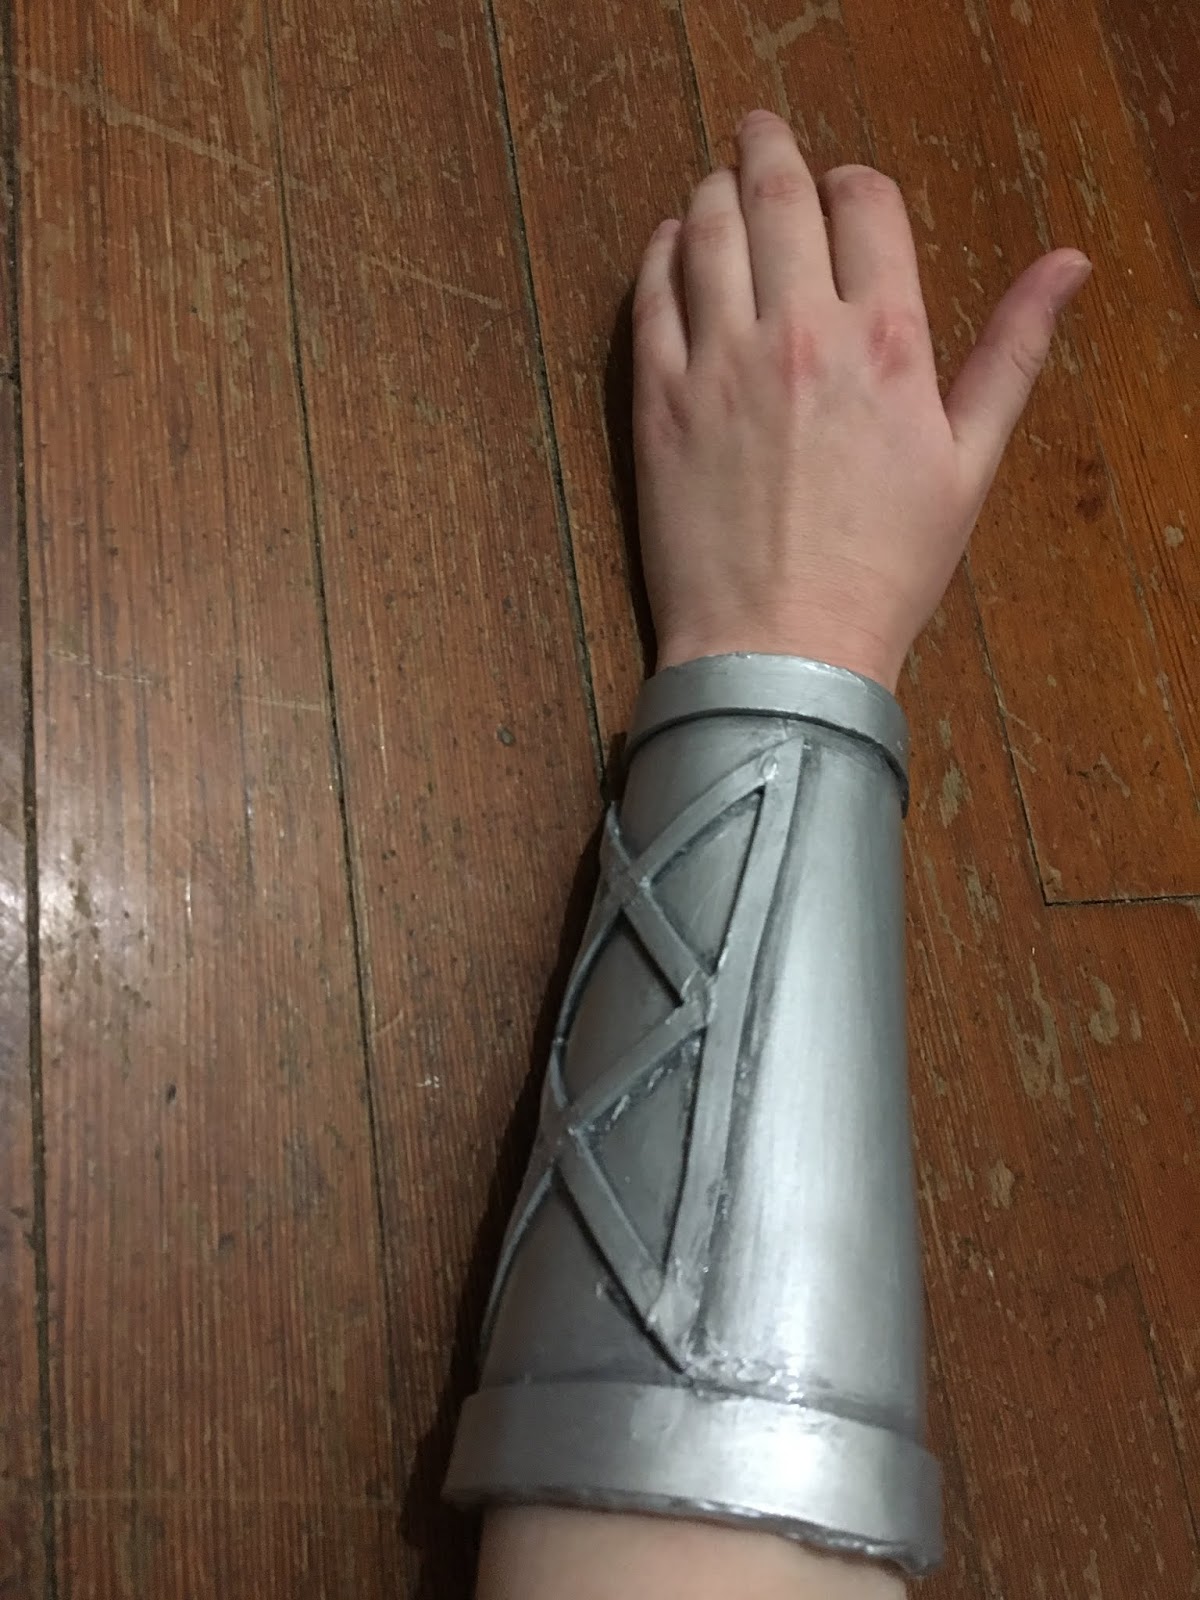
I'm back again with the final DIY piece of the Taako puzzle. Much like the hat, this accessory is one of the few things we know Taako wears in canon: it's the Bureau of Balance bracer! All of the members of the Bureau are issued one, and since they don't exactly come off, we can safely assume that Taako, Magnus, and Merle are all wearing theirs throughout the story. I have to imagine that Taako wasn't thrilled to have to restyle his wardrobe around a permanent accessory, but what else are you gonna do?

Enough chatter, let's get right to it! For this project, I decided to go with foam. It's a common cosplay substitute for armor and the like, since it can easily be painted to resemble metals without carrying all the weight and rigidity of actual armor.

Looking back, it seems I forgot to take pictures for the bracer, so this post is going to be a little light on process photos. There are plenty of cosplay armor tutorials out there, though, so if you're looking for something instructive you should be able to find it elsewhere.

A forearm is essentially just a tapered cylinder, so it was simple enough to measure and cut a corresponding shape out of craft foam. I put two layers of foam together to give a sturdier bracer, making sure to glue them together while they were curved around my arm so that they would hold their shape better. In order to secure the bracer, I used hot glue to attach velcro to the inside.


Then it was onto the detailing. I used scrap strips of foam to create a raised rim around the top and bottom openings, and then set to making the BoB symbol on the front of the bracer. Originally, I figured I would draw the insignia on in hot glue in order to get a sort of embossed effect. That didn't work out too well.


As you can see, the hot glue lines were far from the smooth embossed look I had intended. As it turns out, it's very difficult to get a perfectly even, straight hot glue line! Painting the bracer only made it look worse, so I tore off the hot glue and went back to the drawing board.

It occurred to me that the rim details I made out of foam had actually turned out quite nice, so I decided to try a similar tactic for the symbol. It was fiddly to cut and glue so many thin strips of foam, but in the end, I was much more satisfied with the result.


I covered the whole thing in a few coats of silver paint, and then dry-brushed some black paint into the crevices for a tarnished-metal feel. Then, a coat or two of glossy mod podge sealed everything in and brought out the shine.


There are definitely things I would do differently if I were to make this again, but overall I'm happy with it. It's comfortable enough to wear for a day out cosplaying, and durable enough to withstand it. It won't fool anyone into thinking it's actual metal, but some better paint and thicker foam might be more convincing. And most importantly, it reminded me not to give up if something doesn't work the first time. None of us are perfect crafters, and sometimes we need to try multiple techniques before we find the one that works.

And with that, I've finished all the DIY aspects of this costume. Tune in soon for the reveal of the full thing! (I promise that this time, I'll take pictures of the cosplay sometime this year!) Until then, though, stay crafty!

I'm All (Elf) Ears

Hello again, crafters! In my endeavor to dress up as the entirety of the TAZ cast, I've been working on completing my Taako cosplay. Or, well. It's already finished, I wore it for Halloween and stuff. But I haven't finished writing about it here, so for all intents and purposes, it's not done yet. I've made quite a few things in order to embody this elf wizard, but I'm missing some key components. He's an elf wizard, so I need elf ears!
I've never dipped my proverbial toe into the world of prosthetics, so the first order of business was to do some research. How are they made? Are there multiple techniques? And can I do any of them at home, on a grad student budget?
Well, most of your professional grade prosthetics are made from latex, molded to the shape of the wearer's ears and kept on with special adhesives and whatnot. This is definitely the most natural looking option, though due to a combination of the skills required to make them and the supplies I'd need, it was out of the question for me. I also saw lots of stylized, wire ears. These aren't meant to look realistic at all, just pretty. That was more in my skillset, since I have some experience with wirework from jewelry, but it wasn't quite the look I wanted. So I turned to the third option: clip-ons.
This class of ear prosthetics differs from the professional variety in that they're not meant to fit perfectly over the wearer's ear, leaving no seam. Instead, they clip over the ear like a cuff, or onto the hair, and are worn that way. They might be made of silicone, latex, even fabric or cardboard. Because they don't require precise fitting, I felt like this type of ear was doable. I planned to wear a wig that would hide the clips (and my actual ears) anyway, so a bit of disconnect wasn't an issue. After fiddling around with techniques for a bit, I came up with an inexpensive, easy pair of ears to DIY for my costume!
Because this is a construction method I came up with myself (only very loosely inspired by things I saw online), I'll do my best to provide a tutorial that you can follow along with yourself. Assuming you already have a hot glue gun and some spare paint lying around, you can make a few pairs of these ears in a few days for under $4. So go forth, and make yourself some ears!

Speaking of supplies, here's what you'll need:

  • One 12" x 18" sheet of craft foam, preferably in something close to your skin tone
  • Acrylic paint, in your skin tone
  • Two pairs of clip-on earring backs (note: it might be possible to use regular post earring backs if you have piercings in the right places, but as I don't have pierced ears, I couldn't test that out)
  • Hot glue
  • Regular craft glue
  • Scissors
First, in order to make your ears, you need to know what shape your ears will be. Take a piece of paper and draw out your ideal ear, making sure that the base of the ear (the part closest to your head) is just about as tall as your actual ear. This project works best with the large, exaggerated ears. In order to get a more realistic shape, you can plan out a few layers of depth in your drawing. Ears have an outer rim that give them a cupped shape, and then they funnel in towards the head. In my drawing below, I've labeled the three layers that I'm going to use with numbers. Each layer will have its own piece of foam.


Now, use your paper pattern to cut out your foam. If you want two ears, don't forget to cut each layer out twice! Here you can see the three layers I've made, showing the differences in depth. The outer rim is most raised, and the inner part near the head is the deepest. Notice also that I put a slight curve in the foam at the base of the ear. This is to match the curve of my head, when I put the fake ear behind my real ear (like where you hand goes when you cup your ear to hear better). The better your foam ear fits into this groove, the better it will stay on overall.


Now, glue your pieces together and let them dry completely. I used regular craft glue for this, but you could try hot glue if you're in a hurry. Just make sure it doesn't ooze out of the seams too much.


All right, it's looking like an ear! If you want things to look a little less boxy, you can take a pair of scissors and round out the edges of the ears. 

Now, here comes the hard part. In order to get these things to stay on, we're going to use clip-on earring backs, two for each ear. The first will clip onto the earlobe, in the same place as most vanilla ear piercings are. The second will clip to the very top of the ear (this is why it's important that your foam ear is the same height as your actual ear). Put a dab of hot glue onto the back of the foam ear and place your earring backs and the bottom and top of the ear, orienting them so that they will clip over both the foam ear and your actual ear, sandwiching them between the two pars of the earring. Look at the pictures for help. Once the glue is dry, check to see that the earring backs are actually in the right position to clip onto your ear. It may take several tries. Fortunately, you can easily pop the earring backs out of the glue, re-melt it with the nozzle of the glue gun, and try again. When you're satisfied with the positioning, put another dab of hot glue onto the earring back to keep it from coming off. (Please ignore that I already painted these, you're going to want to save the painting until the end. I just forgot to photograph the next few steps before painting.)

(This view is of the back of the ear. Note the hot glue keeping the earring back in place)


(And here's a front view. The earring back clips over the edge of the ear.)

(When worn, the earring backs clip over both the foam ear and your real ear, pinning the two together. If you spend time positioning them right, this can be quite a sturdy arrangement!)

The ears are now perfectly functional. But if you're like me, you couldn't find any foam that really matched your skin tone. Fortunately, foam is paintable! Grab one or more acrylic paints that match your skin, mix them together if needed, and give your foam ears a few coats of paint! Since the foam is porous, you'll need multiple coats: 3 should do the trick. Then let them dry completely (unless you want paint in your hair), and you're done!


I have to say, I'm pretty proud of these. For a first time prosthetic-maker, I think they turned out well! They're not the most comfortable things in the world to wear (if you've ever worn clip-on earrings, you know the feeling), and they're not quite sturdy enough to survive something like a LARP session, but they certainly stay on well enough to walk around a convention! And if you have a wig or long hair to hide the hardware, they actually look pretty convincing from a distance! I'm seriously considering getting another sheet of foam and making myself a whole set of wacky-shaped ears. Who knows, maybe I'll use them for next Halloween!

With this project in the bag, I inch ever closer to the completing of the Taako look. If you're interested in seeing more of that, stay tuned, and stay crafty!

Sunday, October 13, 2019

Cosplay with a Chorus

Hello! Time for some actual content, hooray! And rather different, special content as well. For you see, today I have a video for you.

It occurred to me that I never actually showed you my completed Aubrey Little cosplay from last Halloween. I did complete it, and I had a great time dressing up as the Lady Flame for a friend's small costume party, but I never went and photographed it. But as those of you who follow the Adventure Zone know, they recently finished their second main story, the one with Aubrey in it. It's very bittersweet to let those characters go, even though I'm excited for what's in store for us next.

That was enough on its own to get me thinking I should break out my cosplay for another spin, but then I was listening to Shmanners. This is yet another podcast in the McElroy empire, and it happens to be co-hosted by Travis, the very man who plays Aubrey in TAZ. A few weeks ago, he mentioned hearing a rendition of the John Denver song "Country Roads" while on a trip, and it making him very emotional and nostalgic for his childhood home in West Virginia. TAZ: Amnesty is also set in West Virginia, coincidentally enough, and the wheels started turning. I have a ukulele. I have an Aubrey costume. I could, just maybe, make a video of "Aubrey" playing an ode to the place that played such a big role in her life.

I've been hesitant to post it though. Truth be told, it doesn't live up to my normal standards of what I share, such as they are. I don't have any recording equipment, for sound or video, other than my cell phone, and nowhere to do it but in my living room (overlooking a fairly busy street, no less). I also have no formal voice or ukulele training whatsoever. And probably most importantly, I have a deep aversion to being on camera. It's actually why I didn't get around to sharing photos of the cosplay: I didn't forget, I just found excuses not to. Something about looking at myself (or hearing myself in videos) just doesn't sit right with me. That said, this idea hit me so powerfully, and I didn't see anyone else try it. If it's going to exist in the world, it's going to be me, I guess.

Enough hedging my bets. I don't like looking at it personally, but I do hope you enjoy!


Wednesday, July 24, 2019

To Bead or Not To Bead


Last week, my mother came to me with a plastic bag full of loose and partially strung beads. I recognized it immediately: it was a necklace I had made for her a few years ago, broken in multiple places and hemorrhaging seed beads into the bottom of the bag. The damage was bad enough that I had to remove and restring the entire necklace in order to repair it. While I’m confident that the repair job will last, I’m certain that Mom will come to me with another bag of beads not long from now, and another, and another. It’s not because she’s careless with jewelry, far from it. It’s because I was careless with how I strung the necklaces in the first place.


The material you use to string your beaded jewelry is incredibly important, though it may not always be evident while you’re making the piece. Some advantages and drawbacks can only be seen years down the line, once the piece has been subjected to considerable wear and tear. I’ve made a lot of choices in this department, both good and bad, so allow me to give you a rundown of the common stringing materials for beads and how they are best used.

Sewing Thread

If you’re completely new to beading, this is likely the material you had on hand for your first project. Sewing thread comes in a million different colors and comes in a range of materials and thicknesses as well. However, it’s not usually the best thing to make a necklace with. Sewing thread is fairly delicate, and it breaks easily under the strain of heavy beads and frequent usage. Quilting thread fares a bit better, as it is sturdier, but similar problems apply.

I would only ever recommend using sewing thread for a project if you need to pass a great number of threads through a single bead. Bead weaving and bead netting are examples. Having multiple threads and anchor points somewhat mitigates the weakness of the thread. Use quilting thread if you can, and never use quilting/sewing thread with medium or heavy weight beads, or with single-stranded beadwork. It will break, and you will be unhappy.

Uncoated Wire

Another material that may have other uses around the house, thin uncoated wire can also be used to string beads. Usually made of steel, these wires are composed of a single strand of metal that has been drawn out to a fine gauge. They can be shaped and twisted, but they easily sag under the weight of heavier beads. Wire like this is good for bead weaving if you want the resulting piece to be firm and not very flexible. Thread is better for pieces that need to drape.

While uncoated wire can be very strong, it has some weaknesses that make it unsuitable for many types of beadwork. If you’re not very careful while working with it, wire will kink, and this kink will remain as a point of weakness in the wire even after you straighten it out. Long, unanchored strands of beaded wire can also kink as a part of daily wear, and that results in breakages. Additionally, depending on the type of metal that has been used, wire may rust or develop a patina that can discolor the insides of transparent beads. I saw this on the necklace I just repaired: the light blue seed beads that had been in contact with the wire had a dark grayish residue on the inside of the hole.

Beading Thread

Now we’re getting into materials that are made specifically with beading in mind. Beading threads are often made of nylon or polyester, and are much stronger than sewing thread. Depending on the brand, they can come in a wide variety of colors. It is usually thin enough to thread on a needle and pass through a seed bead multiple times, making it suitable for bead weaving .

Beading thread is really a great all-purpose choice for making beaded jewelry. It is strong enough to hold up to heavier beads (though unevenly distributed weight may cause the necklace to hang oddly), but drapes nicely even when used with delicate seed beads. My only gripe about this stuff is the price: it can get pretty expensive to bead with specialty thread, especially if you’re working on a project that requires a lot of yardage.

Nylon Filament

Much like wire, nylon filament is one continuously drawn piece of material. Only instead of metal, it’s... nylon. I sure hope you didn’t expect it to be made of something else! These filaments have multiple uses, from fishing line to ukulele strings, but they can also be used for beading!

Nylon is incredibly strong, so it can safely be used for stringing even very heavy beads. It tends to have a bit of stiffness to it, so delicate beaded pieces may not drape as nicely as with something like thread. Nylon is usually only available in while, clear, or a small range of other colors, so it may not be suitable for projects where the threading material will be very visible. It is also difficult to knot or tie, so supplemental materials such as crimp beads are a necessity for a lasting piece of jewelry.

Coated Beading Wire

A distant cousin of the uncoated wire, coated beading wire should be saved for your heavy-duty projects. It’s composed of a multi-stranded twisted or braided wire, covered in a polymer coating. Unlike a single stranded wire, this beading wire doesn’t kink and won’t discolor your beads. It’s incredibly strong and difficult to break: it will hold up to even the heaviest of beads. However, this strength comes at a price. I’ve only ever seen beading wire in one color (steel), so you don’t have many options there. It’s also very stiff, more so than nylon. If you don’t have any heavy beads to weight it down, it’s not going to hang correctly on a necklace. And because beading wire is so thick, you won’t be able to do bead weaving or any delicate beadwork that requires multiple passes through a single bead.

You can use virtually any string-like material to make beaded jewelry, but these materials are the ones I’ve used the most. If you’re looking to start beading, I hope this guide will help you pick the best thread for your project!