Hey everyone. Long time no see!
...About that.
Things have been a little rough over here. I mentioned moving before, but I've also just started graduate school. It's a big change, to say the least. I knew that the whole process was going to make crafting a posting difficult for a while, but even after settling in, I'm not back to full power. Too many changes have me feeling drained, I guess. As a result, I haven't had much of anything to share with you all, or energy to write up any posts.
I feel bad about falling behind on my weekly posting during all this. I have no idea if anyone reads this blog regularly, but if there's even one person who does, I'm sorry I wasn't able to keep up my schedule. I'd rather be kind to myself than put myself down over past failings though.
All of this is a long-winded way of telling you that, for the time being, I'm not going to be posting on any sort of schedule. I'll still share projects when I finish them, of course (hopefully Taako will appear in time for Halloween), but I'm not going to push myself to have something every single week. If and when I feel like I can keep a schedule again, you'll be the first to know.
Thanks for understanding. Stay crafty.
Sunday, September 29, 2019
Thursday, September 12, 2019
No Rabbits in This Hat
With the Spring of Sewing out of the way, I'd say it's time I got back to my Taako cosplay, wouldn't you? Last we left off, I had just made a rather large black wizard hat. Big and in-your-face it was, but it wasn't very fancy, and anyone who's listened to the Adventure Zone knows that Taako would appreciate some bling. Plus, it would give me a great opportunity to break out one of my less-used crafty skills - shuttle tatting!
For those who don't know, shuttle tatting is a form of lacemaking that was popular from the 19th century into the early 20th century. A shuttle wound with thread is used to make rings and chains out of consecutive knots and loops (called picots) which can be joined to one another to form a design. It's a very sturdy type of lace, since it's literally made up of hundreds on individual knots that don't unravel easily. And while it can be a little tricky to get started with, it's pretty easy to do once you have the basics down. If you're interested in learning, I recommend videos or in-person lessons above anything else: the knotting technique can be really hard to understand unless you can see it in action.
I wanted make a nice tatted edging to go on the inner edge of my hat brim, to give it a pop of color when seen from below. The first step was finding a good pattern, which for me meant looking through all my books and then surfing Pinterest.
I eventually came across the top edging pattern in this post. It looked lovely, and easy enough to make lots of. I'd love to give credit to the original pattern-maker, but the site that the post links to is in Russian, and I had no clue how to navigate it to figure out what book the pattern is from. If anyone happens to know who this pattern belongs to, please let me know so I can give credit where credit is due!

But I digress. I tried out the edging in a few different thread sizes to see what works best, and settled on the smaller one. I like the more delicate look it has when it's small. I liked the color of the thinner thread as well: it matched what I had in mind for the shirt I'd be wearing for this costume. So, I set to work making the edging.
I tatted.
And tatted.
And tatted some more.
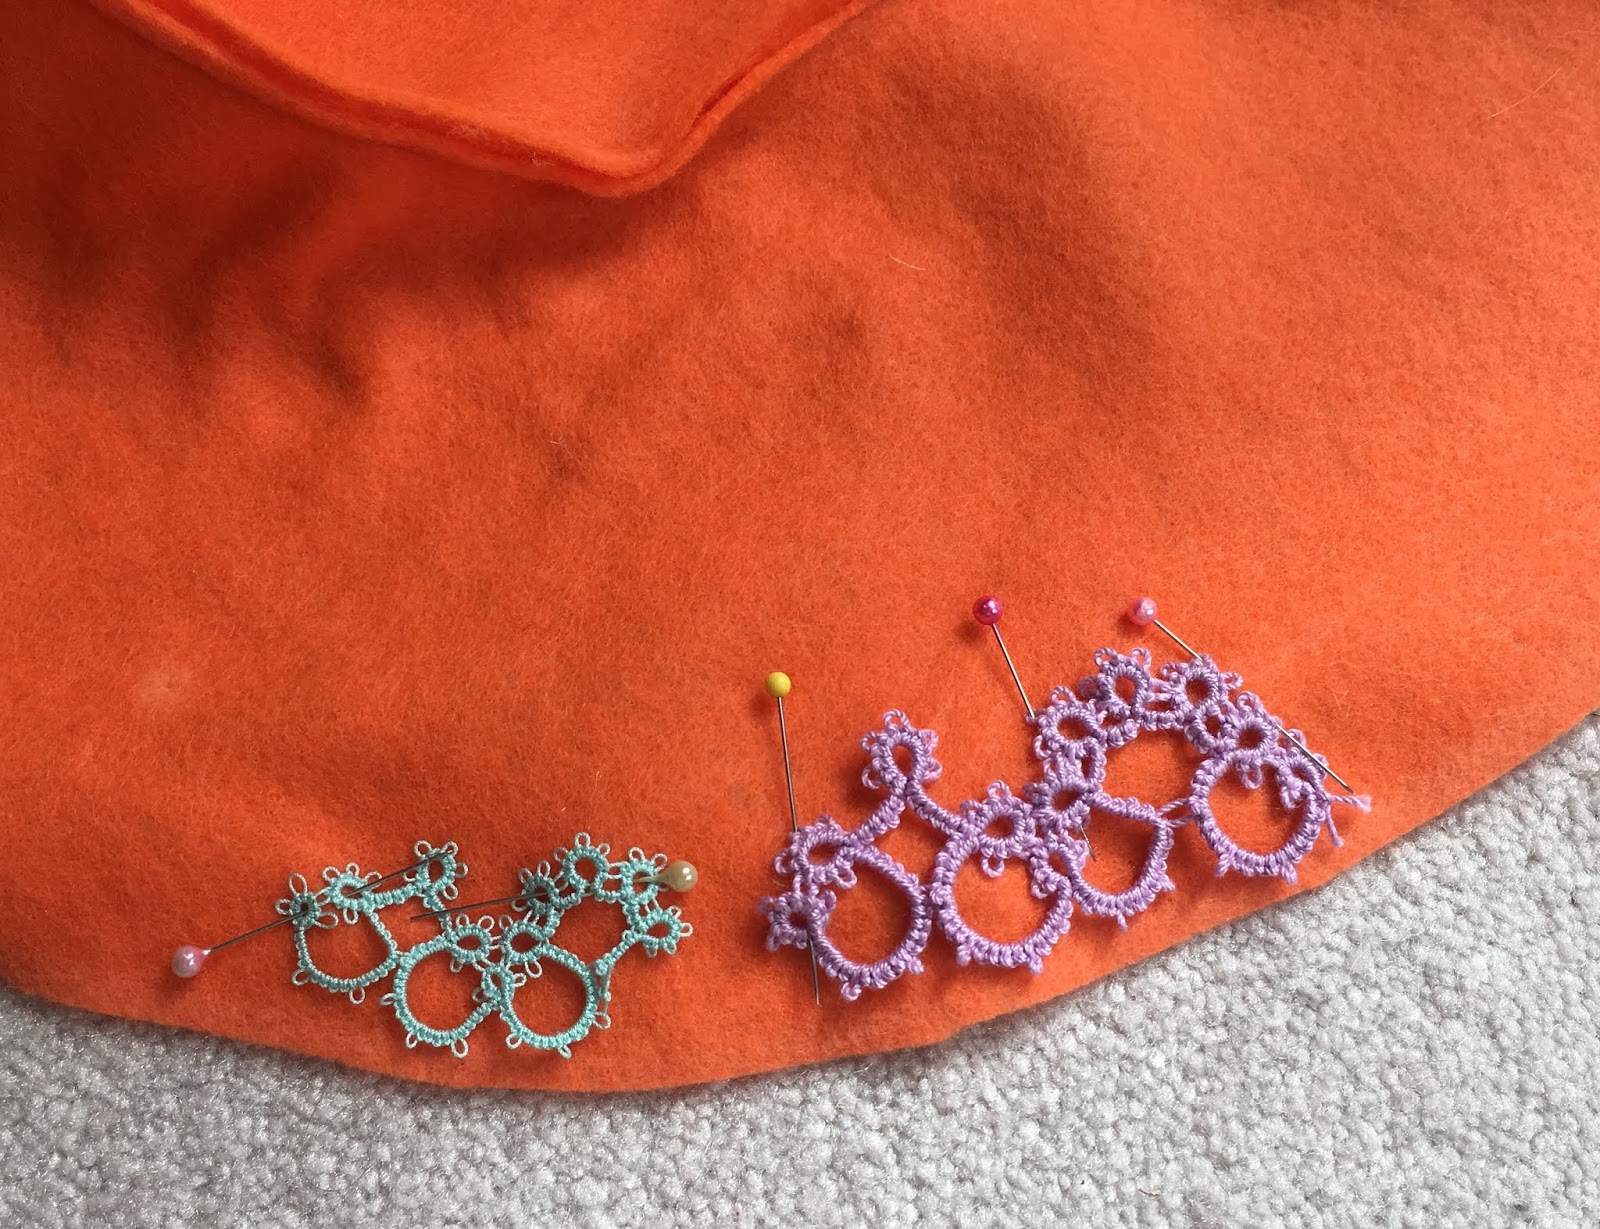
As it turns out, when you have a big hat with a big brim, it takes a lot of yardage to go around. Almost five feet, in fact! That's a lot of lace to make, and it took me quite a while to actually get it all done. But finally, I had enough to work with.


As with any lace, tatting looks best when it's blocked, so I did all that first. No need to stiffen or starch it, because it would be laying flat against a piece of fabric. Then it was a simple matter of pinning it into place and sewing it down.


The hat's already looking better! But I think we can add even more to the brim. My next thought went to fringe, especially beaded fringe. I had seen a few pieces of fanart where Taako's outfit was modeled after the aesthetic of the goddess Istus, and many of them included such a fringe. I liked the look. I wanted it. And because all of this is within my power to control, that's exactly what I did.


After a little trial and error, I made up a fringe design that I thought would work well. It's a bit understated compared to some of the fanart, but for the purposes of wearability, that was going to have to be the case! The beads I chose were some that I've had in my stash for a long time now: a whole mix of assorted blue seed and tube beads. I marked out the spacing of each fringe loop on the hat with chalk before I started so that I knew I'd be able to keep things even, and then I set to work!
Tip: if you're making beaded fringe/edging like this, with lots of freestanding loops, knot the thread each time you stitch through the fabric. It keeps the tension of the loops more constant, making them hang better. Also, don't pull the thread too tight! If you want the fringe to swing and sway about, there needs to be some give with the thread.
The beading process actually went very quickly once I started: just two evenings and I was all the way around. It ended up looking really cool, especially with the tatted edging peeking through from the bottom!


This is the state of the hat at the moment. I think the added detailing really elevates it from basic costume hat to elaborate cosplay accessory, but it's not quite done yet. I still need to add a snazzy hat band, after all! Stay tuned to see that process, and the rest of this cosplay endeavor. And until next time, stay crafty!
For those who don't know, shuttle tatting is a form of lacemaking that was popular from the 19th century into the early 20th century. A shuttle wound with thread is used to make rings and chains out of consecutive knots and loops (called picots) which can be joined to one another to form a design. It's a very sturdy type of lace, since it's literally made up of hundreds on individual knots that don't unravel easily. And while it can be a little tricky to get started with, it's pretty easy to do once you have the basics down. If you're interested in learning, I recommend videos or in-person lessons above anything else: the knotting technique can be really hard to understand unless you can see it in action.
I wanted make a nice tatted edging to go on the inner edge of my hat brim, to give it a pop of color when seen from below. The first step was finding a good pattern, which for me meant looking through all my books and then surfing Pinterest.
I eventually came across the top edging pattern in this post. It looked lovely, and easy enough to make lots of. I'd love to give credit to the original pattern-maker, but the site that the post links to is in Russian, and I had no clue how to navigate it to figure out what book the pattern is from. If anyone happens to know who this pattern belongs to, please let me know so I can give credit where credit is due!
But I digress. I tried out the edging in a few different thread sizes to see what works best, and settled on the smaller one. I like the more delicate look it has when it's small. I liked the color of the thinner thread as well: it matched what I had in mind for the shirt I'd be wearing for this costume. So, I set to work making the edging.
I tatted.
And tatted.
And tatted some more.
As it turns out, when you have a big hat with a big brim, it takes a lot of yardage to go around. Almost five feet, in fact! That's a lot of lace to make, and it took me quite a while to actually get it all done. But finally, I had enough to work with.


As with any lace, tatting looks best when it's blocked, so I did all that first. No need to stiffen or starch it, because it would be laying flat against a piece of fabric. Then it was a simple matter of pinning it into place and sewing it down.


The hat's already looking better! But I think we can add even more to the brim. My next thought went to fringe, especially beaded fringe. I had seen a few pieces of fanart where Taako's outfit was modeled after the aesthetic of the goddess Istus, and many of them included such a fringe. I liked the look. I wanted it. And because all of this is within my power to control, that's exactly what I did.

After a little trial and error, I made up a fringe design that I thought would work well. It's a bit understated compared to some of the fanart, but for the purposes of wearability, that was going to have to be the case! The beads I chose were some that I've had in my stash for a long time now: a whole mix of assorted blue seed and tube beads. I marked out the spacing of each fringe loop on the hat with chalk before I started so that I knew I'd be able to keep things even, and then I set to work!
Tip: if you're making beaded fringe/edging like this, with lots of freestanding loops, knot the thread each time you stitch through the fabric. It keeps the tension of the loops more constant, making them hang better. Also, don't pull the thread too tight! If you want the fringe to swing and sway about, there needs to be some give with the thread.
The beading process actually went very quickly once I started: just two evenings and I was all the way around. It ended up looking really cool, especially with the tatted edging peeking through from the bottom!


This is the state of the hat at the moment. I think the added detailing really elevates it from basic costume hat to elaborate cosplay accessory, but it's not quite done yet. I still need to add a snazzy hat band, after all! Stay tuned to see that process, and the rest of this cosplay endeavor. And until next time, stay crafty!
Thursday, September 5, 2019
Spring of Sewing #3
Whew! Moving is finally over (mostly). I have furniture, I have food, and most importantly, all my craft supplies seem to have survived the trip. I'm stoked to get on with my many projects, but until I can fully get back into the swing of things, here's the third and final project from the sewing class I took.


I searched online... and found nothing.


So, it may not surprise you to learn that, just like last year, I began planning my Halloween-time escapades far in advance. I wasn't totally sure about design for a long time, but even in the spring, I knew I wanted to be Taako, and I knew he was going to be wearing a fashionable capelet. It just seemed like the sort of thing he'd be into. So when planning for the final project came around, I had a very specific idea in mind.


That seemed pretty straightforward to me! All I had to do was find a capelet pattern and I'd be set. So I searched through the class's library... and found nothing.
I searched online... and found nothing.
Catalog after catalog, nobody seemed to have a pattern for the kind of capelet I had envisioned. I was actually kind of surprised; it didn't seem to me like my design was particularly unique. But for whatever reason, I couldn't find something to match. I could have scrapped the idea and gone for a more accessible pattern. But we all know I didn't.
Having almost no experience pattern drafting, I wasn't prepared to make a garment this complicated (not that it's even that complicated) without some help. In a bid to use as much of a commercial pattern as possible, I came up with a pretty neat trick. Find a coat pattern with a nice collar, and use its design from the shoulders up. Then, draft the shoulders down into a cape instead of sleeves and a body. That way, I could avoid making all the complicated bits, and I only had to come up with the easy stuff! I chose this lovely coat as my template:

A few rounds of mockups and tweaks gave me a pretty good idea of how to make a good capelet, so I set off looking for fabric. I knew the general color scheme I wanted to work with -- various shades of blue with accents of red and black -- and it wasn't hard to find a nice dusty blue wool to serve as the outside. I came up with some lovely red lining fabric that has a subtle rose brocade as well. I'm particularly fond of the red lining, both because the fabric is pretty and for some character-relevant reasons that are extremely spoilery. On the off chance that anyone is reading this while in the middle of listening to TAZ: Balance, I won't elaborate, but those of you who have finished it should recognize the significance of red outerwear.
Anyway, back to the garment itself. Construction was fairly easy, since the instructions from the original pattern were still mostly relevant. Soon enough, it was time to show off the finished product!


See what I mean about that lining fabric? It's such a subtle fancy element. And I love how the red is almost completely hidden (save for buttons) while the cape is closed, but can burst out whenever the wearer moves their arms. Not to mention, it's quite practical and warm thanks to the wool! I think this will make an excellent component of Taako's ensemble come October.
Here ends the saga of sewing class for me. I thought it was a fantastic experience, especially as someone who hadn't sewn clothes before. Now, I'm confident enough to take on most commercial patterns, and even try my hand at making my own! This adventure may be over, but the journey of cosplay is still very much active. If you'd like to continue to hear about that, then be sure to come back in (hopefully) a few days, where I should have another update. Until then, stay crafty!
Subscribe to:
Posts (Atom)