Showing posts with label shirts/sweaters. Show all posts

Saturday, March 6, 2021

Sweet as Honey

 Now that I’ve got my big, all-consuming project out of the way, it’s time to focus on some of the smaller things I’ve been meaning to get around to. I’ve already spent a good month or so getting through some of the half-finished knitting and crochet pieces lying around, and now I’m ready for something new.

One of my goals this year is to end with less yarn than I started with. I was going to resolve not to buy any more yarn but… come on, I need to be a little realistic! I rummaged around my stash for inspiration and came upon most of a cone of yellow alpaca silk lace, leftover from my big special occasion shawl. I wasn’t really feeling another lace-weight project, but held double it acted like a fingering. After weighing it and doing some math, I figured I’d have just about enough for a sleeveless top. Perfect! Now to find a pattern.

The color reminds me so much of honey, so I knew I wanted a honeycomb-inspired design. I went searching for just that… and it came up blank. There are certainly patterns with a honeycomb texture, but they’re all sleeved sweater and baby clothes, not the tank top I wanted. I briefly debated trying to reconfigure one of the existing patterns, but it became obvious that it would be a lot of work. Like, I-might-as-well-just-make-my-own-pattern amount of work.

Wait.

Wait.

That’s exactly what I should do!

A sleeveless top is basically a cylinder with some holes in it, right? A tube plus shoulder straps. I could do that. I made a sketch.

(Should I apologize for the creepy mannequin face? I didn’t feel like drawing actual features.)

Yeah, something like that would work. It did need a bit of math to get the dimensions right, though. I got out my tape measure and measured some key points on my torso, including both circumferences and the vertical length between each (nothing worse than becoming the unwilling owner of a crop-top!). I added a few inches to each circumference to get a slightly relaxed fit, and so I could fudge the hip and bust measurements to equal each other (it just makes the math easier).


To go from inches to stitches and rows, I needed a gauge swatch. I was really, really careful with the gauge swatch on this one. I measured down to an eighth of an inch. And then I measured again in centimeters. I didn’t get a second ruler out, but maybe I should have, for reproducibility’s sake?

Where was I? Oh yeah, math. Big thanks to my high school chemistry teacher for making me do a million unit conversion problems. I don’t think you intended me to use it for knitting, but I’m not exactly converting grams to moles in my day-to-day work either, so. I’m repurposing this skill.

After a bit of though and consultation with knitting friends, I decided to make this top in two pieces: front and back. I could knit in the round, but honestly my circular needles aren’t the best quality, and adding seams would strengthen the garment overall. The only downside is that I won’t be able to try it on for fit until it’s nearly done. Here’s hoping my math holds!

With all those logistics out of the way, I’m just now starting to cast on. Most of the body is plain stockinette and pretty boring (why do I keep doing this to myself?), so I’ll check in with you all once I get to the interesting textured bits at the top. Until then, stay crafty!

Saturday, January 23, 2021

Did You Chemise Me?

I don’t know what it is about undergarments that fascinate me so much. Maybe it’s that we take them for granted. We rarely think critically about our bra or panties or boxers when we get dressed in the morning, and I’d venture to guess that most people haven’t thought much about what came before (or what the future holds!) for the world of undergarments. There’s just something about those facets of life that usually go unnoticed that captures my attention. 

So of course I was excited to make some Victorian undergarments.

I’m no historian, but I know that the chemise or shift was the next-to-skin layer for women in western cultures for a long time. Drawers were a somewhat later invention, but still predate our current style of undergarments. They were usually made of something easy to launder like linen or cotton, and they protected outer garments from the grime and oils of the skin. Since they were so simple, they were often sewn at home even if outer garments were purchased elsewhere. And that means that they make a rather good beginner’s project for the aspiring historical costumer. 

Which is good, because I am definitely still a beginner. 

Normally you wouldn’t see much of the chemise and drawers in an outfit, but for the Dream Fairy they’re the only – and therefore the outer – layer. So while it would be perfectly acceptable for them to be  plain and functional, I wanted to put effort into making them look nice. In many ways, the chemise is the dress here, and it deserves that kind of attention. 

To start, I needed some sort of pattern. I’m going for a fantastical interpretation of a late Victorian look, so I searched online for chemise patterns from that era. Fortunately, there are plenty to choose from! As I mentioned this was often a home sewing project, so there’s no shortage of sewing manuals detailing chemise construction. I picked this design from the Manual of Needlework and Cutting Out and set to work!

The basic construction of the chemise is really very simple: just a front and a back piece, identical save for the neckline. I sewed up the sides by machine and felled down the seams for a nice finish (my felling certainly isn’t the best in the world, but it’s nicer than a serged seam!). The armholes and bottom hem were finished in a similar manner.


The neckline required some gathers though, so I couldn’t just fold and stitch the raw edge. I cut out a strip of my fabric for a neckband and set the gathers into it. The Victorians were apparently very meticulous about their gathers: I hope they know I tried!

At this point the chemise was technically done. But since it’s going to be visible, I want lace and frills and decoration. And because I’m something of a craft-masochist, I was determined to make all my lace by hand. 

Fantastic decision making from a time-management perspective, really. 

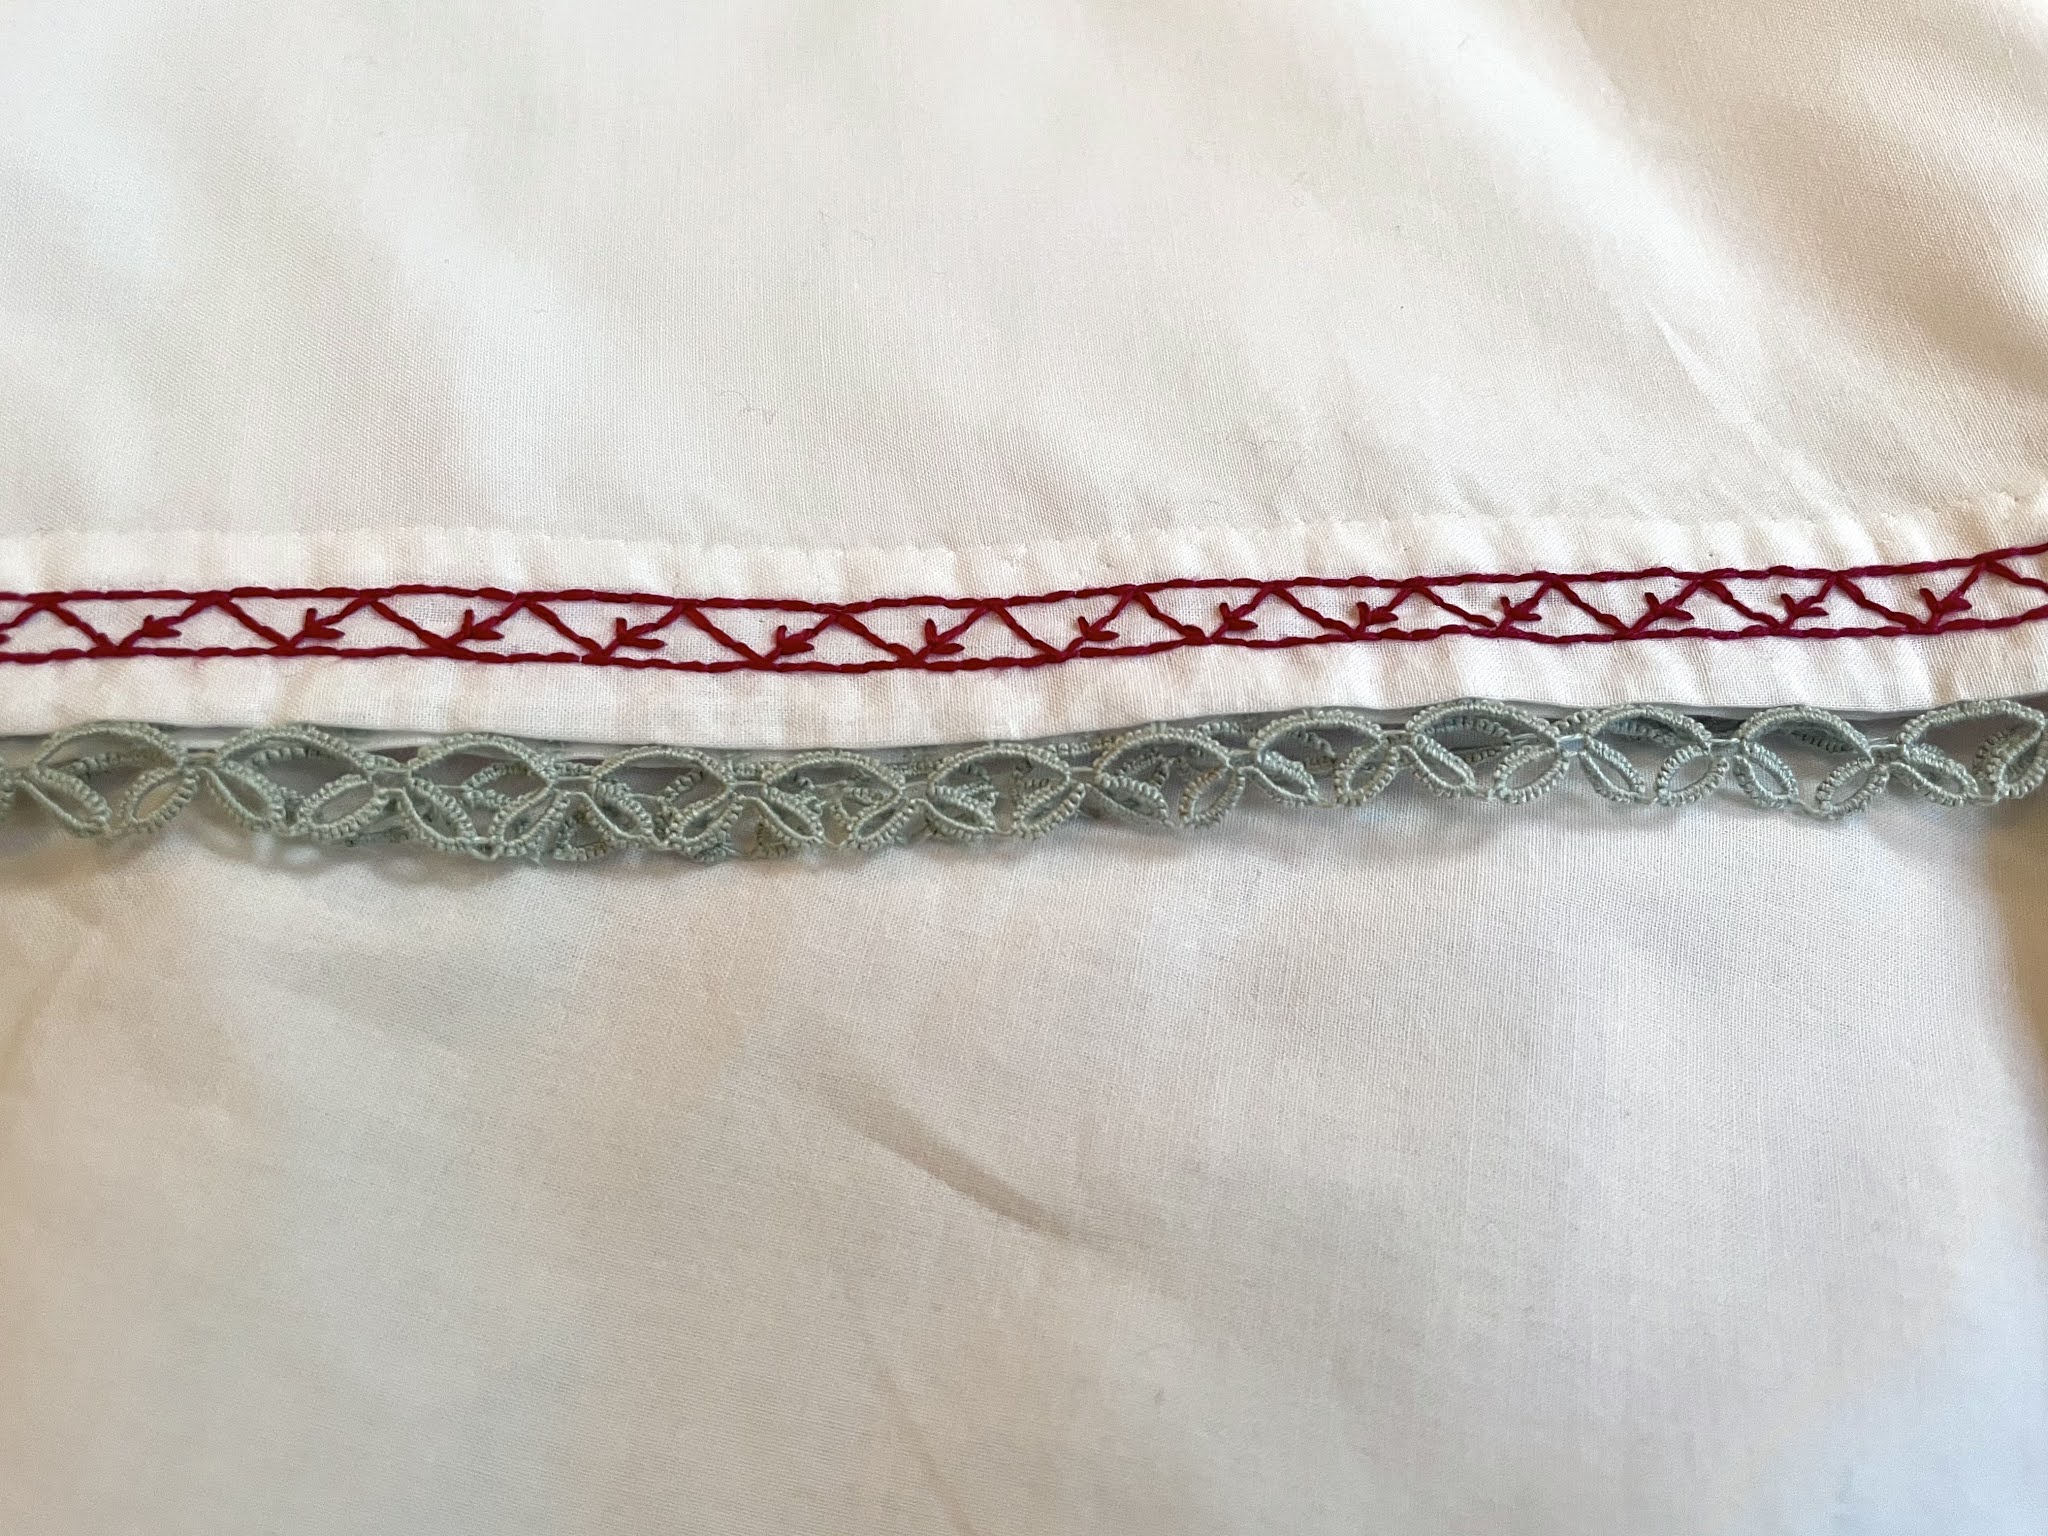
Anyway, I spend a stupid amount of time tatting enough lace (pattern from Beeton’s book of Needlework) to trim all the edges of the chemise, and stitched it all in by hand. 

That still wasn’t enough though, so I found an embroidery design from another book (Artistic Embroidery) to add to the armholes and bottom hem. 


There. That should do it. If I had more time I might’ve indulged in some insertion lace around the bottom hem but I’m cutting it close time-wise as it is, so I’ll just move on. (I can always add it in later, right?)

Next came the drawers, the pattern for which was taken from the same book as the chemise (here). Much like the chemise, sewing the seams and finishing the hems was easy enough, though I did have to alter the pattern a bit to fit my short short legs. The only difference was that the drawers needed a buttonhole in back to close them up. For the frills, I went for a wide crocheted lace pattern from Knitting and crochet: A guide to the use of the needle and the hook. I made the definitely-practical-and-time-conscious decision to double the length of lace needed so that I could gather it into ruffles. 

I have made so much lace over the past year, guys. I have a problem. 

But when it looks so frilly and fun, can you really blame me?

Most of the drawers are hidden under the chemise, so I didn’t bother with other embellishments. One of the cool things about these drawers is their construction: the crotch seam is completely open!

This served the very practical purpose of covering you up down there while still allowing you to use the bathroom without taking off all your skirts. I don’t quite have that problem with this costume, but yay for historical details!

And there they are, in their full glory! I tried to get a picture of them on me, but the fabric is... a little too sheer for my sense of modesty. At least on the top where there’s only one layer of fabric. My goal is to finish off this costume with a corset and that will solve the issue, but I’m not quite done and the deadline for the competition is a little over a week away... 

...Which means I had better get back to it. Until next time, stay crafty!


Monday, May 11, 2020

Sweater Thoughts

Hello everyone! I hope you’re all safe and well as this pandemic continues to keep us trapped indoors. I personally have been taking my mind off things by finishing some of my old projects-in-progress. My many... many... projects...

Look, I’m very good at starting things. Finishing them though? Not so much!

As luck would have it though, quarantine was the kick in the pants I needed to complete one of my bigger projects that had been languishing half-done for months now: my very first sweater! Yes, about a year ago I embarked on one of the seminal projects for a budding knitter: the pullover sweater. The pattern is Apres Surf Hoodie by Connie Chang Chinchio for those interested. It was a lot of work, especially since I’m used to knitting accessories and smaller projects, but it was so worth it! Half the reason I made this post was just to show off how pretty it is.


The other half of why I made this post, though, is because I have Thoughts. Thoughts about first sweaters, what works, and what doesn’t. I wanted to write them down so that if any of you are considering embarking on your own first sweater journey, you’ll have a little more wisdom than I did. Here’s what I learned:

1. Pick a pattern that you love.

You’re new to sweaters. You don’t know about set in sleeves, or circular yokes, or waist shaping, and maybe that’s a bit intimidating. Maybe you’ve decided that because it’s your first time, you’re going to find the most basic sweater pattern out there. It seems like a good plan, right? Well... if a super-basic sweater sounds fun to you, then go ahead. But if not, you’re going to be working on a boring project for a long time, and that won't be very enjoyable. Better to choose a pattern that you love, and make it worth the time and effort of making it!

2. Pick a well-written pattern.

Thought Number One comes with one caveat: if the pattern that you love is poorly written, then maybe it’s one to avoid. When you’re an experienced knitter of sweaters (or socks, or mittens, or what-have-you), you may be able to interpret a bad pattern and see what should be done. You can catch errors in the text and figure out what the pattern writer really meant for you to do. But as a beginner, you almost certainly don’t have this skill (yet!). Trying to use a poorly written pattern will just end in unnecessary confusion and suffering. Pay attention to online reviews of the patterns you’re interested in. If you have a favorite pattern maker or distributor and find their patterns readable, then they’re likely a safe bet. I picked my sweater pattern out of an Interweave Knits book, for example, because I’ve always had good experiences with Interweave patterns.

3. Pick a yarn that you love.

You’re going to be working on this project for a long time, and then you’re going to be wearing it. Why choose a yarn that you don’t like to touch? Nicer yarn may be more expensive, but isn’t an expensive sweater you wear all the time better than a cheap one that you can’t stand at all? This goes also for the care instructions for the yarn. If you despise handwashing your garments, don’t use a 100% non-superwash wool. Your time and effort is worth spending on a yarn that will make you happy to wear over and over again.

4. Read the instructions all the way through before you start.

This is advice for any first-time project. It’s good to know what you’re getting yourself into, plain and simple. Reading through your pattern will also let you know if it uses any techniques you’re unfamiliar with, so you can try them out with some test yarn. For me, this was the i-cord bind off, and I’m really glad I practiced doing it first!

5. Make a gauge swatch.

Everyone and their mother tells you to make a gauge swatch, and I’m no exception. With any sort of sized garment, it’s worth it to take the time so that you know you’re actually making the right size!

6. Put in lifelines

If you don’t know what a lifeline is, I suggest you look it up because they’re really useful. They make it so much easier to rip back a piece of knitting if you make a big mistake. I put a lifeline in whenever I was about to start a new type of shaping or joining, and it gave me exactly the confidence I needed to just do it without worrying what would happen if I messed up. 

7. Take a break when the project becomes a chore.

Maybe it’s just me, but I tend to experience project fatigue on longer knits. After a certain amount of time, working on them stops being fun, and that’s when I know I need a break. I’ll work on a different project, or try a different craft, or even (gasp!) do something non-crafty for a while. If you knit as a hobby, then it should be an enjoyable thing: don’t force yourself to work on a project just because it’s there! I promise, it will make the experience better, even if it takes longer to complete.


And there you have it! If you’re thinking of starting a sweater, or any other big complicated project, I hope you find this helpful. And I hope you go ahead and take the leap! Bigger projects are a challenge, but they’re so satisfying when you weave in that final end!

Stay safe, everyone, and until next time, stay crafty!

Thursday, September 5, 2019

Spring of Sewing #3

Whew! Moving is finally over (mostly). I have furniture, I have food, and most importantly, all my craft supplies seem to have survived the trip. I'm stoked to get on with my many projects, but until I can fully get back into the swing of things, here's the third and final project from the sewing class I took.

So, it may not surprise you to learn that, just like last year, I began planning my Halloween-time escapades far in advance. I wasn't totally sure about design for a long time, but even in the spring, I knew I wanted to be Taako, and I knew he was going to be wearing a fashionable capelet. It just seemed like the sort of thing he'd be into. So when planning for the final project came around, I had a very specific idea in mind. 


That seemed pretty straightforward to me! All I had to do was find a capelet pattern and I'd be set. So I searched through the class's library... and found nothing. 

I searched online... and found nothing. 

Catalog after catalog, nobody seemed to have a pattern for the kind of capelet I had envisioned. I was actually kind of surprised; it didn't seem to me like my design was particularly unique. But for whatever reason, I couldn't find something to match. I could have scrapped the idea and gone for a more accessible pattern. But we all know I didn't.

Having almost no experience pattern drafting, I wasn't prepared to make a garment this complicated (not that it's even that complicated) without some help. In a bid to use as much of a commercial pattern as possible, I came up with a pretty neat trick. Find a coat pattern with a nice collar, and use its design from the shoulders up. Then, draft the shoulders down into a cape instead of sleeves and a body. That way, I could avoid making all the complicated bits, and I only had to come up with the easy stuff! I chose this lovely coat as my template:


A few rounds of mockups and tweaks gave me a pretty good idea of how to make a good capelet, so I set off looking for fabric. I knew the general color scheme I wanted to work with -- various shades of blue with accents of red and black -- and it wasn't hard to find a nice dusty blue wool to serve as the outside. I came up with some lovely red lining fabric that has a subtle rose brocade as well. I'm particularly fond of the red lining, both because the fabric is pretty and for some character-relevant reasons that are extremely spoilery. On the off chance that anyone is reading this while in the middle of listening to TAZ: Balance, I won't elaborate, but those of you who have finished it should recognize the significance of red outerwear. 

Anyway, back to the garment itself. Construction was fairly easy, since the instructions from the original pattern were still mostly relevant. Soon enough, it was time to show off the finished product!


See what I mean about that lining fabric? It's such a subtle fancy element. And I love how the red is almost completely hidden (save for buttons) while the cape is closed, but can burst out whenever the wearer moves their arms. Not to mention, it's quite practical and warm thanks to the wool! I think this will make an excellent component of Taako's ensemble come October. 

Here ends the saga of sewing class for me. I thought it was a fantastic experience, especially as someone who hadn't sewn clothes before. Now, I'm confident enough to take on most commercial patterns, and even try my hand at making my own! This adventure may be over, but the journey of cosplay is still very much active. If you'd like to continue to hear about that, then be sure to come back in (hopefully) a few days, where I should have another update. Until then, stay crafty!

Friday, August 9, 2019

Spring of Sewing #1

Hello again! Sorry for the increasing lateness of posts: I've been busy moving! Yes, I'm starting graduate school, and with that comes a relocation. Please forgive me if I miss a week now and then while I sort this whole thing out. I'm still crafting while I move, don't worry. In fact, I have a piece of lace for my Taako cosplay that's nearing 3 feet in length now...

But that's a post for another day! While I move, I thought I'd take the time to go over a little project I undertook earlier this year. You see, even though I've only officially started my latest cosplay recently, I've been thinking about it for much longer. I've been sketching ideas, diving into fanart, and relistening to The Adventure Zone essentially since I finished the last cosplay, and I knew early on that I'd need some better garment sewing skills to pull a new cosplay off. 

Since I didn't have much in the way of clothing sewing experience already, I needed to learn. And what better what to learn than to take a class? I found a costume design course thanks to the recommendation of a good friend and enrolled immediately. 

Now, this was an awesome class. I learned so, so much about sewing, even though I've known the basics since I was in elementary school! I got all of my measurements (super useful just to have on hand, but you need a friend to help), learned about reading sewing patterns, and even tried my hand at drafting my own. The class centered around three major projects, designed to increase in complexity as the course went on. In this post series, I'll show you the results of my projects! Hopefully, you all will be able to see how much improvement can be made in a short period of time, if you're dedicated to the work and have a good teacher.

I'm getting ahead of myself though. Let's start with the first project I did. 

The project description was fairly open-ended: I could make any kind of simple, unstructured shirt. No darts, no set-in shoulders, just a few pieces of fabric meant to cover the upper half of your body. In the spirit of the costuming nature of the class, I wanted to envision a character who would be wearing the garment. I settled on a sort of water-nymph girl (I'm weak for fantasy) wearing a loose tunic-type shirt. I sketched a lot of different ideas, some of which I might come back to someday, but there was only time to make one of them! Here's the one that I settled on.


I liked the idea of lots of pleating giving the garment shape without having to use things like darts or seams. The belt would prevent the tunic from being too tent-like, and the detailing on the bottom would be embroidered in a sashiko-like style to give the impression of waves and seafoam. I had ambitions. 


This is what I ended up making. Pretty different from the original, right?

Well, all of the changes I made to the original design were made for good reason. I forewent the pleats for simply gathering the fabric at the waist with a belt, for example, because the pleats just would've made the bottom of the top too full. I didn't need the pleats to get the effect I wanted, so they went.

I also added sleeves, where my original design was sleeveless. As it turns out, sleeveless shirts are a bit tricky to sew. In order to finish the armholes and keep them from fraying, you need an extra piece of fabric called a facing on the inside of the garment. That would mean drafting another piece of the pattern, making sure it fits, and sewing it together carefully. I was quickly realizing that sewing clothes is much more time-consuming than I imagined, and the sleeveless idea got scrapped in favor of short sleeves that could easily be turned in and stitched to finish. 

Finally, some of the detailing got left off simply because I ran out of time to finish the garment! I didn't get around to embroidering the hem of the tunic, and instead of sewing a wide fabric belt, I whipped up a quick crocheted number just to give it the shape it needed. That being said, these things are easy to change, and I fully plan to embroider the hem at some point, just because I think it'll really elevate the look of the tunic. (That's definitely a project that's a while away, though. Gotta finish a cosplay first!)

And there you have it! My first proper sewn garment! It's a humble start, for sure, but I learned so much from going through the process, and I know there's room to make it better if I so choose. I'll be back next week with project #2 of this series, so stay tuned if you want to see how I applied all that I learned. Until then, though, stay crafty!

Sunday, January 20, 2019

Pattern Review: Arzote Top

It's finished! I've been working on this project on and off since July, and I'm finally done. So now you all get to see it!

In my endeavor to learn knitting faster than the average bear, I decided to take on a sweater six months in. Definitely not the craziest crafty thing I've dived into, but a sweater is still a big project. I had some dark green and multicolored yarn that I was itching to use for a garment, and they seemed like the perfect combination for a nice, simple striped sweater (cue Spongebob music).

One problem: I didn't have quite enough. I was short maybe a hundred yards. I would've just gotten another skein, but the yarn was a gift from over a year ago: no way the same dye lot would still be in stock. It seemed like the universe's goal was to thwart my plans! I was going to give up and search for another project, but I came across a lucky find in pattern form: Arzote by Berroco. It seemed like a pretty standard sweater... until you got to the short sleeves. I calculated my yardage and decided that I would indeed have enough yarn to make a striped, short-sleeved sweater.

I double-checked.

Yup, still enough.

As is tradition for first sweater (or almost-sweater) projects, I made my fair share of mistakes. One which I still can quite figure out ended up with me having a dozen mystery stitches on the front half of the shirt, with no evidence of mistaken increases in the fabric. I can only imagine that I missed decreases somewhere, though where exactly still escapes me. Fortunately, blocking hides a multitude of sins, and in my opinion, the top turned out pretty darn well! I blocked it straight onto Mannie Quinn in order to get the fit right.


All in all, it turned out well! I love these two yarns together: the colors work nicely off of one another. And despite my stitch counting mishap, the shirt fits well too! It's deceptively heavy for its size, since the fabric is so thick, but the yarns have lots of cotton and synthetic content in addition to wool, so it's not nearly as hot as it might seem. I'm looking forward to warmer months so that I can really show it off!

As for the pattern, I have a number of observations. Overall, I liked it. The instructions were clear and easy to follow, and it was simple enough for a novice sweater-knitter to understand. I didn't add a pocket because I didn't want it to clash with the stripes, but the original pattern includes a breast pocket that is very cute.

On the negative side of things, I did have a few issues with blocking and fit that I'm fairly certain weren't attributable to error on my part. The first is that there seemed to be a fair amount of extra stitches in the back when doing the ribbing for the collar. This extra ribbing stuck out from the neckline at odd angles and wouldn't lay flat against the back of my neck until I really forced it to with blocking. I'm usually trying to avoid stretched collars in my clothes, so starting out with one isn't that great. The other issue I have is with the shoulder seam construction. The fabric is quite thick, being made of worsted weight yarn, and that really influences the seams. While the side seams aren't that big of a deal, it becomes rather bulky in the shoulder and armpit area, which is a tad uncomfortable. More noticeable from the outside, the thick seams and fabric don't fold and stretch on themselves very much, so the shoulders of the shirt are kind of locked in an arms-down position. When I lifted my arms over my head, the shoulder area pops up to my ears, making the entire shirt ride up. I was using the recommended weight yarn and the correct gauge for this project, so I expect that it's not just my seam job that creates this problem.

All that being said, I still like the top. It's pretty, and it fits well as long as I don't raise my arms too high (and let's be honest, they're usually down at my lap with a craft project anyway). It's got some flaws, but if you're willing to deal with them, you'll get a nice looking product!

With my first sweater-ish project out of the way, I think it's time to set my sights on a new garment! Maybe this time I'll try a full-fledged sweater. In fingering weight. With lace. That won't take a million years to complete, right? Well, I'm going to dive through my pattern books. Until next time, stay crafty!

Sunday, October 14, 2018

Putting it Together

It's October already, and that means it's less than a month until Halloween! I'm so excited! It also means that I need to finish my Aubrey cosplay if I want to wear it around. I maaaaay have gotten sidetracked with some... other projects recently, but now's the time to buckle down! And I'm starting that by putting all of the components that are done together. Time to sew!


First, I sewed all of my lovely patches onto the lapels of my jacket. It already looks very cool. Where's the Pine Guard patch, you ask?


It's a secret society, I'm not gonna leave it out in the open! (Plus I can be all cool and flip my collar whenever I want to show it off.)

But that's not the only thing that's happening to this jacket! Remember those wing decals I made way back when?


They've been sewn on as well! And in order to really drive home the "flame" part of the Lady Flame, I made some fire decals in the same style and added them to the "pockets" in the front. Finally, a use for fake pockets!


Put it all together, and it turns out pretty cool if I do say so myself!


With that, the jacket is pretty much finished. I could probably just throw this on and pass for Aubrey, but whoever likes to do fun things halfway? Onwards, to more projects!

Monday, June 25, 2018

A Quiet Oasis

Hm, seems I've been slipping when it comes to my once a week rule... Sorry everyone, I'll try to keep the pace up! I'm excited to show this particular project, since it's a longer-term one that I had been planning for months.

On vacation last year, I stopped in a yarn shop and picked up a copy of Interweave Crochet on a whim. It had a lovely pattern called the Oasis Shell (link here), which I knew I had to try. I love lace guys, It's so pretty.


Look at that lace! And you know the best part?


It continues all up the back! Seriously, it's so nice. And the body of the top is also pretty cool. It's Tunisian crochet, turned inside out for an interesting texture a little bit reminiscent of the wrong side of knitted stockinette. If you're looking to try Tunisian crochet, this would be a good pattern: lots of practice for the simple stitch! I'd recommend this pattern to anyone looking for a summery lacy top!