Showing posts with label DreamFairy. Show all posts

Friday, January 29, 2021

Of Corset Is


This is it! The final piece of the costume! We’re nearly there (and not a moment too soon).

The observant might notice that there was no corset in my original costume sketch. To be truthful, that’s because corsets scare me. Not the wearing – I’ve watched enough Costube to understand that a well-fit, moderately laced corset shouldn’t be painful – but the making. This is a complicated garment with lots of curves, and not a lot of room for error. When I planned this costume, I didn’t think I was going to be ready to make one by the deadline.

I still don’t think I’m ready, but I went ahead anyway! Doing is the best way to learn, isn’t it?

The first challenge was finding a pattern to start with, because there was no way I was going to draft one from scratch. We should at least start this process with someone who knew what they were doing! I looked around at different styles of mid-late Victorian corsets and found myself drawn to a particular style of corded corset. These had very few bones: most of the support came from densely corded panels. I did a little digging and found a free Foundations Revealed article (though it seems to have since been removed) examining a corded corset from the 1880s, including a transcribed pattern! I loved the way this corset looked, and while it was a bit small waist-wise for me, the presumed height of the original wearer was close to mine. And I figured that adjusting the width would be easier than adjusting height.

(As it turns out, both are hard. But I’m getting ahead of myself.)

I made two mockups, each with different methods for fitting the pattern to me. For the first, I simply widened each panel by a fixed amount until it fit my hips. The problem, though, was that the bust and hips were way too big, even if I were to pad my figure out. It was downright cartoonish. I tried to size down the bust/hips, but ended up ruining all the nice curves of the panels. Back to the drawing board, then.

For the second mockup, I tried to grade the pieces to fit the major three measurements: bust, waist, and hips. I got lazy this time and didn’t actually cord the panels, opting instead to stiffen some scrap upholstery fabric just to get an idea of the shape.

It was also at this point that I realized something. I was making a corset for a (fictional) fairy, and fairies are hurt or repelled my iron in many stories. And corset busks are made of iron-containing steel.

Realistically, the Dream Fairy wouldn’t be able to wear the corset as I was making it.

The steel busk doesn’t touch the skin while being worn, but it would still present a problem when taking the garment on and off. And I imagine the Dream Fairy sewed her own clothes, in which case she wouldn’t have been able to insert the busk in the first place. I needed another solution.

All the antique corsets I’ve seen have had a busk, but plenty of modern corsets don’t. Sometimes they lace up the front. Sometimes they don’t have a front opening at all. Neither option is particularly accurate to the time period (as far as my very amateur knowledge goes), but hey, I’m making a costume for a fictional person belonging to a fictional species. I can afford not to be perfectly accurate. I liked the clean look of corsets sewn up the front, so I simply replaced the busk with a pair of bones in the second mockup.

…yeah I may have taken half of it apart before I remembered to snap a picture.  But this one fit a lot better. It wasn’t as dramatic in silhouette as I wanted, but I was fast running out of time and needed to move on.

The stiffened upholstery fabric worked surprisingly well as a strength layer. I’m not going to claim it was as good as real coutil (it’s not), but it wasn’t bad. Because of how long it took to finish the mockups (and decide that yes, I really was going to go through with this), I was worried that I wouldn’t be able to buy coutil online in time to actually make my corset, so I made the executive decision to continue upcycling upholstery fabric in my final project. Isn’t that what a fairy would do, after all? She wouldn’t be able to go to the store and buy the perfect fabric, she’d use what she could find.

Anyway, back to the actual making of the thing. I cut panels, sewed coding channels, and inserted cords (which was not easy on the hands, let me tell you!) The cords are actually just some random cotton yarn from my stash. They show through the sheer outer fabric just a little, which surprised me, but I have to say I like the way it draws the eye to the curves of the corded panels.

Next, I sewed together the panels and felled the seams.

Eyelets were another brief point of contention. If I was forgoing the busk because it was steel, I couldn’t very well use steel eyelets. Brass I could justify, but the color wouldn’t work with the red-green-silver palette I had going. Fortunately, sewn eyelets are very much a thing. They might be a little old-fashioned for this style of corset (I’m not sure), but at this point we’re only vaguely gesturing towards historical accuracy so I didn’t care. Sewn eyelets it was.

What else is there to do? Oh right, boning. There are only three pairs of bones in this entire corset: two in the back supporting the eyelets, and one in the front replacing the busk. Historically these were made of whalebone (or steel, but obviously we’re not going that route), but nowadays we prefer to protect the whales, and use synthetic whalebone instead.

Admittedly, I didn’t have any synthetic whalebone. I didn’t even have any big zip-ties. But I did have some plastic folders!

Should I call this my trash corset? It’s made of a lot of stuff that would have wound up in the garbage otherwise. I cut a folder into strips and sandwiched a few together for a sturdier “bone”.


Maybe it’s my MacGyver corset instead. I didn’t actually use any duct tape or bobby pins, but I got close. Should I try to make a corset out of duct tape and bobby pins? Would that even work?

…I was in the middle of something else. Wacky hijinks can wait.

Step number I’ve-lost-count was to insert the bones into their respective channels and bind off the top and bottom edges, finally hiding all the raw edges in the garment. I used some red quilting cotton for the binding, and because I didn’t have a long enough piece to go along the whole edge, I pieced together two different patterns and made a design out of it. I think that bit worked rather nicely.

Now all the sewing’s done, and the fun part begins. Whenever you have boning, you need to do something to secure the ends of the bones so they don’t wear through the binding. Often, this was also an opportunity to add a bit of decoration to the corset. Yes, I’m talking about flossing! I found photos on the corset-making livejournal showing a flossing sampler, which was all the inspiration I needed. I did some functional flossing on the bones, of course, but I also had fun flossing the corded panels. These don’t serve a structural purpose; they just look pretty. Really pretty.


Does anyone else ever get a little nervous when using abstract designs? I’m always worried that I’ll accidentally copy a design with a symbolic meaning that I have no knowledge of. I hope these come off as regular little floral motifs.

By now the corset is perfectly functional, but there’s still something missing. What could it be…

Ah yes. There’s no lace. That won’t do.

I dove once again into my favorite archive.org resources and found yet another lovely bit of crocheted lace, this time from Crochet series No. 1-5 (link here). Crocheted lace works up much faster than any other type of lace I’ve yet to try, so it wasn’t long before I was blocking, pinning, and sewing it onto the form. I made a (very long) four-stranded round braid to act as the lacing, gave everything one last good press, and voila! A real-life corset!

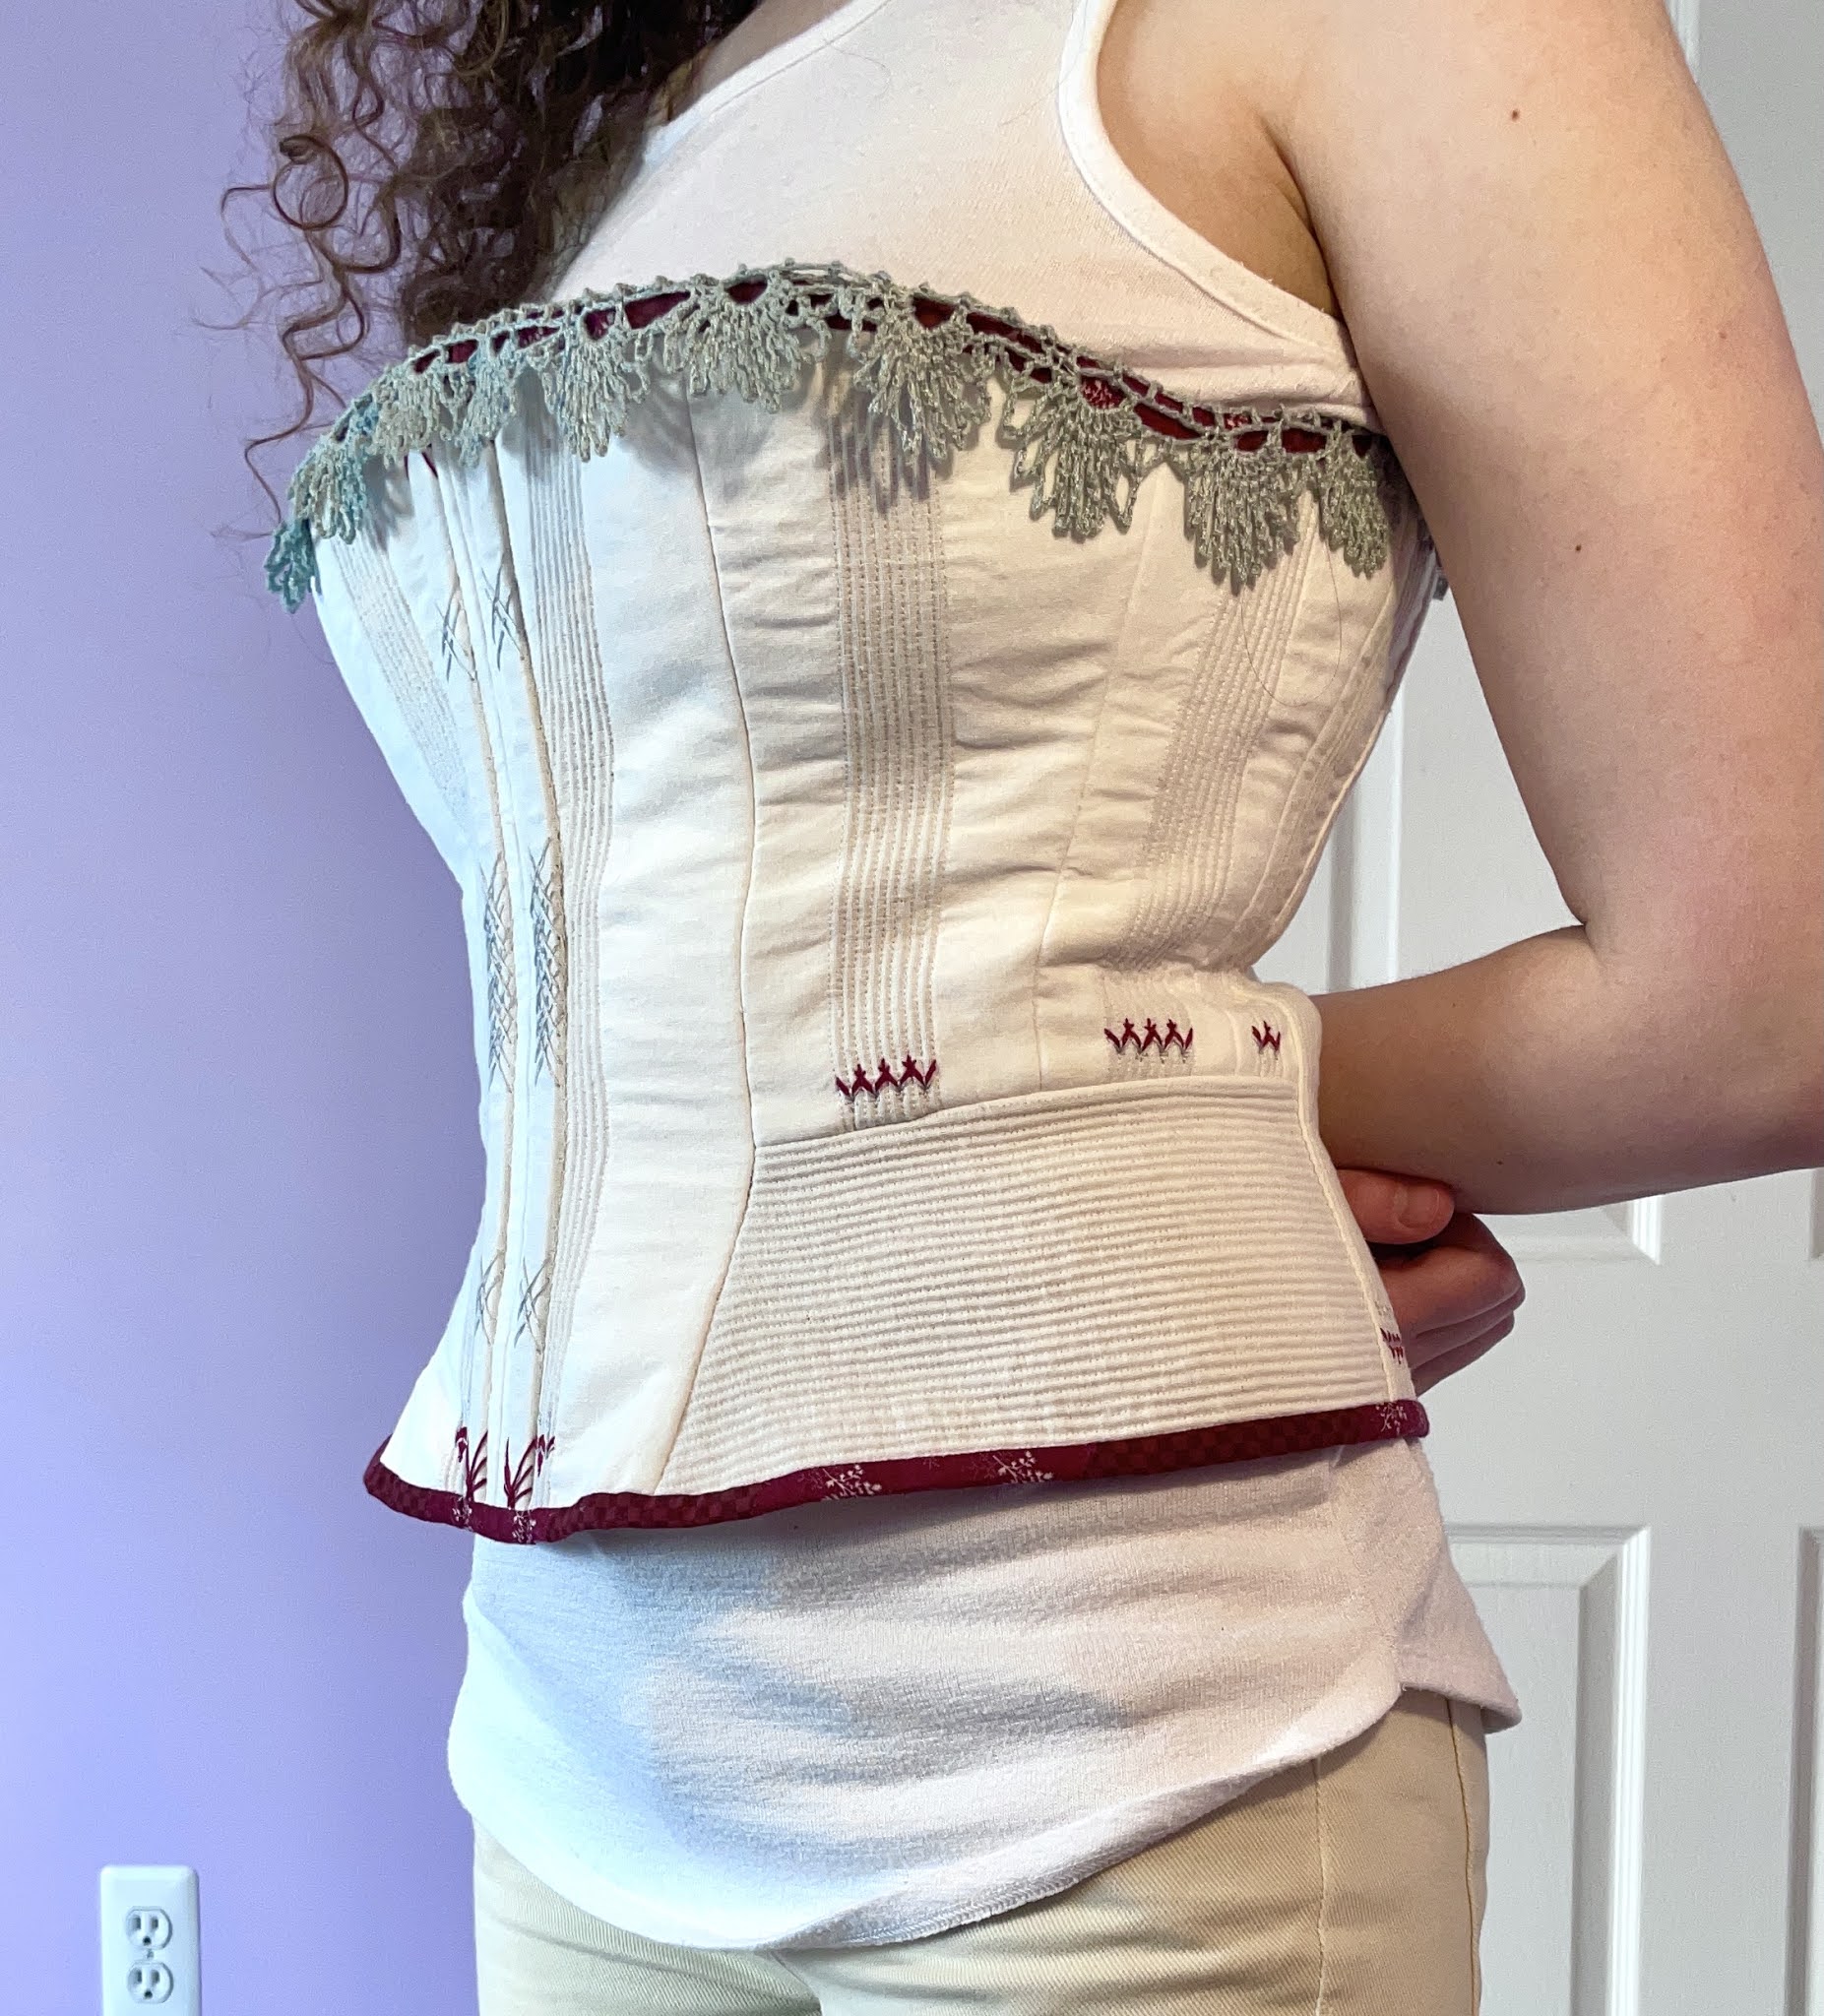
 

Well, it’s certainly a corset. I won’t say I’m entirely pleased with it. Despite my attempts at careful measuring, it’s a bit too big on me (would’ve been better if it was too small, but alas). I don’t think the silhouette is quite right for the era. There are some fit issues, especially in the back, that I was never able to get rid of.

But then, there are positives too. It fits me well enough to be comfortable and supportive. My experiment removing the busk worked pretty well. The embroidery and lace are pretty. For my first corset, and in fact my first fitted garment ever, I’d say it’s a good effort.

I won’t lie, I’m nervous to enter this into a competition. I don’t like to be judged on work that is so imperfect, and I know the judges will find even more wrong than I can see right now. But sharing and allowing for that vulnerability is how we grow. To do anything else is stagnation for the sake of security.

As scared as I am, I’m going to show this. I accept its flaws, but I’m proud of the things I did well. And next time, I’ll do even better.

Saturday, January 23, 2021

Did You Chemise Me?

I don’t know what it is about undergarments that fascinate me so much. Maybe it’s that we take them for granted. We rarely think critically about our bra or panties or boxers when we get dressed in the morning, and I’d venture to guess that most people haven’t thought much about what came before (or what the future holds!) for the world of undergarments. There’s just something about those facets of life that usually go unnoticed that captures my attention. 

So of course I was excited to make some Victorian undergarments.

I’m no historian, but I know that the chemise or shift was the next-to-skin layer for women in western cultures for a long time. Drawers were a somewhat later invention, but still predate our current style of undergarments. They were usually made of something easy to launder like linen or cotton, and they protected outer garments from the grime and oils of the skin. Since they were so simple, they were often sewn at home even if outer garments were purchased elsewhere. And that means that they make a rather good beginner’s project for the aspiring historical costumer. 

Which is good, because I am definitely still a beginner. 

Normally you wouldn’t see much of the chemise and drawers in an outfit, but for the Dream Fairy they’re the only – and therefore the outer – layer. So while it would be perfectly acceptable for them to be  plain and functional, I wanted to put effort into making them look nice. In many ways, the chemise is the dress here, and it deserves that kind of attention. 

To start, I needed some sort of pattern. I’m going for a fantastical interpretation of a late Victorian look, so I searched online for chemise patterns from that era. Fortunately, there are plenty to choose from! As I mentioned this was often a home sewing project, so there’s no shortage of sewing manuals detailing chemise construction. I picked this design from the Manual of Needlework and Cutting Out and set to work!

The basic construction of the chemise is really very simple: just a front and a back piece, identical save for the neckline. I sewed up the sides by machine and felled down the seams for a nice finish (my felling certainly isn’t the best in the world, but it’s nicer than a serged seam!). The armholes and bottom hem were finished in a similar manner.


The neckline required some gathers though, so I couldn’t just fold and stitch the raw edge. I cut out a strip of my fabric for a neckband and set the gathers into it. The Victorians were apparently very meticulous about their gathers: I hope they know I tried!

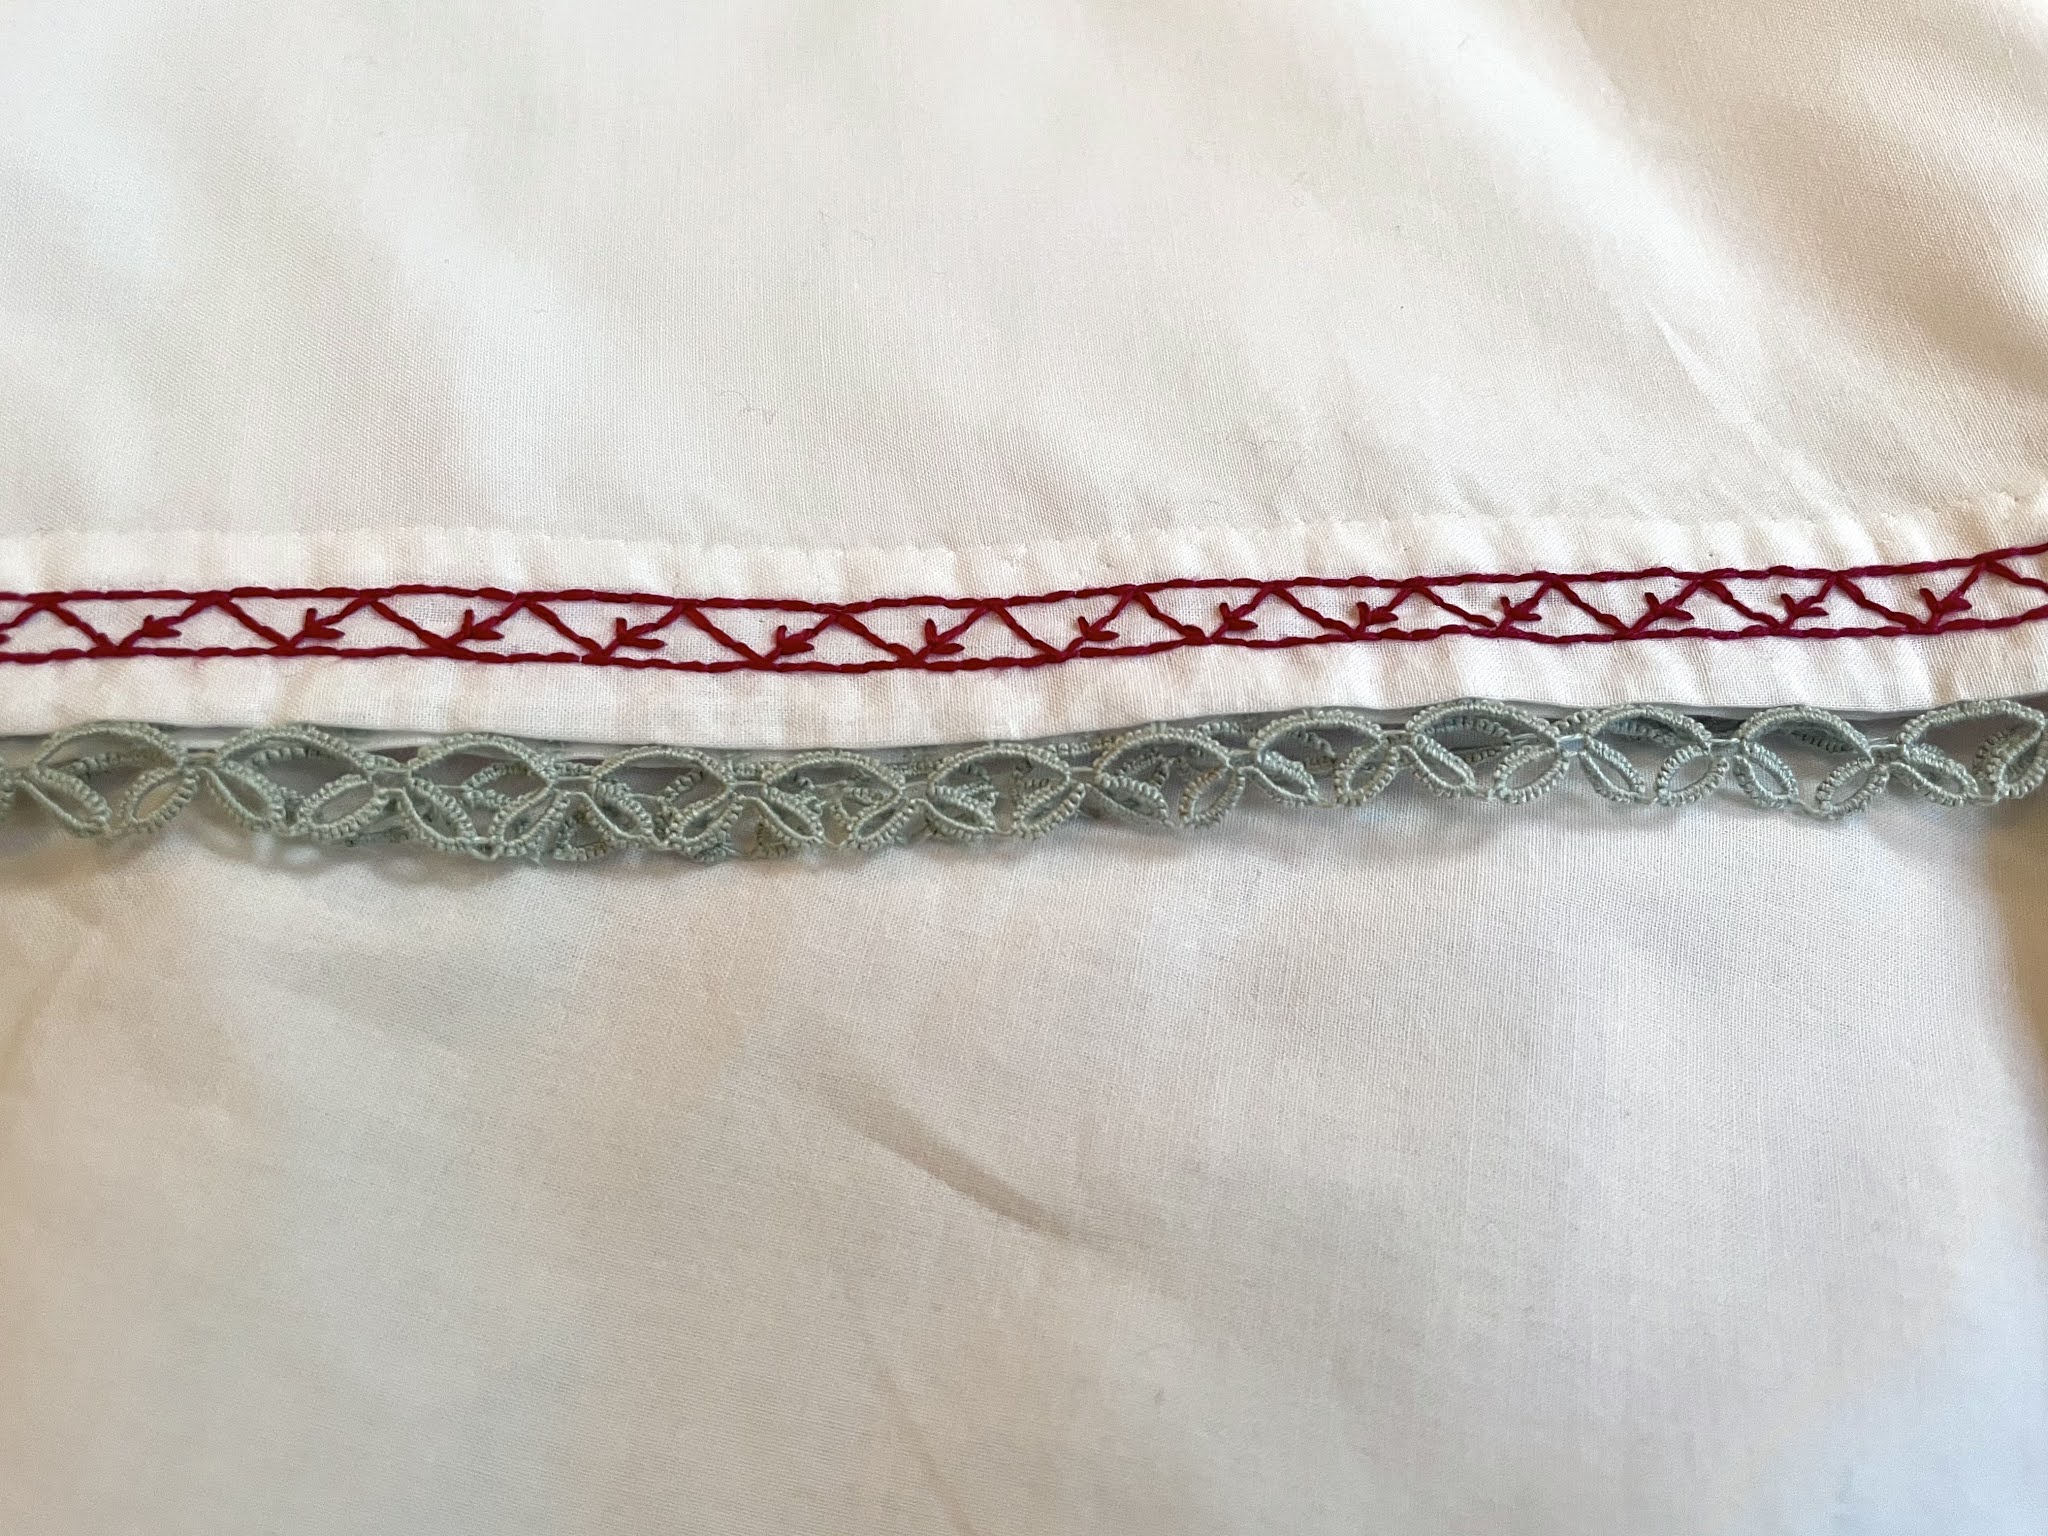
At this point the chemise was technically done. But since it’s going to be visible, I want lace and frills and decoration. And because I’m something of a craft-masochist, I was determined to make all my lace by hand. 

Fantastic decision making from a time-management perspective, really. 

Anyway, I spend a stupid amount of time tatting enough lace (pattern from Beeton’s book of Needlework) to trim all the edges of the chemise, and stitched it all in by hand. 

That still wasn’t enough though, so I found an embroidery design from another book (Artistic Embroidery) to add to the armholes and bottom hem. 


There. That should do it. If I had more time I might’ve indulged in some insertion lace around the bottom hem but I’m cutting it close time-wise as it is, so I’ll just move on. (I can always add it in later, right?)

Next came the drawers, the pattern for which was taken from the same book as the chemise (here). Much like the chemise, sewing the seams and finishing the hems was easy enough, though I did have to alter the pattern a bit to fit my short short legs. The only difference was that the drawers needed a buttonhole in back to close them up. For the frills, I went for a wide crocheted lace pattern from Knitting and crochet: A guide to the use of the needle and the hook. I made the definitely-practical-and-time-conscious decision to double the length of lace needed so that I could gather it into ruffles. 

I have made so much lace over the past year, guys. I have a problem. 

But when it looks so frilly and fun, can you really blame me?

Most of the drawers are hidden under the chemise, so I didn’t bother with other embellishments. One of the cool things about these drawers is their construction: the crotch seam is completely open!

This served the very practical purpose of covering you up down there while still allowing you to use the bathroom without taking off all your skirts. I don’t quite have that problem with this costume, but yay for historical details!

And there they are, in their full glory! I tried to get a picture of them on me, but the fabric is... a little too sheer for my sense of modesty. At least on the top where there’s only one layer of fabric. My goal is to finish off this costume with a corset and that will solve the issue, but I’m not quite done and the deadline for the competition is a little over a week away... 

...Which means I had better get back to it. Until next time, stay crafty!


Sunday, January 3, 2021

Winging It

Happy New Year!

(Insert a paragraph about how 2020 has been terrible and 2021 is going to be so much better, blah blah blah. You’ve heard it before, you can fill in the rest.)

The deadline for the Foundations Revealed competition is fast approaching, which means I really need to finish my costume. So the next piece I decided to tackle was the wings! If you remember from a few months ago, I made a mockup fairy wing out of wire and crocheted mesh. It looked good, but I ran into trouble developing a harness. The wire was just too flimsy, and I couldn’t source the right wire for the job. Alas, the design had to be scrapped, and I started over. To avoid the wire issue, I wanted to make a shawl to give the impression of wings, rather than attempting another standalone structure. It wouldn’t look as “realistic,” but I figure that a fairy visiting people’s houses would probably use some sort of illusion or glamour on herself anyway.

The poor original wing just couldn’t stand up to the pressure of use (or as it turns out, having boxes collapse on it in my closet...)

Since this costume is inspired by the Dream Fairy poem, there were a few requirements for Wing Design 2.0. The colors and shape should be reminiscent of a Luna moth’s wings, and it also needed “silver spots”. At first I tried to make my own design, but that just wasn’t working out (props to all the pattern designers out there) so I turned to my favorite source of historical patterns instead: archive.org. Soon enough, I happened upon a half-square shawl from the 1885 book Knitting and crochet. A guide to the use of the needle and the hook (available here). To me, the lozenge shapes look like a stylized version of the veins and scales of a butterfly’s wings, and it wasn’t hard to lengthen the half-square shape to better reflect the Luna moth’s long trailing tails. I picked out some lace yarn in pale green and burgundy and set to work.


This pattern was actually pretty quick and easy to work up. It’s colorwork, but you only use one color per row so there’s no need to worry about carrying strands. And since it’s mostly garter stitch, it was perfect for mindless knitting while watching TV. The original pattern called for a crocheted border on top and tassels along the sides, but I extended the border all the way around and just used tassels on the ends. The edges needed that extra bit of stability, in my opinion. And it turned out sooooooo long! It feels so dramatic and elegant to wear, I love it.

The last step was to add the “silver spots upon her wings” like the poem says. In keeping with the fantastical themes of this project, I interpreted the spots as small flowers crocheted with silver thread. I couldn’t figure out a good way to incorporate them into the knitting, so I opted to applique onto the finished product. This has the added bonus of being easily removable once the contest is over; I want to be able to wear the shawl in my everyday outfits without it feeling like too much of a costume.


And there we have it: one more piece of the puzzle down! There’s lots more to do but I’m almost finished with the chemise and drawers, so expect those soon. And until next time, stay crafty!

Saturday, August 29, 2020

Stockings for Days (or months, as the case may be)

Do you ever have a project that’s just... a mistake? Not in the sense that you made a lot errors while making it or it turned out poorly, but just that it was a bad idea in the first place?


Yeah, I may have a penchant for those types of projects, and this pair of stockings is one of them. You see, I’ve been working on my historically inspired Dream Fairy costume, and I wanted a nice set of stockings to go with the chemise. Rather than buy a modern pattern simply based on Victorian styles, I decided to go straight to the source with an 1884 book titled Knitting: How to Knit and What to Knit. If you’ve got any interest in historical knitting whatsoever, I highly recommend giving this book a read. Its instructions are pretty detailed, and they’ll get you used to the antiquated terminology that has lapsed out of knitting vernacular in the ensuing 140 years.


I wanted to use a stocking pattern from the Victorian era because I love all the little details that speak to the period. I’ve never seen a “seam stitch” in modern sock knitting, and we don’t use the purl 2 together decrease on the right side of the stockinette nearly as often as the Victorians did (at least, judging from this book), but they all make subtle changes to the way the finished product looks, and I was determined to make it look good!


But, like I said, this project was a mistake, and its nature first became apparent when I had to buy yarn. The book doesn’t specify what weight yarn to use (at least, not in a way that I understood) but just judging by the stitches I had to cast on for the leg, it had to be lace weight. It should have struck me then that if I was going to be making thigh-length stockings in lace weight yarn, that this was going to be a long-haul of a project. Did I want to knit that much stockinette?


The answer doesn’t matter, because I didn’t ask myself that question. I bought two skeins of lace in a lovely charcoal gray and set to work.


The second hurdle came after I was actually smart for once and knitted/blocked a proper gauge swatch. I knew that the cast-on edge would have to fit around my lower thigh, minus a bit of negative ease. But with the gauge I was getting, even on my smallest needles, the sock as written would be waaaaaaaaaaay too big. Like, “I could probably fit both my legs into the sock” too big. But I had already bought the yarn, and I didn’t want to buy size 000000 needles for this project, so I did some math to adjust stitch counts. It meant I would have to record everything meticulously if I wanted the socks to match, but that was fine, right? Tentatively, I cast on and began the first stocking’s lace edging, making sure to check the fit periodically.


The book I used had an option for a plain edged stocking, but come on. We all know I was going to go for the lace. I chose the No. 24 edging and happily plugged away at it. While there weren’t any charts, the written instructions were thorough and not too different from what I’d see in a modern pattern, so they were fairly easy to follow. I was having fun! And then... then came the stockinette.


When I finished my lace sweater a while back, I encouraged you all to choose patterns that would be fun to knit, and avoid anything you’d find boring (even if you liked the finished look). Well, I did not take my own advice on this one, friends. Plain stockinette is my knitting kryptonite. And because I was trying to cover my legs from mid-thigh down, that meant a lot of stockinette! I kid you not, there were 100 rows (with 112 stitches per row) to knit before I even started the calf decreases! Here, look at my notes if you want proof.


(Meticulous notes are meticulous. But if socks (or sleeves, or mittens) are going to match, I want them to match exactly, and that means marking out every row)


The silver lining to knitting 18 inches of leg is that once you get to the ankle, you’re already in the home stretch. The book offers a number of different options for the heel, and I went with the first because it’s by far the most familiar. Anyone who’s knit their fair share of socks would recognize the technique immediately: yes it’s the good ol’ heel flap!


As far as I can tell, this method of heel knitting hasn’t actually changed much since the 1880’s, so it was a relative breeze. Then it was back to the dreaded stockinette, but only for a few inches before reaching the toe. Again, there were a few options for this section, and I chose No. 14 just because I liked it. It seems that the Victorians preferred to work their toes in a spiral decrease pattern, rather than on either side of the foot like we usually do today. Another interesting historical detail to ponder as I admired my beautiful finished stocking. I was finally done!


...Oh, right. The other stocking. Back to work I guess!


In all seriousness, I am glad that I took detailed notes while making the first stocking. It saved me the headache of wondering whether or not these two socks would even look like a matched set in the end. And knowing exactly how much more I had to knit staved off the dreaded second sock syndrome.


Like I said at the start, the reason these stockings were a mistake wasn’t because they turned out poorly. I really love the way they came out, and aside from the costume I’m definitely going to be wearing them in the wintertime with my taller boots. No, they were a mistake because they took two dedicated months of knitting, and it wasn’t knitting that I particularly enjoyed. They felt more like a chore to me than something I was doing out of passion, and that’s no good when you’re a hobbyist. I’m glad these are done with, and I think I’m taking a break from knitting for a little while to recover. Fortunately, the rest of the Dream Fairy ensemble still needs making, and there’s plenty of sewing and tatting to spend my time on. Perhaps next it’s time to tackle the chemise...


Stay safe, my friends. Until next time!


Friday, June 19, 2020

Antique Lace Adventures

Today, I am in a lace mood.

If we're being completely honest, I've been in a lace mood for weeks. And nothing satiates my hunger for lace like some good shuttle tatting. In the interest of working on my Dream Fairy costume, I thought I'd look for some nice antique tatting patterns to use as edgings. Due to the pandemic, I can't go browse the stacks of my university's library like I'd like to, but archive.org is really just as good an option. There are dozens of handcraft/needlecraft books available there in the time period I'm interested in, so needless to say I was in heaven searching through it all. 

One of the books I found most interesting was Beeton's Book of Needlework, an instructional guide for knitting, crochet, tatting, netting, and embroidery published in the year 1870. The instructions are quite detailed, and it has dozens of patterns for each craft. I tried out four of the tatted edging patterns, to see if any would be appropriate for my costume.


Friends, I don't know if you've ever read 150-year-old instructions for anything before, but things change. Especially the terminology. Most of the techniques (for tatting at least) are pretty similar to what I've learned as a 21st-century crafter, but I had to relearn a lot of the terms in order to read these patterns. Plus, the Victorians were not shy about mixing crafts. Something like half of the tatting patterns have you grab a crochet hook at one point or another.

Not that I mind that. I always have my hooks handy!

In the interest of making these beautiful old patterns more accessible to modern tatters, I've written up my own interpretations of them below. BIG DISCLAIMER: I am not a historian, and I have no expertise whatsoever in interpreting historical patterns. I am, in fact, a computational biologist, which I'm pretty sure is about as far removed from historical lacemaking as anything conceivably could be. So if you care about historical accuracy, take my interpretations with a big grain of salt. With that said, let's get on to the patterns. 

Note: All samples were worked in Lisbeth size 40 cotton thread. A 0.75 mm hook was used for the crochet sections. Crochet instructions use US terminology.

No 3 – Lace Edging in Tatting


Tatting Section:


Wind shuttle, and do not cut thread from ball.


*R 10 ds, p, 10 ds, cl r. Turn work.

Ch 8 ds, p, 8 ds. Turn work.

R 10 ds, j to p of previous ring, 10 ds, cl r. *


Repeat until edging is desired length, then cut and tie.


Crochet Section:


Ch 1, sc into picot of first tatted chain, * ch 6, sc into picot of next tatted chain*


Repeat between * until all picots have been worked. Tie off. Weave in ends.


No 4 – Lace Edging in Tatting


Tatting Section:


Wind shuttle, and do not cut thread from ball.


* R 10 ds, p, 10 ds, cl r.

R 10 ds, p, 10 ds, cl r. Turn work.

Ch 12 ds, p, 4 ds, j to p of previous ring, 4 ds, p 12 ds. Turn work.

R 10 ds, j to p of previous ring (the same p that you just joined the chain to), 10 ds, cl r.

R 10 ds, j to p of the first ring, 10 ds, cl r. *


Repeat until edging is desired length, then cut and tie.


Crochet Section:


Ch 1, sc into picot of first tatted chain, ch 4, sc into picot of second tatted chain, * ch 6, sc into picot of next tatted chain, ch 4, sc into picot of next tatted chain *


Repeat between * until all picots have been worked. Tie off. Weave in ends.


No 5 – Border in Tatting with Crochet Edging


Tatting Section:


Wind shuttle, and cut thread.


R 9 ds, cl r. Turn work.

Leave approx. 1/6 in (0.4 cm) between previous ring and next ring.

R 4 ds, p, 3, ds, p, 3 ds, p, 3 ds, p, 3 ds, p, 4 ds, cl r. Turn work.

* Leave approx. 1/6 in (0.4 cm) between previous ring and next ring.

R 9 ds, cl r. Turn work.

Leave approx. 1/6 in (0.4 cm) between previous ring and next ring.

R 4 ds, j to last p of previous large ring, 3, ds, p, 3 ds, p, 3 ds, p, 3 ds, p, 4 ds, cl r. Turn work. *


Repeat between * until edging is the desired length, then cut and tie.


Crochet Section:


Row 1: Ch 1, sc into first small tatted ring, *ch 6, sc into next small tatted ring* Repeat between * until all rings have been worked. Ch 2, turn work.

Row 2: Dc into first st of previous row * ch 1, skip st, dc into next st * Repeat between * until end of row. Ch 2, turn work.

Row 3: Repeat the Decorative Edge Stitch (see below) to the end of the row, ending on a dc.


Tie off. Weave in ends.


No 6 – Border in Tatting and Crochet


Tatting Section:


Wind shuttle, and cut thread.


R 4 ds, p, 3 ds, p, 3 ds, p, 3 ds, p, 3 ds, p, 4 ds. Close ring partially, leaving about 1/8 in (0.3 cm) open.

* Leave approx. 1/8 in (0.3 cm) between previous ring and next ring.

R 3 ds, j to last p of previous ring, 3 ds, j to second to last p of previous ring , 4 ds, p, 4 ds, p, 3 ds, p, 3 ds, cl r.

Leave approx. 1/8 in (0.3 cm) between previous ring and next ring.

R 4 ds, j to last p of previous ring, 3 ds, j to second to last p of previous ring, 3 ds, p, 3 ds, p, 3 ds, p, 4 ds. Close ring partially, leaving about 1/8 in (0.3 cm) open. *


Repeat between * until edging is the desired length, then cut and tie.


Crochet Section:


Row 1: Ch 1, 3 sc into first partially closed ring, * 3 sc into next space between rings, 3 sc into next space between rings, 3 sc into next partially closed ring * Repeat between * until all rings and spaces have been worked. Ch 2, turn work.

Row 2: Dc into first st of previous row * ch 1, skip st, dc into next st * Repeat between * until end of row. Ch 2, turn work.

Row 3: Repeat the Decorative Edge Stitch (see below) to the end of the row, ending on a dc.


Tie off. Weave in ends.


Decorative Edge Stitch:


Dc into next stitch.


Remove hook, leaving a live loop.


Without picking up live loop, insert hook into next stitch and draw up a loop.


Chain 1.


Note: It is possible for the dropped loops to unravel if pulled. To prevent this, thread a piece of scrap string/yarn through each loop after the stitch is completed. When attaching the edging, make sure that each loop is secured to the base fabric.