Showing posts with label bag. Show all posts

Saturday, July 11, 2020

Simple Dice Bags with Lining

All dice need a home. Why not make them one yourself?


(Let’s all conveniently ignore the fact that these dice bags are not holding dice. I misplaced my set and haven’t got around to ordering new ones because all the games I play are online anyway!)


This pattern comes in two sizes: medium and large.


The medium bag will comfortably hold a single set of dice, plus or minus a few pieces. Do you have just one set of dice that you use for everything? Maybe you have many sets, but you prefer to keep them nicely organized. Or perhaps one of your dice sets is so special it needs its own handmade container. If so, this is the bag for you.


On the other hand, are you a DM who routinely needs to make five initiative rolls at once? Are you the player that everyone looks to when the warlock casts Circle of Death and deals 8d6 damage to 6 creatures simultaneously? Or perhaps you just love dice, and don’t care whether or not they’re sorted by color. If so, you may want the large bag, which easily holds 5+ sets of loose dice.


Materials


25-75 yards (23-70 meters) of lace weight yarn or size 10 crochet thread.

Scrap of quilting cotton or other medium-weight woven fabric, for lining (optional)

Thread matching the fabric color


Supplies


US size 1 steel crochet hook (2.35 mm)

Stitch marker (optional, to mark beginning of round)

Tapestry/yarn needle

Sewing needle, for lining (optional)


Abbreviations


(Note: this pattern uses US crochet terminology)

sc: single crochet

hdc: half double crochet

inc: increase

ch: chain

sl st: slip stitch

st: stitch

tbl: through back loop


Instructions- Size Medium


Base


Round 0: sc 6 in magic circle. Do not join. (6 sts)

Round 1: inc each st around (12 sts)

Round 2: *1 sc, inc* around (18 sts)

Round 3: *2 sc, inc* around (24 sts)

Round 4: *3 sc, inc* around (30 sts)

Round 5: *4 sc, inc* around (36 sts)

Round 6: *5 sc, inc* around (42 sts)

Round 7: *6 sc, inc* around (48 sts)

Sl st into next st


Sides


Note: You can substitute any other stitch you want for hdc in rounds 2-14. Work your rounds until the sides measure 2.5” (6.5 cm) tall, then proceed to round 15. Some stitch patterns may benefit from joining at the ends of rounds, instead of continuous rounds as written. In this case, at the end of each round, sl st to first stitch in round, and ch 1-3, depending on the height of your chosen stitch.


Round 1: sc tbl, *hdc tbl* around

Round 2-14: hdc around

Round 15: *2 hdc, ch1, skip 1 st, 3 hdc* around (8 ch1 spaces)

Round 16-18: hdc around

sc 1, sl st 1, tie off yarn, weave in ends


Instructions- Size Large


Base


Round 0: sc 6 in magic circle. Do not join. (6 sts)

Round 1: inc each st around (12 sts)

Round 2: *1 sc, inc* around (18 sts)

Round 3: *2 sc, inc* around (24 sts)

Round 4: *3 sc, inc* around (30 sts)

Round 5: *4 sc, inc* around (36 sts)

Round 6: *5 sc, inc* around (42 sts)

Round 7: *6 sc, inc* around (48 sts)

Round 8: *7 sc, inc* around (54 sts)

Round 9: *8 sc, inc* around (60 sts)

Round 10: *9 sc, inc* around (66 sts)

Round 11: *10 sc, inc* around (72 sts)


Sl st into next st


Sides


Note: You can substitute any other stitch for hdc in rounds 2-25. Work your rounds until the sides measure 4.5” (10 cm) tall, then proceed to round 26. Some stitch patterns may benefit from joining at the ends of rounds, instead of continuous rounds as written. In this case, at the end of each round, sl st to first stitch in round, and ch 1-3, depending on the height of your chosen stitch.


Round 1: sc tbl, *hdc tbl* around

Round 2-25: hdc around

Round 26: *2 hdc, ch1, skip 1 st, 3 hdc* around (12 ch1 spaces)

Round 27-31: hdc around

sc 1, sl st 1, tie off yarn, weave in ends


Drawstring – Both Sizes


The drawstring for this bag can be made of many things. Shown  above are an I-cord (small white bag), a ribbon (large bag), and a braid (small pink bag). Drawstrings should measure approximately 10” (25 cm) long for the medium bag, or 14” (35 cm) long for the large bag.


To insert the drawstring, weave one end into and out of the holes produced in round 15/26. The ends of the drawstring should end up outside the bag.


Lining (Optional) – Both Sizes


A fabric lining can easily be sewn into these dice bags for added strength and stability. Recommended fabrics are any medium-weight woven fabric, especially quilting cottons. A ¼” (0.5 cm) seam allowance is used throughout.


For the medium size, cut out a circle measuring 3” (7.5 cm) in diameter and a 3.5” x 8.25” (9 x 21 cm) rectangle. For the large size, cut out a circle measuring 4” (10 cm) in diameter and a 6” x 11.5” (15.25 x 29.25 cm) rectangle.


With right sides facing, sew the short sides of the rectangle together by machine or by hand. Optionally, press the seam open using an iron.


Using a pencil, fabric marker, or chalk, make 4 equidistant marks on the edge of the circle, separating it into equal quarters. Do the same thing with one of the long raw edges of the rectangle (now a tube).


Using a long stitch, sew a gathering stitch around the circle about ⅛” (0.25 cm) from the edge. Pull on the thread to gather the edges. Insert the circle into the tube, with right sides facing. Match up the marks on the circle to the marks on the tube and pin in place. Then, add pins to the area between each mark, adjusting the easing as necessary to fit the curves to each other. Sew together, by machine or by hand.


Trim the excess fabric of the new seam to about ⅛” (0.25 cm), and clip the seam to allow the bottom to lie flat. Be careful not to cut your stitches! Finally, fold the top raw edge over ¼” (0.5 cm) on the wrong side (you may find it helpful to press this fold in with an iron). Insert the lining into your crocheted bag so that the right side of the fabric faces inwards (aka, the part you will see when you open the bag) and use a whipstitch to secure the top edge to the top edge of the crocheted bag.


And there you have it: your very own dice bag! It's a great way to use up leftover bits of yarn, and this pattern is very easy to riff on, so feel free to make your own. If you do, comment below with pictures, or head over to my Ravelry (MeadowlarkLace) or my Instagram (@_meadowlarklace_) and show me there. And until next time, stay crafty my friends!

Sunday, August 25, 2019

Spring of Sewing #2

Hello everyone! I'm sorry I skipped a week: moving has been even more time-intensive than I imagined it would be. I'm still not done, but I have gotten the all-important crafting supplies out of their moving-box prisons, so I'm here for another post! Since I didn't really have time to make anything after all that moving, we'll continue on with an exploration of the things I made for my spring sewing class.

As you may remember, the class was focused on costume making, especially for theatrical productions. Usually, that meant we were making garments to wear, but costumes aren't all shirts and pants. Accessories are just as important! For my second project, I decided that I'd be making an accessory, in the form of a large tote bag.

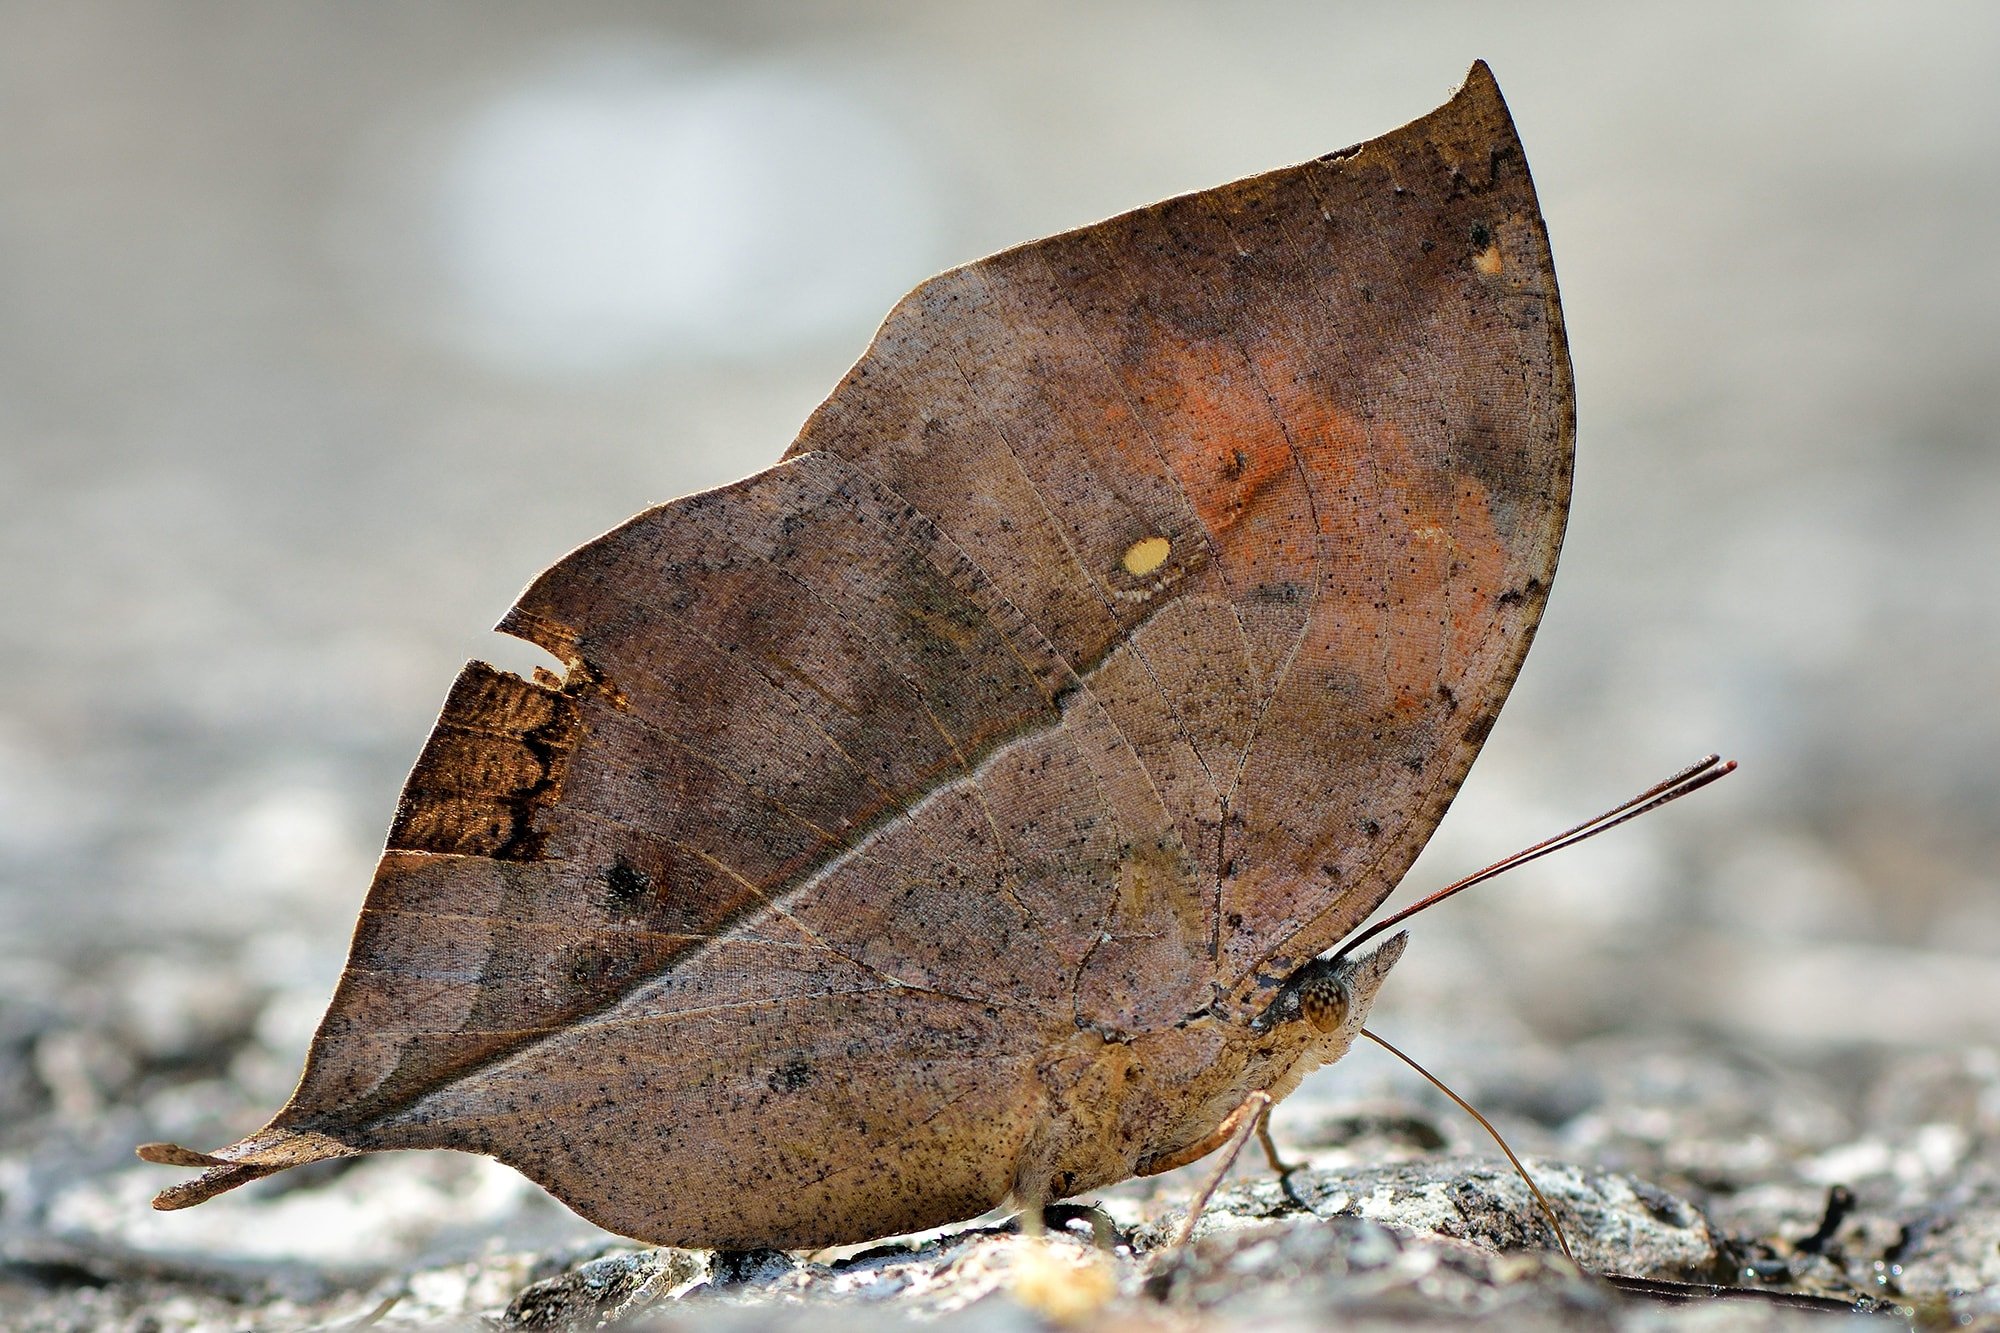
I wasn't about to make just any old tote, though. It was supposed to be part of a theoretical costume, after all, so I had to put some thought into it. I looked around for inspiration (read: dug through the available fabrics) until an idea came to me. I was going to make a tote bag inspired by the look of the leaf mimic butterfly, Kallima inachus.

(Photo from Australian Geographic)

It looks... like a leaf! Shocking, I know. You may be wondering why I would want to design anything based off of this drab insect, but this is only half the story. For you see, while the outside of the butterfly's wings are brown and leafy, the insides are much more striking.

(Photo from Wikipedia)

Now that's a pretty butterfly! I liked the idea of making a bag that was drab on the outside, but had a bright, colorful lining fabric, just like this butterfly's wings. I imagine it could be used by a character who's usually a wallflower, but has some sort of wild hobby or secret.

Unfortunately, I don't have any planning or process pictures for this bag. I used a pattern from a book, but it was borrowed, and I didn't think to write the name down for future reference. Truth be told, the book's pattern wasn't very clear: it had me put pieces together in the wrong order, and even included pieces that were totally unnecessary. I could have drafted out a simple flat-bottom bag pattern myself and saved a headache. 

Back to the design, though, I picked out a number of fabrics in order to achieve the butterfly effect I desired. I chose a flower-camo print canvas for the outside of the bag. It was dull enough to be unassuming, and I liked the added detail of the camouflage shapes being flowers instead of the usual blobs. For the lining fabric, I picked a really nice satiny teal lining. I would have liked to get closed in color to the actual butterfly's wings, but I couldn't find anything that quite fit, and the teal was just too pretty to pass up. I also used the lining fabric to create straps. Next, in order to bring in some of the contrasting yellow-gold color on the butterfly's wings, I found some metallic ribbon trim, which I added to the straps and around the inner edge of the bag. I sewed it all together, and viola!


Don't let this tote's understated outside fool you. Just like the leaf butterfly, it's got a colorful secret inside! The bag was perfectly complete as it was, but as you might have noticed, I decided to pay a little extra homage to the butterfly that inspired it in the form of some cross stitching. It was my first time doing cross stitch on linen instead of canvas, but I think it turned out pretty well regardless!


And there we have project number two of my spring series. Stay tuned for the grand finale, which will hopefully be out on time next week. Until then, stay crafty everyone!

Monday, March 18, 2019

It's In The Bag

Hello again! It's time for another entry in my quest to learn to sew properly.

A while ago, I made new pillow covers for my mom's living room. Around the same time, I also decided to try my hand at another simple sewn item: a project bag. A wise friend and fellow crafter once said that you can never have too many project bags, and I agree. So I decided to make her one!

I wanted something that would be easy to sew and big enough to carry a sweater-sized quantity of yarn, and after a bit of searching I came across this Market Purse tutorial from Fabricworm. Super cute! A quick dive into the fabric bins yielded some nicely patterned blue quilting cottons, and I was ready to start.

In all honesty, I forgot to take in-progress pictures on this one. But really, if you want that then go to the original tutorial: the pictures are plentiful and informative! I found it really easy to follow; I was even able to adjust the size a bit with no problems. Because I was using medium-weight cottons instead of canvas and batting, my project turned out a bit less structured than the original. But I think it's just as charming!


I'm not usually a huge fan of florals, but I like this understated pattern quite a lot. It's more interesting than a solid without looking like a bouquet!


The bag pattern also helpfully comes with a pocket! It's always nice to have a place to put odds and ends like buttons or stitch markers, so that you don't have to go rummaging around when you need them.


And as Mannie is so kind to demonstrate, it's quite spacious! It doesn't look too big because it's soft-sided, but there's a hefty skein of yarn in it in that picture, and you can't even see it. Not only that, but there was room for at least one, maybe two more skeins of a similar size!

Overall, I'd say this was a successful sewing endeavor. I gave it to my friend and she seemed to like it (I know you read these, so feel free to weigh in!), and it gave me the confidence to look for something a little more challenging next. I'll put the rest of my adventures here in due time, so stay tuned! After all, it is about time for me to begin Halloween planning, and sewing opens up a world of possibilities...

Until next time, stay crafty!

Friday, September 28, 2018

A Well-Traveled Cow

Who doesn't want to see the world?

...okay, so I'm not much of a traveler. Vacations are paradoxically stressful! But I love to read and hear about other parts of the world, and I'm happy to say that I'm hosting quite the adventurous guest for a few weeks. Say hello to EDNA!


Yes, that's a cow made out of a sock. Her name is EDNA. This probably requires some explanation.

I've been a fan of the webcomic Stand Still Stay Silent for about four years now, and I've been a part of its fan forum for almost as long. At one point, one of the forum members, ginger, acquired a kit to sew an adorable cow from a sock. A few others suggested that this little cutie could travel to all the far-flung regions of the world our fellow forumites call home, and EDNA was born! She's been to so many countries now! East-coast US is probably not the most exciting of those locales, but it's a good thing she's making a stop with me, because her next destination is a wedding! And she needs something nice to wear, doesn't she?

I'm not accustomed to freehanding a pattern, but there weren't exactly published patterns on Ravelry sized to fit sock cows. So I just started to crochet a tube out of thread, varying the stitches as I saw fit to give the emerging dress a little texture.


I was going for a bit of a 20's flapper-dress style (because who isn't excited for it to be the 20's again? I know I want some of that fashion to be back in style!). So just a little flare at the bottom, with some strategically placed spiraling holes for a little added interest. All that was left to do was to add some straps, and EDNA had a custom-made dress!


She looks awfully good in it, too!


But that's not all. EDNA also has a variety of coins from all the countries she's visited, along with a cute purple bag to hold them. The thing is, she's been so many places that the bag is now too small! I decided to make her a new, bigger container for all her keepsakes:


What's the best storage for a gal on the go? A backpack!


Now EDNA's all decked out and ready for her next adventure! But first, let's do a photoshoot with her in all her new stuff. The trees are just starting to change color and....


...And it's rainy and miserable. Right. Well, an indoor photoshoot is just as good!

Bovine fashion is going to be all the rage next season, you guys. I'm calling it. But this cow here is an adventurer first and foremost, and she's ready to go forth into the world yet again. So long EDNA! I hope to see you again someday!


Sunday, March 4, 2018

Pattern Review: Sensu Fan Market Tote

Time for something a little different! I'd like to share my thoughts on some patterns I've come across, and now seems like as good a time as any, as I've just finished a project. I had a few hundred yards of beige cotton yarn left over from a larger project, and I was on the hunt for something to do with it. The pattern I settled on was the Sensu Fan Market Tote from The Lavender Chair. Here's my version:


Cotton yarn isn't great for hats and scarves since it's not very warm, but it works well for bags and summery items, and the stitch definition you can get with smooth cotton yarn really makes stitches with interesting texture pop. This tote had a great fan-shaped stitch decorating the center, which was perfect for the yarn. It was quick to work up, too, and with the roughly worsted weight yarn I used, the bag is big enough to hold sunscreen, sunglasses, and whatever else you'd need for a day at the beach.

However, there are a few things I didn't like so much. First of all, because the fan stitch in the center is downright lacy, there are big holes that your belongings could fall out of. I'm going to line the bag with some plain white fabric to solve the problem. It'll have the added bonus of putting a nice solid background on the fan stitches, making them pop even more!


(The role of white fabric is being played by a pillow case until I can get to the fabric store for some muslin or other woven cotton)

Secondly, if you followed the link, you'll notice that the original pattern included a strap, and mine clearly does not. Part of the reason for that was that I was running out of yarn, but it was also an intentional choice. The thing about crocheted fabric is that it has quite a bit of stretch to it (much like a knitted fabric). If you put a weight at the end of the fabric -- say the weight of a full tote bag -- the strap is bound to stretch and sag and generally be uncomfortable. The yarn choice helps mitigate some of the stretch (cotton is less elastic than wool), but I wanted something sturdier to put on my shoulder. Since I was already going to sew in a lining, I decided that I would just get a woven strap to sew on as well.

So there you have it. Overall, the Sensu Fan Market Tote is a great little pattern for an intermediate crocheter. It's perfect if you have a few hundred yards of cotton that you've been saving for a rainy day. The flaws in the design might make it impractical to use as-is, but they can be fixed with a few extra supplies from a craft store and a bit of sewing knowledge. Try it out sometime!