Showing posts with label cosplay. Show all posts

Friday, January 29, 2021

Of Corset Is


This is it! The final piece of the costume! We’re nearly there (and not a moment too soon).

The observant might notice that there was no corset in my original costume sketch. To be truthful, that’s because corsets scare me. Not the wearing – I’ve watched enough Costube to understand that a well-fit, moderately laced corset shouldn’t be painful – but the making. This is a complicated garment with lots of curves, and not a lot of room for error. When I planned this costume, I didn’t think I was going to be ready to make one by the deadline.

I still don’t think I’m ready, but I went ahead anyway! Doing is the best way to learn, isn’t it?

The first challenge was finding a pattern to start with, because there was no way I was going to draft one from scratch. We should at least start this process with someone who knew what they were doing! I looked around at different styles of mid-late Victorian corsets and found myself drawn to a particular style of corded corset. These had very few bones: most of the support came from densely corded panels. I did a little digging and found a free Foundations Revealed article (though it seems to have since been removed) examining a corded corset from the 1880s, including a transcribed pattern! I loved the way this corset looked, and while it was a bit small waist-wise for me, the presumed height of the original wearer was close to mine. And I figured that adjusting the width would be easier than adjusting height.

(As it turns out, both are hard. But I’m getting ahead of myself.)

I made two mockups, each with different methods for fitting the pattern to me. For the first, I simply widened each panel by a fixed amount until it fit my hips. The problem, though, was that the bust and hips were way too big, even if I were to pad my figure out. It was downright cartoonish. I tried to size down the bust/hips, but ended up ruining all the nice curves of the panels. Back to the drawing board, then.

For the second mockup, I tried to grade the pieces to fit the major three measurements: bust, waist, and hips. I got lazy this time and didn’t actually cord the panels, opting instead to stiffen some scrap upholstery fabric just to get an idea of the shape.

It was also at this point that I realized something. I was making a corset for a (fictional) fairy, and fairies are hurt or repelled my iron in many stories. And corset busks are made of iron-containing steel.

Realistically, the Dream Fairy wouldn’t be able to wear the corset as I was making it.

The steel busk doesn’t touch the skin while being worn, but it would still present a problem when taking the garment on and off. And I imagine the Dream Fairy sewed her own clothes, in which case she wouldn’t have been able to insert the busk in the first place. I needed another solution.

All the antique corsets I’ve seen have had a busk, but plenty of modern corsets don’t. Sometimes they lace up the front. Sometimes they don’t have a front opening at all. Neither option is particularly accurate to the time period (as far as my very amateur knowledge goes), but hey, I’m making a costume for a fictional person belonging to a fictional species. I can afford not to be perfectly accurate. I liked the clean look of corsets sewn up the front, so I simply replaced the busk with a pair of bones in the second mockup.

…yeah I may have taken half of it apart before I remembered to snap a picture.  But this one fit a lot better. It wasn’t as dramatic in silhouette as I wanted, but I was fast running out of time and needed to move on.

The stiffened upholstery fabric worked surprisingly well as a strength layer. I’m not going to claim it was as good as real coutil (it’s not), but it wasn’t bad. Because of how long it took to finish the mockups (and decide that yes, I really was going to go through with this), I was worried that I wouldn’t be able to buy coutil online in time to actually make my corset, so I made the executive decision to continue upcycling upholstery fabric in my final project. Isn’t that what a fairy would do, after all? She wouldn’t be able to go to the store and buy the perfect fabric, she’d use what she could find.

Anyway, back to the actual making of the thing. I cut panels, sewed coding channels, and inserted cords (which was not easy on the hands, let me tell you!) The cords are actually just some random cotton yarn from my stash. They show through the sheer outer fabric just a little, which surprised me, but I have to say I like the way it draws the eye to the curves of the corded panels.

Next, I sewed together the panels and felled the seams.

Eyelets were another brief point of contention. If I was forgoing the busk because it was steel, I couldn’t very well use steel eyelets. Brass I could justify, but the color wouldn’t work with the red-green-silver palette I had going. Fortunately, sewn eyelets are very much a thing. They might be a little old-fashioned for this style of corset (I’m not sure), but at this point we’re only vaguely gesturing towards historical accuracy so I didn’t care. Sewn eyelets it was.

What else is there to do? Oh right, boning. There are only three pairs of bones in this entire corset: two in the back supporting the eyelets, and one in the front replacing the busk. Historically these were made of whalebone (or steel, but obviously we’re not going that route), but nowadays we prefer to protect the whales, and use synthetic whalebone instead.

Admittedly, I didn’t have any synthetic whalebone. I didn’t even have any big zip-ties. But I did have some plastic folders!

Should I call this my trash corset? It’s made of a lot of stuff that would have wound up in the garbage otherwise. I cut a folder into strips and sandwiched a few together for a sturdier “bone”.


Maybe it’s my MacGyver corset instead. I didn’t actually use any duct tape or bobby pins, but I got close. Should I try to make a corset out of duct tape and bobby pins? Would that even work?

…I was in the middle of something else. Wacky hijinks can wait.

Step number I’ve-lost-count was to insert the bones into their respective channels and bind off the top and bottom edges, finally hiding all the raw edges in the garment. I used some red quilting cotton for the binding, and because I didn’t have a long enough piece to go along the whole edge, I pieced together two different patterns and made a design out of it. I think that bit worked rather nicely.

Now all the sewing’s done, and the fun part begins. Whenever you have boning, you need to do something to secure the ends of the bones so they don’t wear through the binding. Often, this was also an opportunity to add a bit of decoration to the corset. Yes, I’m talking about flossing! I found photos on the corset-making livejournal showing a flossing sampler, which was all the inspiration I needed. I did some functional flossing on the bones, of course, but I also had fun flossing the corded panels. These don’t serve a structural purpose; they just look pretty. Really pretty.


Does anyone else ever get a little nervous when using abstract designs? I’m always worried that I’ll accidentally copy a design with a symbolic meaning that I have no knowledge of. I hope these come off as regular little floral motifs.

By now the corset is perfectly functional, but there’s still something missing. What could it be…

Ah yes. There’s no lace. That won’t do.

I dove once again into my favorite archive.org resources and found yet another lovely bit of crocheted lace, this time from Crochet series No. 1-5 (link here). Crocheted lace works up much faster than any other type of lace I’ve yet to try, so it wasn’t long before I was blocking, pinning, and sewing it onto the form. I made a (very long) four-stranded round braid to act as the lacing, gave everything one last good press, and voila! A real-life corset!

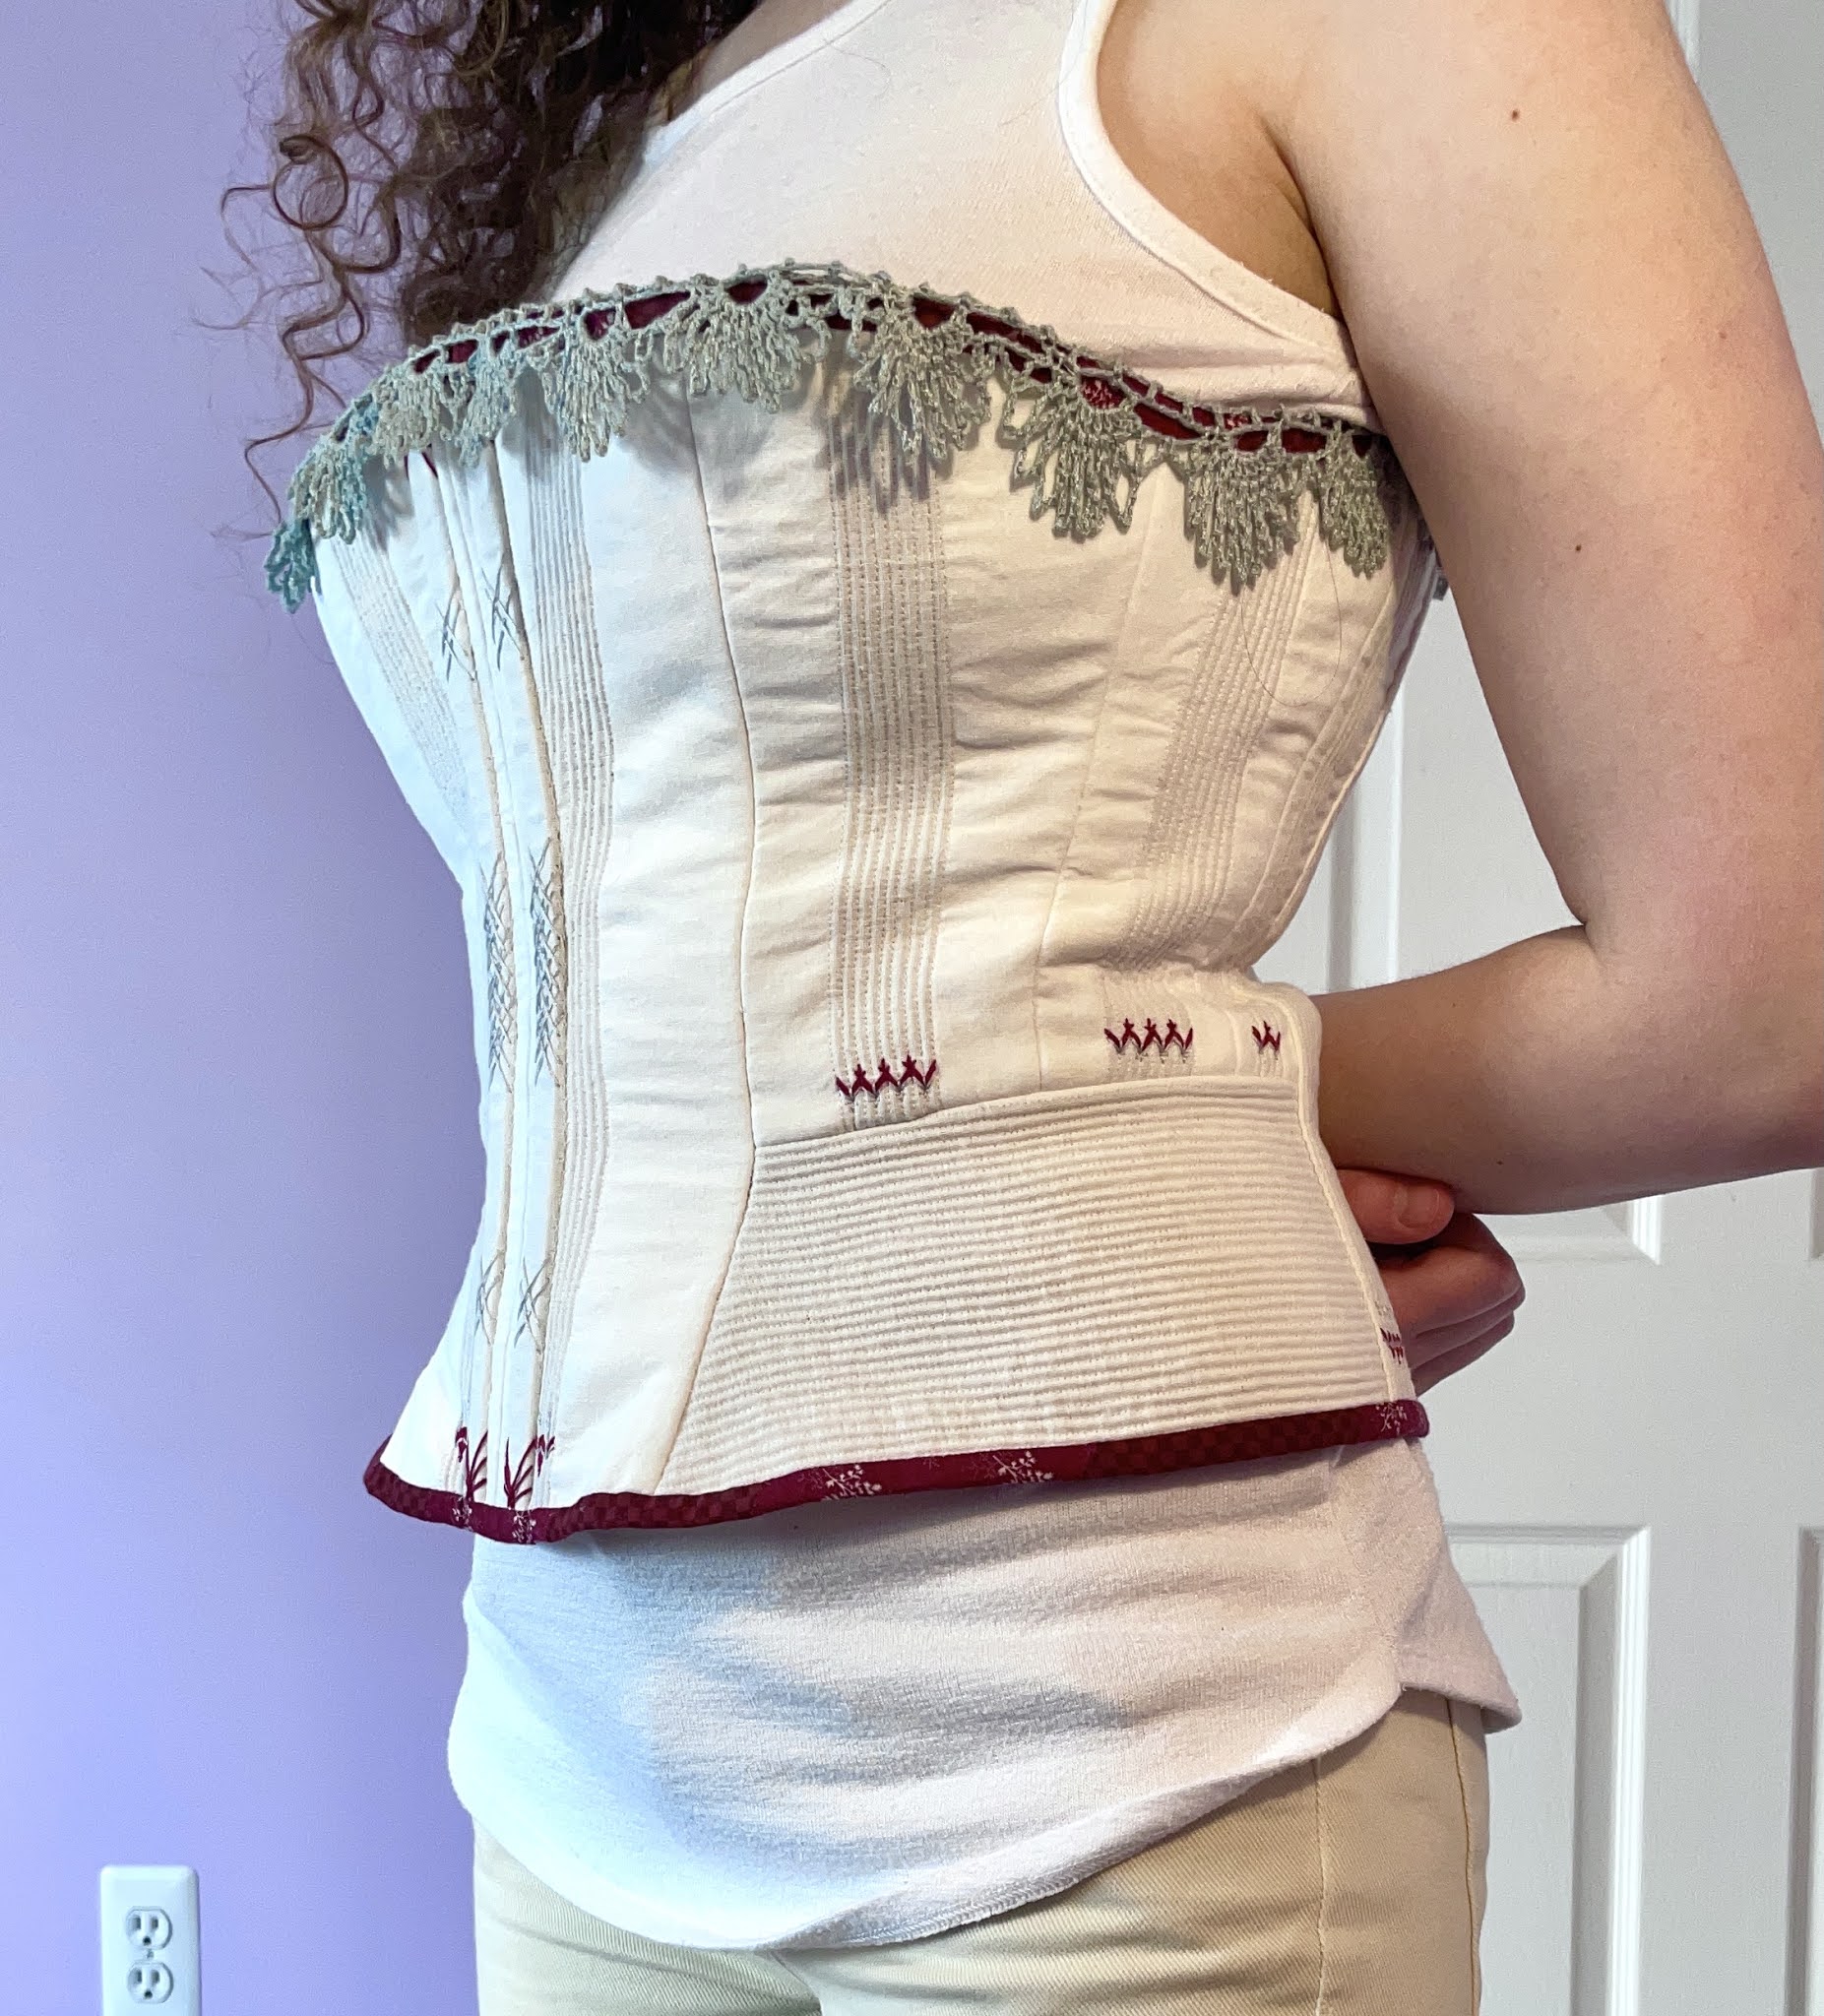
 

Well, it’s certainly a corset. I won’t say I’m entirely pleased with it. Despite my attempts at careful measuring, it’s a bit too big on me (would’ve been better if it was too small, but alas). I don’t think the silhouette is quite right for the era. There are some fit issues, especially in the back, that I was never able to get rid of.

But then, there are positives too. It fits me well enough to be comfortable and supportive. My experiment removing the busk worked pretty well. The embroidery and lace are pretty. For my first corset, and in fact my first fitted garment ever, I’d say it’s a good effort.

I won’t lie, I’m nervous to enter this into a competition. I don’t like to be judged on work that is so imperfect, and I know the judges will find even more wrong than I can see right now. But sharing and allowing for that vulnerability is how we grow. To do anything else is stagnation for the sake of security.

As scared as I am, I’m going to show this. I accept its flaws, but I’m proud of the things I did well. And next time, I’ll do even better.

Saturday, August 29, 2020

Stockings for Days (or months, as the case may be)

Do you ever have a project that’s just... a mistake? Not in the sense that you made a lot errors while making it or it turned out poorly, but just that it was a bad idea in the first place?


Yeah, I may have a penchant for those types of projects, and this pair of stockings is one of them. You see, I’ve been working on my historically inspired Dream Fairy costume, and I wanted a nice set of stockings to go with the chemise. Rather than buy a modern pattern simply based on Victorian styles, I decided to go straight to the source with an 1884 book titled Knitting: How to Knit and What to Knit. If you’ve got any interest in historical knitting whatsoever, I highly recommend giving this book a read. Its instructions are pretty detailed, and they’ll get you used to the antiquated terminology that has lapsed out of knitting vernacular in the ensuing 140 years.


I wanted to use a stocking pattern from the Victorian era because I love all the little details that speak to the period. I’ve never seen a “seam stitch” in modern sock knitting, and we don’t use the purl 2 together decrease on the right side of the stockinette nearly as often as the Victorians did (at least, judging from this book), but they all make subtle changes to the way the finished product looks, and I was determined to make it look good!


But, like I said, this project was a mistake, and its nature first became apparent when I had to buy yarn. The book doesn’t specify what weight yarn to use (at least, not in a way that I understood) but just judging by the stitches I had to cast on for the leg, it had to be lace weight. It should have struck me then that if I was going to be making thigh-length stockings in lace weight yarn, that this was going to be a long-haul of a project. Did I want to knit that much stockinette?


The answer doesn’t matter, because I didn’t ask myself that question. I bought two skeins of lace in a lovely charcoal gray and set to work.


The second hurdle came after I was actually smart for once and knitted/blocked a proper gauge swatch. I knew that the cast-on edge would have to fit around my lower thigh, minus a bit of negative ease. But with the gauge I was getting, even on my smallest needles, the sock as written would be waaaaaaaaaaay too big. Like, “I could probably fit both my legs into the sock” too big. But I had already bought the yarn, and I didn’t want to buy size 000000 needles for this project, so I did some math to adjust stitch counts. It meant I would have to record everything meticulously if I wanted the socks to match, but that was fine, right? Tentatively, I cast on and began the first stocking’s lace edging, making sure to check the fit periodically.


The book I used had an option for a plain edged stocking, but come on. We all know I was going to go for the lace. I chose the No. 24 edging and happily plugged away at it. While there weren’t any charts, the written instructions were thorough and not too different from what I’d see in a modern pattern, so they were fairly easy to follow. I was having fun! And then... then came the stockinette.


When I finished my lace sweater a while back, I encouraged you all to choose patterns that would be fun to knit, and avoid anything you’d find boring (even if you liked the finished look). Well, I did not take my own advice on this one, friends. Plain stockinette is my knitting kryptonite. And because I was trying to cover my legs from mid-thigh down, that meant a lot of stockinette! I kid you not, there were 100 rows (with 112 stitches per row) to knit before I even started the calf decreases! Here, look at my notes if you want proof.


(Meticulous notes are meticulous. But if socks (or sleeves, or mittens) are going to match, I want them to match exactly, and that means marking out every row)


The silver lining to knitting 18 inches of leg is that once you get to the ankle, you’re already in the home stretch. The book offers a number of different options for the heel, and I went with the first because it’s by far the most familiar. Anyone who’s knit their fair share of socks would recognize the technique immediately: yes it’s the good ol’ heel flap!


As far as I can tell, this method of heel knitting hasn’t actually changed much since the 1880’s, so it was a relative breeze. Then it was back to the dreaded stockinette, but only for a few inches before reaching the toe. Again, there were a few options for this section, and I chose No. 14 just because I liked it. It seems that the Victorians preferred to work their toes in a spiral decrease pattern, rather than on either side of the foot like we usually do today. Another interesting historical detail to ponder as I admired my beautiful finished stocking. I was finally done!


...Oh, right. The other stocking. Back to work I guess!


In all seriousness, I am glad that I took detailed notes while making the first stocking. It saved me the headache of wondering whether or not these two socks would even look like a matched set in the end. And knowing exactly how much more I had to knit staved off the dreaded second sock syndrome.


Like I said at the start, the reason these stockings were a mistake wasn’t because they turned out poorly. I really love the way they came out, and aside from the costume I’m definitely going to be wearing them in the wintertime with my taller boots. No, they were a mistake because they took two dedicated months of knitting, and it wasn’t knitting that I particularly enjoyed. They felt more like a chore to me than something I was doing out of passion, and that’s no good when you’re a hobbyist. I’m glad these are done with, and I think I’m taking a break from knitting for a little while to recover. Fortunately, the rest of the Dream Fairy ensemble still needs making, and there’s plenty of sewing and tatting to spend my time on. Perhaps next it’s time to tackle the chemise...


Stay safe, my friends. Until next time!


Saturday, May 30, 2020

Dreaming of a New Project

Hello, friends! I hope the weather has been as lovely in your corner of the world as it has been for me these past few weeks, because it really is nice outside. I’m savoring all that spring has to offer before the heat of summer truly kicks in.


That’s not what I came to talk about today though. No, I realized a while ago that I’ve gone over six months without having a big costume project to work on. Six months! Half a year! Do you know what that is?


Unacceptable, that’s what! So I’ve set out to fix the situation by entering the annual Foundations Revealed competition. For those of you who don’t know, Foundations Revealed is a membership-based resource for sewing, especially historical sewing. I’m not personally a member (grad student budget, anyone?), but I happily gobble up their free resources, and I’d love to be a member someday. Each year, their competition has a theme, and this year’s is characters from literature (poems, novels, short stories, etc.). No character came immediately to mind, so I went searching and happened upon a poem by Thomas Hood titled The Dream Fairy. In it, the eponymous fairy comes down from the moon to grant dreams to good children. It’s a cute poem, and it gave me a similarly cute idea for a costume.


(As it turns out, tracing over a photograph is the fastest way to get realistic proportions for your design sketch. I have no shame.)


Art skills aside, let me take you on a tour of the plan. I’ve been itching to try my hand at some historical sewing for a while now, so the costume is based on late 19th century undergarments. Dreams are something of a transitional state, between sleep and wakefulness, so I want to capture that feeling in a “transitional” type of dress, as if the fairy were caught changing clothes. Plus, undergarments are typically simple and easy to make: an ideal first project! The specific pieces I’m going to make are a chemise, drawers, and stockings. I’ll trim everything with handmade lace (of course) and embroidery.

Then there’s the wings. Every fairy needs a pair, and what better wings for a fairy who comes down from the moon than those of a luna moth? I mean, just look at these beautiful bugs!


This is actually one of my own photos: I was lucky enough to spot a luna moth a few years back and wasted no opportunity in photographing it. They’re fairly rare to spot since they only live as adults for a short while. The fairy’s wings are modeled directly after the luna moth, both in shape and color. I’m going to make the frame out of wire and fill it in with crocheted mesh, in the style of Irish lace. In the interest of fantasy, I’d also like to add some floral motifs, as both the wing-spots and the top edge of the upper wings. Of course, I’ll need a harness of some sort to attach them to, and the chemise will need to be able to accommodate them. I expect the wings will be the most complicated part of the costume, and might require a few prototypes, but they also have the potential to be the most eye-catching component as well.


To be honest, I’m pretty nervous to enter this competition. I saw the entries for the previous years, and everything is amazing, even down to the absolute beginner level. I’m not entering to win, but I’d like to make something to be proud of. That being said, all we can do is our own personal best, right? I’m excited to start this project, and I’m excited to share it with you all! So stay tuned to hear more about it, and until next time, stay crafty!


Tuesday, November 19, 2019

Finished Taako Cosplay

And now, folks, the moment you've all been waiting for! For once in my life, I've actually taken photos of a finished cosplay and posted them in a reasonable amount of time. So without further ado, I present to you: Taako!


Unfortunately, some of the images are a little grainy. It's difficult to take good photos of yourself when all you have is a phone camera and a bunch of textbooks playing the role of tripod. What can I say? If I waited for a better camera and an actual photographer, you all would be kept in suspense until next Halloween!


The perceptive among you might notice that I never made the corset belt that was in my original concept design. This wasn't an oversight: I actually did make a prototype belt, and it worked pretty well. However, when trying it on, I realized something: corset belts really accentuate your curves. Taako's a male elf and I'm a female human, so that detail wasn't really working in my favor, so I ended up scrapping it. Not that I went to huge lengths to crossplay in the first place... I basically just put on a sports bra...


Have I mentioned that Taako is super fun to cosplay? He's just so over the top! That's the opposite of how I act in real life, so it's really fun to pretend!


And that concludes Halloween 2019! Overall, I'd say I'm happy with it! If I had more time, there are some things I would have changed or added (like modifying the umbrella I bought, or coming up with a more interesting hairstyle), but those are mostly nitpicks. The project also taught me a lot of new skills, especially working with foam. Maybe for my next cosplay, I'll experiment more with foam and prosthetics!

With that being said, I think I'm going to wait a while before I start a new cosplay. As fun as they are, they're a big crafting commitment, and I'd like to do some smaller projects to recharge. Hopefully, that means my schedule will become a bit more predictable again. No promises just yet, but stay tuned and we shall see. And until next time, stay crafty!

Sunday, November 17, 2019

Brace Yourself

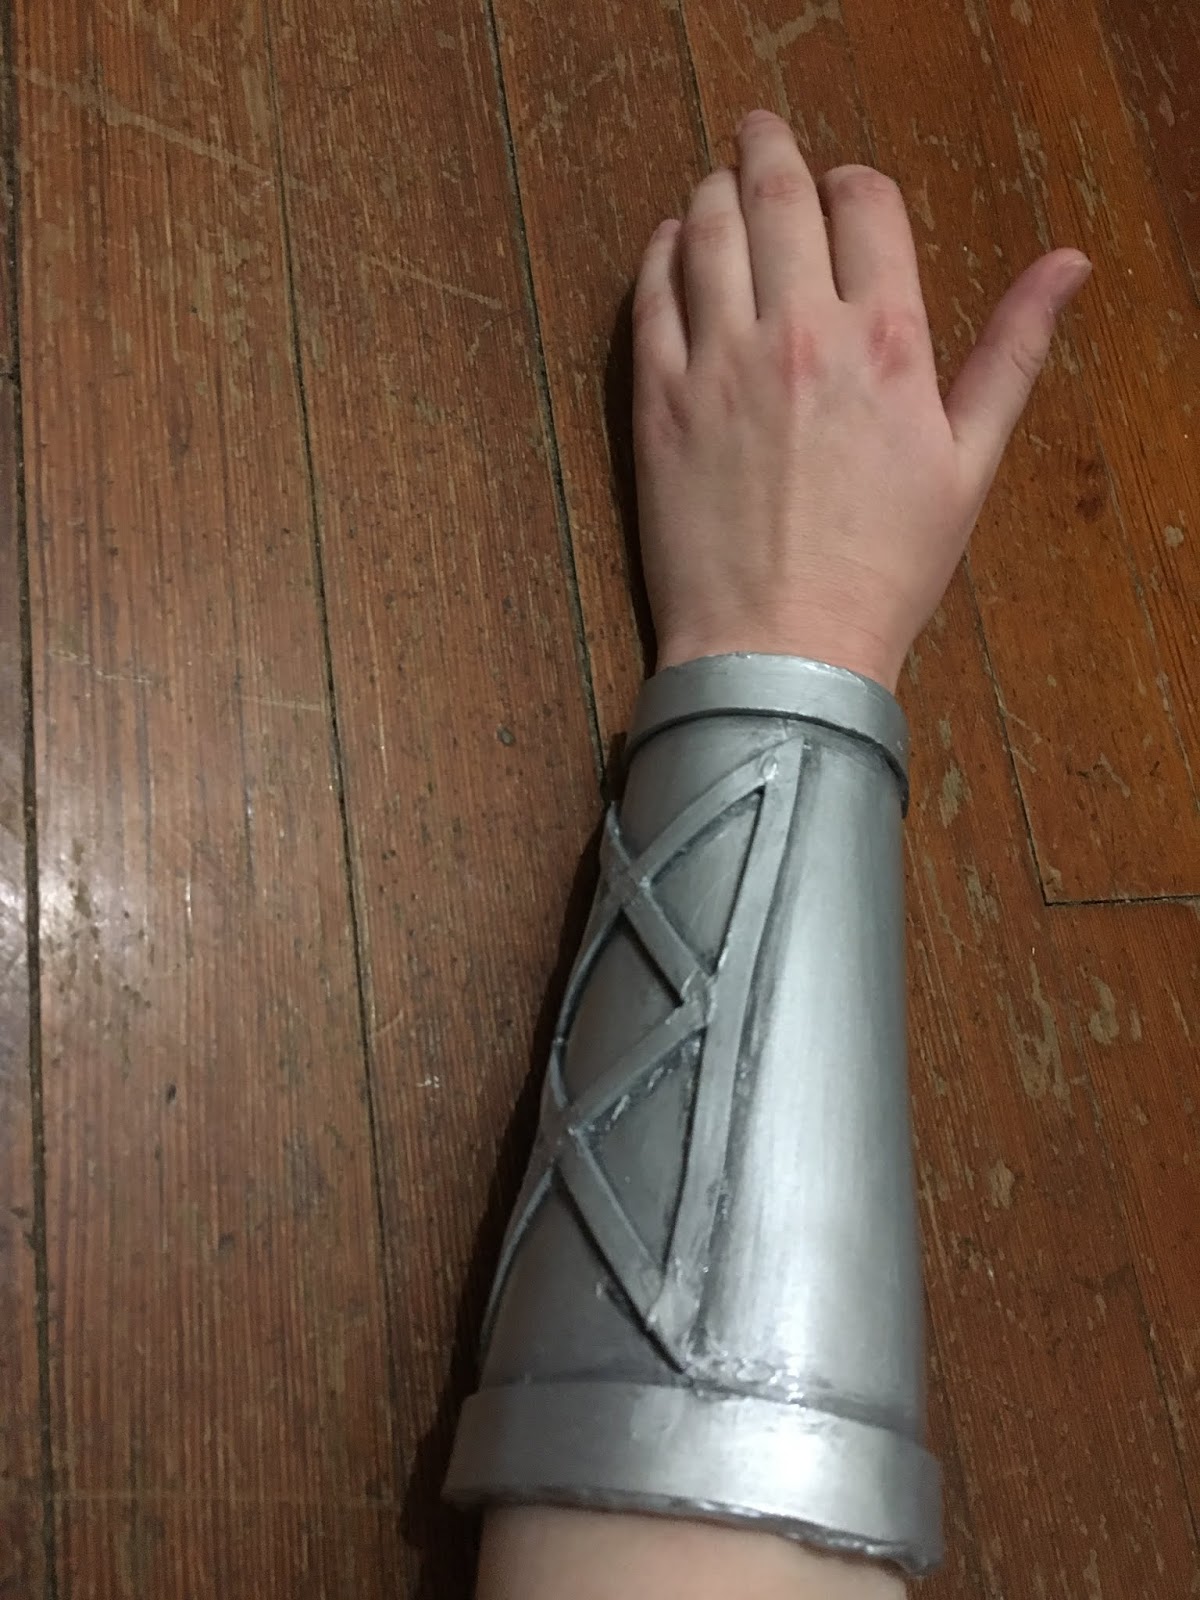
I'm back again with the final DIY piece of the Taako puzzle. Much like the hat, this accessory is one of the few things we know Taako wears in canon: it's the Bureau of Balance bracer! All of the members of the Bureau are issued one, and since they don't exactly come off, we can safely assume that Taako, Magnus, and Merle are all wearing theirs throughout the story. I have to imagine that Taako wasn't thrilled to have to restyle his wardrobe around a permanent accessory, but what else are you gonna do?

Enough chatter, let's get right to it! For this project, I decided to go with foam. It's a common cosplay substitute for armor and the like, since it can easily be painted to resemble metals without carrying all the weight and rigidity of actual armor.

Looking back, it seems I forgot to take pictures for the bracer, so this post is going to be a little light on process photos. There are plenty of cosplay armor tutorials out there, though, so if you're looking for something instructive you should be able to find it elsewhere.

A forearm is essentially just a tapered cylinder, so it was simple enough to measure and cut a corresponding shape out of craft foam. I put two layers of foam together to give a sturdier bracer, making sure to glue them together while they were curved around my arm so that they would hold their shape better. In order to secure the bracer, I used hot glue to attach velcro to the inside.


Then it was onto the detailing. I used scrap strips of foam to create a raised rim around the top and bottom openings, and then set to making the BoB symbol on the front of the bracer. Originally, I figured I would draw the insignia on in hot glue in order to get a sort of embossed effect. That didn't work out too well.


As you can see, the hot glue lines were far from the smooth embossed look I had intended. As it turns out, it's very difficult to get a perfectly even, straight hot glue line! Painting the bracer only made it look worse, so I tore off the hot glue and went back to the drawing board.

It occurred to me that the rim details I made out of foam had actually turned out quite nice, so I decided to try a similar tactic for the symbol. It was fiddly to cut and glue so many thin strips of foam, but in the end, I was much more satisfied with the result.


I covered the whole thing in a few coats of silver paint, and then dry-brushed some black paint into the crevices for a tarnished-metal feel. Then, a coat or two of glossy mod podge sealed everything in and brought out the shine.


There are definitely things I would do differently if I were to make this again, but overall I'm happy with it. It's comfortable enough to wear for a day out cosplaying, and durable enough to withstand it. It won't fool anyone into thinking it's actual metal, but some better paint and thicker foam might be more convincing. And most importantly, it reminded me not to give up if something doesn't work the first time. None of us are perfect crafters, and sometimes we need to try multiple techniques before we find the one that works.

And with that, I've finished all the DIY aspects of this costume. Tune in soon for the reveal of the full thing! (I promise that this time, I'll take pictures of the cosplay sometime this year!) Until then, though, stay crafty!

I'm All (Elf) Ears

Hello again, crafters! In my endeavor to dress up as the entirety of the TAZ cast, I've been working on completing my Taako cosplay. Or, well. It's already finished, I wore it for Halloween and stuff. But I haven't finished writing about it here, so for all intents and purposes, it's not done yet. I've made quite a few things in order to embody this elf wizard, but I'm missing some key components. He's an elf wizard, so I need elf ears!
I've never dipped my proverbial toe into the world of prosthetics, so the first order of business was to do some research. How are they made? Are there multiple techniques? And can I do any of them at home, on a grad student budget?
Well, most of your professional grade prosthetics are made from latex, molded to the shape of the wearer's ears and kept on with special adhesives and whatnot. This is definitely the most natural looking option, though due to a combination of the skills required to make them and the supplies I'd need, it was out of the question for me. I also saw lots of stylized, wire ears. These aren't meant to look realistic at all, just pretty. That was more in my skillset, since I have some experience with wirework from jewelry, but it wasn't quite the look I wanted. So I turned to the third option: clip-ons.
This class of ear prosthetics differs from the professional variety in that they're not meant to fit perfectly over the wearer's ear, leaving no seam. Instead, they clip over the ear like a cuff, or onto the hair, and are worn that way. They might be made of silicone, latex, even fabric or cardboard. Because they don't require precise fitting, I felt like this type of ear was doable. I planned to wear a wig that would hide the clips (and my actual ears) anyway, so a bit of disconnect wasn't an issue. After fiddling around with techniques for a bit, I came up with an inexpensive, easy pair of ears to DIY for my costume!
Because this is a construction method I came up with myself (only very loosely inspired by things I saw online), I'll do my best to provide a tutorial that you can follow along with yourself. Assuming you already have a hot glue gun and some spare paint lying around, you can make a few pairs of these ears in a few days for under $4. So go forth, and make yourself some ears!

Speaking of supplies, here's what you'll need:

  • One 12" x 18" sheet of craft foam, preferably in something close to your skin tone
  • Acrylic paint, in your skin tone
  • Two pairs of clip-on earring backs (note: it might be possible to use regular post earring backs if you have piercings in the right places, but as I don't have pierced ears, I couldn't test that out)
  • Hot glue
  • Regular craft glue
  • Scissors
First, in order to make your ears, you need to know what shape your ears will be. Take a piece of paper and draw out your ideal ear, making sure that the base of the ear (the part closest to your head) is just about as tall as your actual ear. This project works best with the large, exaggerated ears. In order to get a more realistic shape, you can plan out a few layers of depth in your drawing. Ears have an outer rim that give them a cupped shape, and then they funnel in towards the head. In my drawing below, I've labeled the three layers that I'm going to use with numbers. Each layer will have its own piece of foam.


Now, use your paper pattern to cut out your foam. If you want two ears, don't forget to cut each layer out twice! Here you can see the three layers I've made, showing the differences in depth. The outer rim is most raised, and the inner part near the head is the deepest. Notice also that I put a slight curve in the foam at the base of the ear. This is to match the curve of my head, when I put the fake ear behind my real ear (like where you hand goes when you cup your ear to hear better). The better your foam ear fits into this groove, the better it will stay on overall.


Now, glue your pieces together and let them dry completely. I used regular craft glue for this, but you could try hot glue if you're in a hurry. Just make sure it doesn't ooze out of the seams too much.


All right, it's looking like an ear! If you want things to look a little less boxy, you can take a pair of scissors and round out the edges of the ears. 

Now, here comes the hard part. In order to get these things to stay on, we're going to use clip-on earring backs, two for each ear. The first will clip onto the earlobe, in the same place as most vanilla ear piercings are. The second will clip to the very top of the ear (this is why it's important that your foam ear is the same height as your actual ear). Put a dab of hot glue onto the back of the foam ear and place your earring backs and the bottom and top of the ear, orienting them so that they will clip over both the foam ear and your actual ear, sandwiching them between the two pars of the earring. Look at the pictures for help. Once the glue is dry, check to see that the earring backs are actually in the right position to clip onto your ear. It may take several tries. Fortunately, you can easily pop the earring backs out of the glue, re-melt it with the nozzle of the glue gun, and try again. When you're satisfied with the positioning, put another dab of hot glue onto the earring back to keep it from coming off. (Please ignore that I already painted these, you're going to want to save the painting until the end. I just forgot to photograph the next few steps before painting.)

(This view is of the back of the ear. Note the hot glue keeping the earring back in place)


(And here's a front view. The earring back clips over the edge of the ear.)

(When worn, the earring backs clip over both the foam ear and your real ear, pinning the two together. If you spend time positioning them right, this can be quite a sturdy arrangement!)

The ears are now perfectly functional. But if you're like me, you couldn't find any foam that really matched your skin tone. Fortunately, foam is paintable! Grab one or more acrylic paints that match your skin, mix them together if needed, and give your foam ears a few coats of paint! Since the foam is porous, you'll need multiple coats: 3 should do the trick. Then let them dry completely (unless you want paint in your hair), and you're done!


I have to say, I'm pretty proud of these. For a first time prosthetic-maker, I think they turned out well! They're not the most comfortable things in the world to wear (if you've ever worn clip-on earrings, you know the feeling), and they're not quite sturdy enough to survive something like a LARP session, but they certainly stay on well enough to walk around a convention! And if you have a wig or long hair to hide the hardware, they actually look pretty convincing from a distance! I'm seriously considering getting another sheet of foam and making myself a whole set of wacky-shaped ears. Who knows, maybe I'll use them for next Halloween!

With this project in the bag, I inch ever closer to the completing of the Taako look. If you're interested in seeing more of that, stay tuned, and stay crafty!