Saturday, May 30, 2020

Dreaming of a New Project

Hello, friends! I hope the weather has been as lovely in your corner of the world as it has been for me these past few weeks, because it really is nice outside. I’m savoring all that spring has to offer before the heat of summer truly kicks in.


That’s not what I came to talk about today though. No, I realized a while ago that I’ve gone over six months without having a big costume project to work on. Six months! Half a year! Do you know what that is?


Unacceptable, that’s what! So I’ve set out to fix the situation by entering the annual Foundations Revealed competition. For those of you who don’t know, Foundations Revealed is a membership-based resource for sewing, especially historical sewing. I’m not personally a member (grad student budget, anyone?), but I happily gobble up their free resources, and I’d love to be a member someday. Each year, their competition has a theme, and this year’s is characters from literature (poems, novels, short stories, etc.). No character came immediately to mind, so I went searching and happened upon a poem by Thomas Hood titled The Dream Fairy. In it, the eponymous fairy comes down from the moon to grant dreams to good children. It’s a cute poem, and it gave me a similarly cute idea for a costume.


(As it turns out, tracing over a photograph is the fastest way to get realistic proportions for your design sketch. I have no shame.)


Art skills aside, let me take you on a tour of the plan. I’ve been itching to try my hand at some historical sewing for a while now, so the costume is based on late 19th century undergarments. Dreams are something of a transitional state, between sleep and wakefulness, so I want to capture that feeling in a “transitional” type of dress, as if the fairy were caught changing clothes. Plus, undergarments are typically simple and easy to make: an ideal first project! The specific pieces I’m going to make are a chemise, drawers, and stockings. I’ll trim everything with handmade lace (of course) and embroidery.

Then there’s the wings. Every fairy needs a pair, and what better wings for a fairy who comes down from the moon than those of a luna moth? I mean, just look at these beautiful bugs!


This is actually one of my own photos: I was lucky enough to spot a luna moth a few years back and wasted no opportunity in photographing it. They’re fairly rare to spot since they only live as adults for a short while. The fairy’s wings are modeled directly after the luna moth, both in shape and color. I’m going to make the frame out of wire and fill it in with crocheted mesh, in the style of Irish lace. In the interest of fantasy, I’d also like to add some floral motifs, as both the wing-spots and the top edge of the upper wings. Of course, I’ll need a harness of some sort to attach them to, and the chemise will need to be able to accommodate them. I expect the wings will be the most complicated part of the costume, and might require a few prototypes, but they also have the potential to be the most eye-catching component as well.


To be honest, I’m pretty nervous to enter this competition. I saw the entries for the previous years, and everything is amazing, even down to the absolute beginner level. I’m not entering to win, but I’d like to make something to be proud of. That being said, all we can do is our own personal best, right? I’m excited to start this project, and I’m excited to share it with you all! So stay tuned to hear more about it, and until next time, stay crafty!


Monday, May 11, 2020

Sweater Thoughts

Hello everyone! I hope you’re all safe and well as this pandemic continues to keep us trapped indoors. I personally have been taking my mind off things by finishing some of my old projects-in-progress. My many... many... projects...

Look, I’m very good at starting things. Finishing them though? Not so much!

As luck would have it though, quarantine was the kick in the pants I needed to complete one of my bigger projects that had been languishing half-done for months now: my very first sweater! Yes, about a year ago I embarked on one of the seminal projects for a budding knitter: the pullover sweater. The pattern is Apres Surf Hoodie by Connie Chang Chinchio for those interested. It was a lot of work, especially since I’m used to knitting accessories and smaller projects, but it was so worth it! Half the reason I made this post was just to show off how pretty it is.


The other half of why I made this post, though, is because I have Thoughts. Thoughts about first sweaters, what works, and what doesn’t. I wanted to write them down so that if any of you are considering embarking on your own first sweater journey, you’ll have a little more wisdom than I did. Here’s what I learned:

1. Pick a pattern that you love.

You’re new to sweaters. You don’t know about set in sleeves, or circular yokes, or waist shaping, and maybe that’s a bit intimidating. Maybe you’ve decided that because it’s your first time, you’re going to find the most basic sweater pattern out there. It seems like a good plan, right? Well... if a super-basic sweater sounds fun to you, then go ahead. But if not, you’re going to be working on a boring project for a long time, and that won't be very enjoyable. Better to choose a pattern that you love, and make it worth the time and effort of making it!

2. Pick a well-written pattern.

Thought Number One comes with one caveat: if the pattern that you love is poorly written, then maybe it’s one to avoid. When you’re an experienced knitter of sweaters (or socks, or mittens, or what-have-you), you may be able to interpret a bad pattern and see what should be done. You can catch errors in the text and figure out what the pattern writer really meant for you to do. But as a beginner, you almost certainly don’t have this skill (yet!). Trying to use a poorly written pattern will just end in unnecessary confusion and suffering. Pay attention to online reviews of the patterns you’re interested in. If you have a favorite pattern maker or distributor and find their patterns readable, then they’re likely a safe bet. I picked my sweater pattern out of an Interweave Knits book, for example, because I’ve always had good experiences with Interweave patterns.

3. Pick a yarn that you love.

You’re going to be working on this project for a long time, and then you’re going to be wearing it. Why choose a yarn that you don’t like to touch? Nicer yarn may be more expensive, but isn’t an expensive sweater you wear all the time better than a cheap one that you can’t stand at all? This goes also for the care instructions for the yarn. If you despise handwashing your garments, don’t use a 100% non-superwash wool. Your time and effort is worth spending on a yarn that will make you happy to wear over and over again.

4. Read the instructions all the way through before you start.

This is advice for any first-time project. It’s good to know what you’re getting yourself into, plain and simple. Reading through your pattern will also let you know if it uses any techniques you’re unfamiliar with, so you can try them out with some test yarn. For me, this was the i-cord bind off, and I’m really glad I practiced doing it first!

5. Make a gauge swatch.

Everyone and their mother tells you to make a gauge swatch, and I’m no exception. With any sort of sized garment, it’s worth it to take the time so that you know you’re actually making the right size!

6. Put in lifelines

If you don’t know what a lifeline is, I suggest you look it up because they’re really useful. They make it so much easier to rip back a piece of knitting if you make a big mistake. I put a lifeline in whenever I was about to start a new type of shaping or joining, and it gave me exactly the confidence I needed to just do it without worrying what would happen if I messed up. 

7. Take a break when the project becomes a chore.

Maybe it’s just me, but I tend to experience project fatigue on longer knits. After a certain amount of time, working on them stops being fun, and that’s when I know I need a break. I’ll work on a different project, or try a different craft, or even (gasp!) do something non-crafty for a while. If you knit as a hobby, then it should be an enjoyable thing: don’t force yourself to work on a project just because it’s there! I promise, it will make the experience better, even if it takes longer to complete.


And there you have it! If you’re thinking of starting a sweater, or any other big complicated project, I hope you find this helpful. And I hope you go ahead and take the leap! Bigger projects are a challenge, but they’re so satisfying when you weave in that final end!

Stay safe, everyone, and until next time, stay crafty!

Thursday, April 2, 2020

Butterfly Away

Hey everyone. I hope you all are doing well, given the unpleasant situation we find ourselves in. Pandemic is a scary thing that seemed like it was tucked away into the history books, but I suppose we were mistaken about that. I won’t belabor the point here, but I just want to encourage you to practice good hygiene and social distancing, and to listen to what the experts in virology, epidemiology, and infectious disease have to say. And during this strange time, I hope you will join me in taking comfort in the small joys of crafting and creating something beautiful.

I hardly need an incentive to start new crafts, but being stuck at home, untempted by all the new supplies that I could buy at the store, makes me want to follow through with some unfinished projects that have been lying dormant for months. To that end, I began with one of my newer craft skills: linocut.

Some of you may remember that I made my first foray into the world of linoleum block printing during New Years 2019, where I made a design for some festive new years cards. Shortly after that, I bought another larger block... and couldn’t figure out what to do with it. 5 x 7” is a lot of space when you only have one color to work with, and I wanted a design that would be useful for longer than a single holiday. There were plenty of beautiful lino prints online to see, but I didn’t want to simply copy someone else’s work, either. It wasn’t until early fall that I hit upon a topic I really liked: butterflies. Their large wings and dramatic patterns would make a perfect candidate for a print, I thought. So I set to work.

I’m not much of an artist when it comes to realistic sketches, so I turned to the internet to help me find a good image to use. I wanted this butterfly to be realistic in terms of proportion and patterning. I came across the Smithsonian National Museum of Natural History’s online collection of pinned insects, which includes detailed photos of a wide variety of butterflies. The best butterfly for this one-block project would have just a two colors on its wings (the ink color and the paper color), so I scrolled down the list and settled on the meadow fritillary. It’s a bit less mainstream than, say, a monarch, but just as beautiful.


With that, I printed out the image in a size compatible with my linoleum block and got to tracing! Tracing this image wasn’t quite so simple as following every line I saw: I had to be conscious of which areas would be the ink color, and which would be removed to show the background color. Unlike in real life, there are no subtle gradients in a linocut like this. Still, it was much easier than trying to draw such a detailed butterfly freehand! After tracing, I got an image that looked pretty similar to the original butterfly, only simplified.


Then it was time to transfer the image to the linoleum. Linoleum takes pencil marks well, so I used the old trick of flipping the pencil drawing over on the linoleum and rubbing a spoon on the back of the paper to transfer the marks. Then I darkened the marks on the linoleum itself with some pencil, just to make sure I’d be able to see well while cutting.


If you’ve never done it before, cutting linoleum is kind of weird. It’s not like wood because it doesn’t really have a grain, but it’s not quite as soft and pliable as soap or wax. Honestly the closest thing I can think of is those hard pink school erasers. I spent a lot of time digging my thumbnail into those things in order to make designs. Then, I’d take my pencil and slowly work a hole into the center of the rubber, all while completely ignoring whatever was going on in the class!

Anyway, back to linoleum. My first few prints didn’t turn out so great. It seems that the bigger the block, the harder it is to get a good clean print. I made the mistake of putting waaaaay too much ink on the block, and everything turned out blobby and undefined.


But practice and learning from your mistakes does wonders! It took a lot of tries, but eventually I got to a point where the prints were turning out pretty nicely.


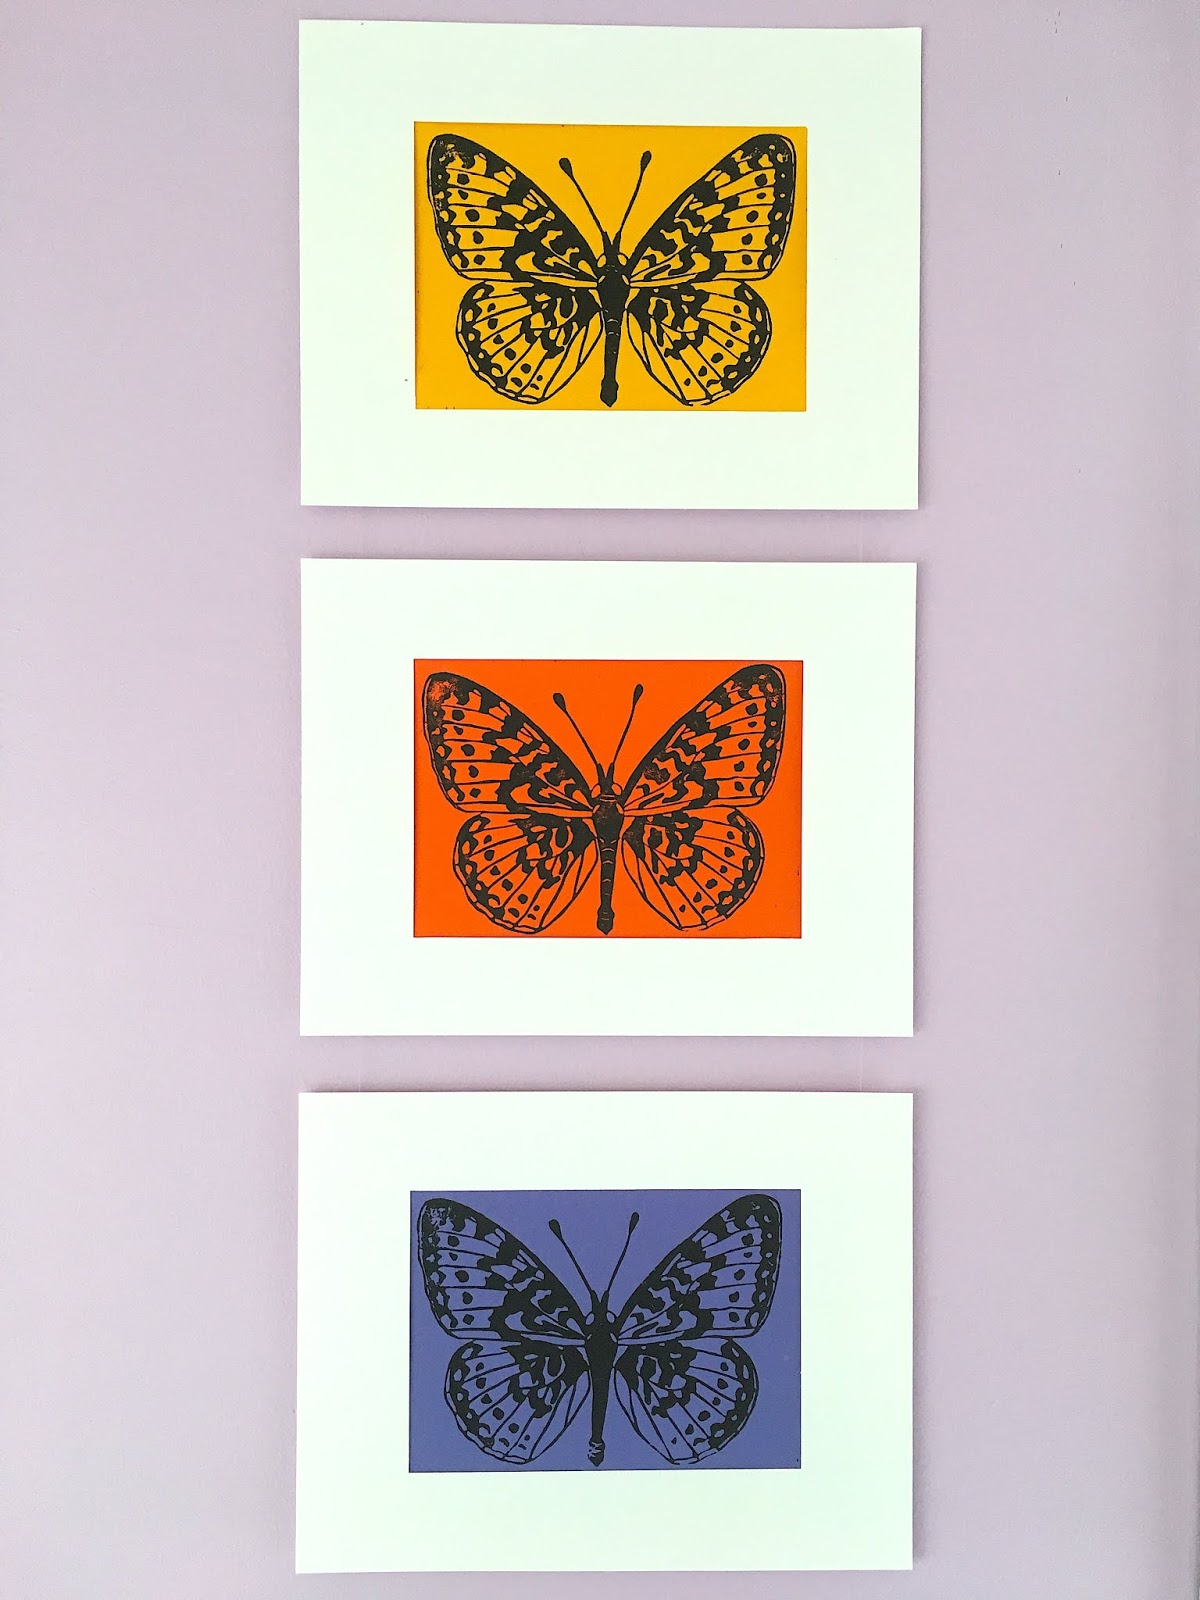
They’re still not perfect, but honestly I think that imperfection is charming. And the block will be there for me if I learn a new printing trick and want to try it out. For now though, I’m happy with what I have, and I made a few of my best prints into a wall hanging!


My apartment walls are still rather bare, and these butterflies will do well to liven up the place a bit. Maybe I should make a whole insect linocut series! Regardless of what I end up doing next, I do hope you’ll stick around to see it. Until next time, stay safe, stay well, and stay crafty.

Monday, March 2, 2020

Tutorial: Pompom Wreath


I love wreaths. Indoor or outdoor, on windows or doors or simply hung over the mantle, they always add a nice touch to the decor. Most wreaths are made of foliage and intended for the fall and winter months. But when we have the power to make our own, why limit ourselves to that style? Wreaths can be made of almost anything, and can decorate at any time of year.

 So why am I making a pompom wreath? The explanation requires a little bit of story time. You see, I have pretty curly hair, and when I was a teenager it was fairly short. This caused it to stick out from my head in a consistent orb of fluff. It was... well, it was definitely a look. And among my friends, that look earned me the nickname “Pompom.” I eagerly embraced my pompomness (pompomosity?) by changing all my profile pictures to photos of fluffy yarn balls. Eventually I grew my hair out of the orb-shape, but even now, a few of my accounts have pompom avatars. I have a fondness for pompoms. And I can’t think of a softer, friendlier way to decorate my front door!


If you too would like a poofy door decoration, these wreaths are super easy and quick to make. The materials you’ll need are:

  •  Pompoms
  • Cardboard
  • Cardstock, in a similar color to the pompoms (optional)
  • Scrap of ribbon
  • Craft glue (optional)
  • Hot glue
Once you’ve gathered all your materials, it’s time to determine the size of your wreath. I found it useful to pile my pompoms into a rough donut, in order to get a feel for how much space I could fill. From that shape, I measured the inner and outer diameter of the ring. Make your dimensions a little bit smaller than you think you have the pompoms for: a small dense wreath will look nicer than a large, sparse one.

(Note: your wreath doesn’t have to be circular. Experiment with other shapes too!)

Once you have the size of the wreath, trace the inner and outer circle onto a piece of cardboard, and cut out the ring. It should look something like this:


As an optional step, you can trace the same ring onto a piece of cardstock and glue that onto the cardboard. This will prevent the color of the cardboard from peeking through if your pompoms aren’t densely packed enough. If you’ve got plenty of pompoms to cover the area, though, the cardstock won’t be seen, and you can skip it. I erred on the side of caution and covered my wreath base with some pale pink cardstock.


Next is the fun part: the pompoms! Get a bunch of pompoms in a variety of sizes and colors. My pompoms happen to be sort of sherbet-colored, which I love, and they came in multi-size packs. You may find it helpful to sort them by size before you start.


Turn on your hot glue gun, and spread your workspace with newspaper or something else to catch glue drips. (Trust me, it’s worth the extra minute of setup!) While it heats up, take the biggest pompoms you have and space them evenly around your base. I had eight large pompoms, but the exact number isn’t crucial: what is important is covering the wreath as evenly as possible.

When your glue gun is ready, it’s time to start attaching the pompoms. If you’ve used a glue gun before, you know the drill. Put a dab of glue on the pompom...


And press it to the wreath where you want it to stick.


Alternatively, you can put the glue on the wreath first, and then place the pompom. I switched between the two over the course of the project, and both methods work fine.

Once you’ve gotten your biggest pompoms glued down, move on to the medium-sized ones. Here, your goal is to fill in the spaces left between the big pompoms. I found it helpful to arrange each round of pompoms before gluing them down, in order to space them well.


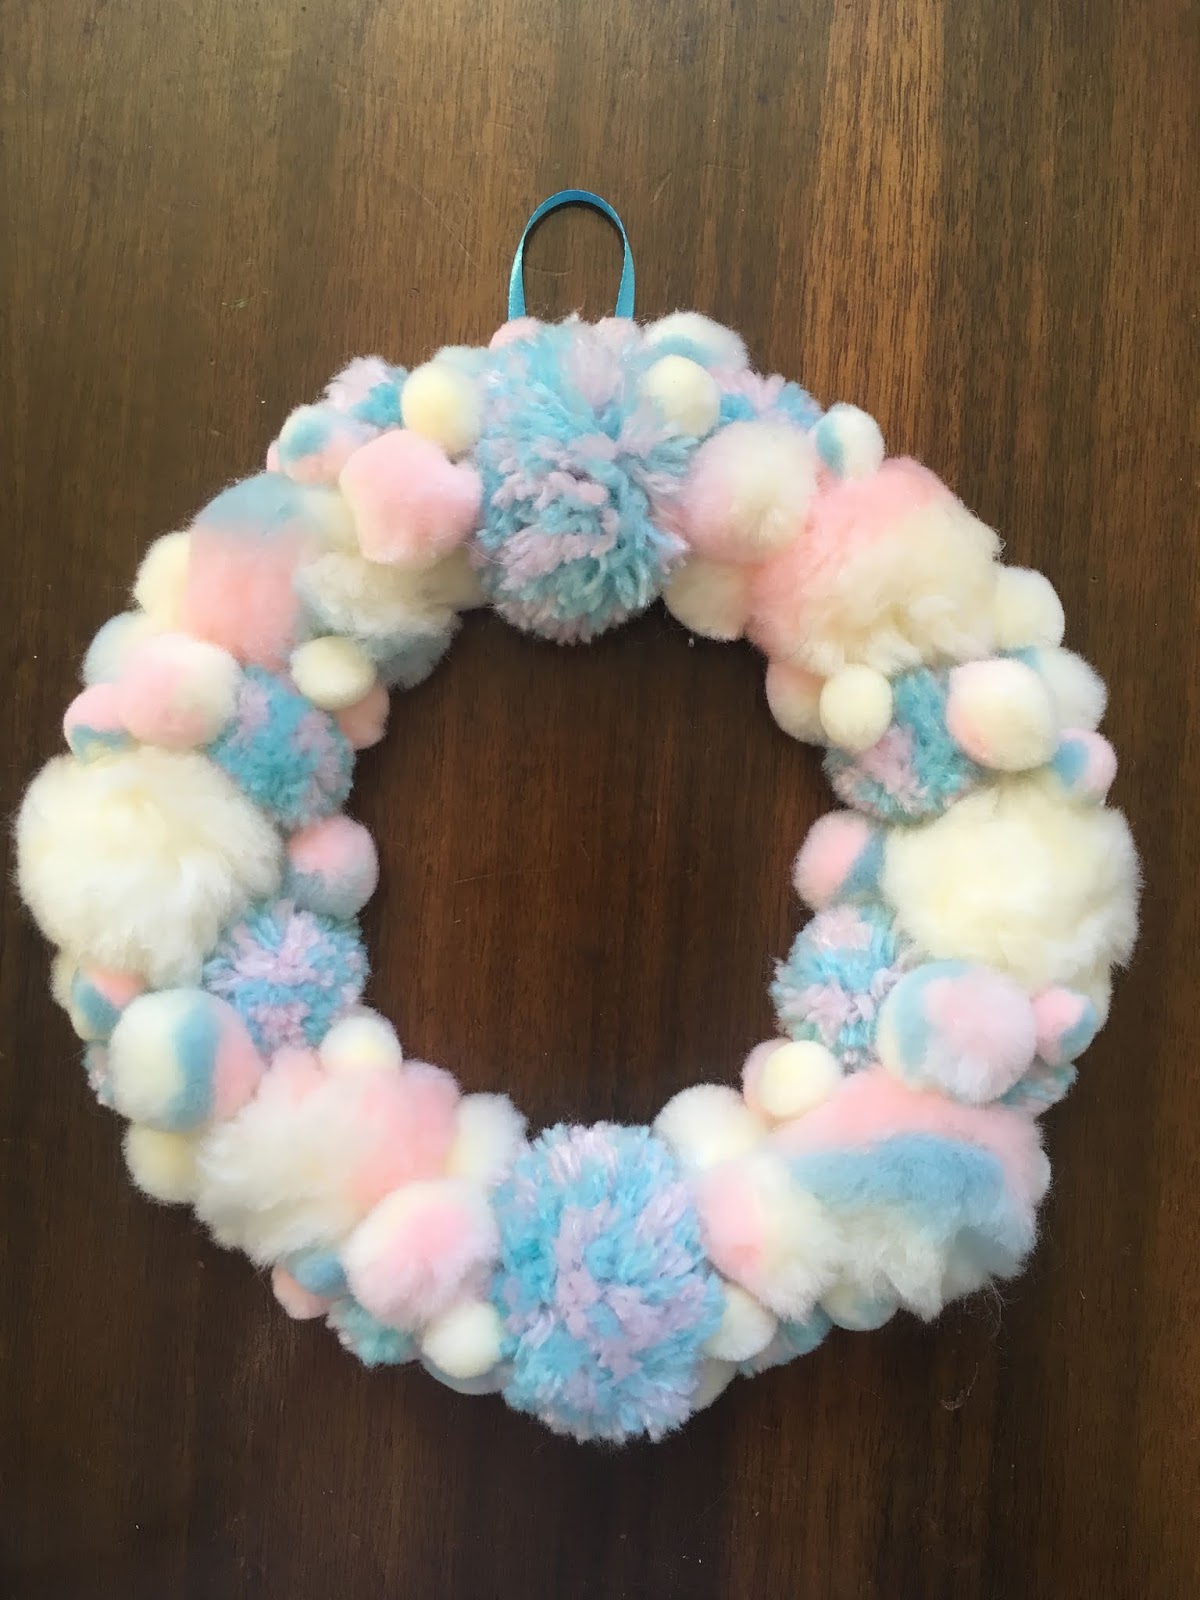
Continue using smaller and smaller pompoms to fill in the spaces. Don’t be afraid to squeeze pompoms into small crevices! That’s what will give the wreath its plush look and texture. Most pompoms will be glued directly to the base, but you can also stack pompoms on top of one another to round out the shape. When you’ve added your last pompom, the wreath should look something like this:


(Yes, it is as soft as it looks)

Finally, we need some way to hang our creation up. Take a small scrap of ribbon (a few inches long will work), fold it in half, and hot glue it to the back of the cardboard base, at the top of the wreath.


And there you have it! A fluffy cuddly pompom wreath to decorate any door or window you like!


The colors of my wreath would make it a good Easter decoration (though it’s a bit early for that), but your wreath can be any color, or any combination! Make a bunch of wreaths for every season. Make a wreath for each day of the week, and swap them out each morning! With how quick these are to whip up, the possibilities really are endless. In fact, I think I’ll pick up some more pompoms next time I’m at the craft store...

Well, it seems I have some shopping to do, so until next time, stay crafty!

Announcement


Hello lovely crafters! It’s been a while, hasn’t it? Fear not, I have plenty of projects that should be ready to share within the next few weeks. But first, there are some logistics I want to talk about.
You see, for the past few weeks I’ve been thinking about the format of this blog and how it can be improved. I love sharing what I make with you all, complete with the stories of how and why it came to be. But not every project has an interesting story behind it. Sometimes all I really want to share are the pretty finished pictures and a few words of review for whatever pattern I used. I can do that on a blog, certainly, but it’s not the best format for that sort of thing.
All of this is to say, I’m expanding! Yes, in addition to maintaining this blog, I’m going to start an Instagram account and a Ravelry account. The Instagram will be for all of the lovely aesthetic finished photos, and the Raverly will be for reviews and recommendations of other people’s patterns (and for publishing my own patterns should I ever try that!). This blog will remain the place to come for stories and tutorials. If you like seeing everything I post, follow all three! If not, then hopefully one of the platforms will suit your tastes better. I won’t judge, promise :)
Oh, and one more thing. To go along with this  revamp, I’ve decided to change the name of this blog as well. “Late Crafternoon” has served me well for these past two years, but let’s be honest, it’s was never a very catchy or funny title. I wanted a pun in the name, but this was a real stretch. And as much as I still love wordplay, I think something less punny will do better.
After some thought, I’ve settled on “Meadowlark Lace” for the new title of the blog, as well as its associated accounts elsewhere. As far as yarncrafts go, lace is sort of my signature style, after all. (I love it so much!) And I have a great fondness for animals, especially birds. My grandfather taught me how to identify birds at the feeder when I was young, and I still automatically try to identify every bird I see!
Within the next week or so, I’ll switch the url of this blog over to meadowlarklace.blogspot.com. I’ve already made the other accounts, so look for MeadowlarkLace at Raverly, and _meadowlarklace_ at Instagram. There's not much there quite yet, but there will be soon!

Until next time, stay crafty!

Saturday, January 25, 2020

Leaf Lights

Hello all! I think it's high time for another crafty escapade, don't you?

I did a lot of yarn-craft for Christmas, and so when the time came to start another project (never mind the five half-finished ones in the corner) I reached for my craft blade. Papercutting was one of the first crafts I taught myself, and so it's an old standby when I want something to do. I have plenty of cardstock in a whole rainbow of colors left over from an old project, so I already had the supplies on hand as well. The only question was what to make.

I rummaged through my desk drawers hoping for some inspiration, and came up with the jackpot: a handful of little electric tea lights! I had originally bought them in order to illuminate a paper luminary I made: why not use them for the same purpose again? My windowsills are sadly bare at the moment, and a set of small luminaries will do wonders for them.

After ruminating on the idea for a few days, I settled on a leaf-centric papercut design. One of my absolute favorite things is the look of light as it filters down through leaves on a summer day. I love the dappled shade. I love looking up and seeing the delicate outline of veins through the leaf. I love the colors, both in the height of summer and as the leaves begin to turn in fall. Right now, there aren't any leaves on the trees to admire: why not make some that I can keep year-round?

I took to the internet to search for reference photos, in order to keep my leaf cutouts true-to-life. I wanted a variety of leaf types: everything from maple to oak to gingko! Using the photos, I traced the outline and vein structure of each leaf onto a net of a cube, printed on cardstock. Simply put, a net is a 2D representation of a 3D shape that can be folded up to recreate the shape. Cubes have very simple nets, but you can also make weird, wonderful, complex polyhedra in the same way. Make a dodecahedron luminary! Hang platonic solids from your ceiling as a crazy mathematical mobile!

...Ahem. Back to the luminaries. After the shapes were traced, it was a simple matter of cutting out the shapes. As always, I work from the fiddly inner details outwards while papercutting. The added stability while cutting out tiny vein patterns makes things so much easier!

Once everything was cut out, it was time for my secret weapon of luminary-making. You could certainly leave the sides open, and it would be pretty. However, the open papercutting is very fragile and prone to bending, and the light from the candle doesn't diffuse nicely around it. It's great for shadow puppets, and less great for home decor. So, I went to the store and bought myself a package of plain white tissue paper: the kind used for stuffing in gift bags. I cut out little squares of tissue paper and glued them carefully to the back of each luminary. The tissue paper provides just enough of a solid foundation to make the papercuts sturdy and resistant to tearing. It also diffuses light coming from the candle inside, resulting in a very pleasing, soft image. But don't take my word for it: look for yourself!


(And what kind of person would I be if I didn't include a video of the lovely flickering of the electric candles?)

For those curious what these look like in the daylight: I tried to match the cardstock colors to the actual colors of the leaves (either in full summer, or fall foliage)


These are very calming to look at, and they're going straight onto my windowsills! I highly recommend making yourself a selection of paper luminaries (using electric lights only please! Let's not start any fires!). I could even make a proper tutorial, if that's something people want. Regardless, I'll see you all next time with something new. Until then, stay crafty!