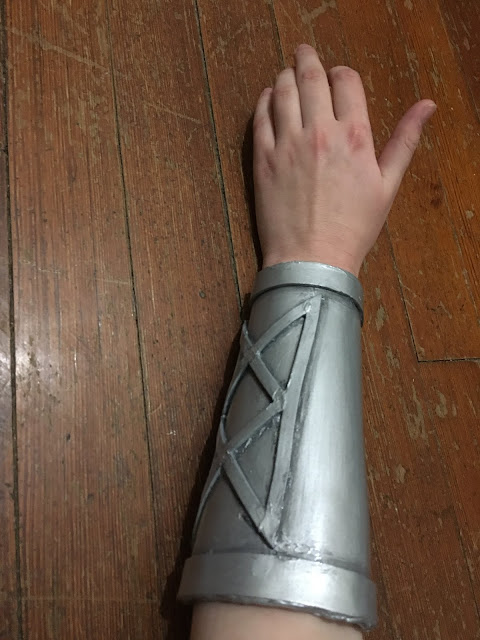
Enough chatter, let's get right to it! For this project, I decided to go with foam. It's a common cosplay substitute for armor and the like, since it can easily be painted to resemble metals without carrying all the weight and rigidity of actual armor.
Looking back, it seems I forgot to take pictures for the bracer, so this post is going to be a little light on process photos. There are plenty of cosplay armor tutorials out there, though, so if you're looking for something instructive you should be able to find it elsewhere.
A forearm is essentially just a tapered cylinder, so it was simple enough to measure and cut a corresponding shape out of craft foam. I put two layers of foam together to give a sturdier bracer, making sure to glue them together while they were curved around my arm so that they would hold their shape better. In order to secure the bracer, I used hot glue to attach velcro to the inside.
Then it was onto the detailing. I used scrap strips of foam to create a raised rim around the top and bottom openings, and then set to making the BoB symbol on the front of the bracer. Originally, I figured I would draw the insignia on in hot glue in order to get a sort of embossed effect. That didn't work out too well.
As you can see, the hot glue lines were far from the smooth embossed look I had intended. As it turns out, it's very difficult to get a perfectly even, straight hot glue line! Painting the bracer only made it look worse, so I tore off the hot glue and went back to the drawing board.
It occurred to me that the rim details I made out of foam had actually turned out quite nice, so I decided to try a similar tactic for the symbol. It was fiddly to cut and glue so many thin strips of foam, but in the end, I was much more satisfied with the result.
I covered the whole thing in a few coats of silver paint, and then dry-brushed some black paint into the crevices for a tarnished-metal feel. Then, a coat or two of glossy mod podge sealed everything in and brought out the shine.
There are definitely things I would do differently if I were to make this again, but overall I'm happy with it. It's comfortable enough to wear for a day out cosplaying, and durable enough to withstand it. It won't fool anyone into thinking it's actual metal, but some better paint and thicker foam might be more convincing. And most importantly, it reminded me not to give up if something doesn't work the first time. None of us are perfect crafters, and sometimes we need to try multiple techniques before we find the one that works.
And with that, I've finished all the DIY aspects of this costume. Tune in soon for the reveal of the full thing! (I promise that this time, I'll take pictures of the cosplay sometime this year!) Until then, though, stay crafty!


No comments:
Post a Comment