Wednesday, July 24, 2019

To Bead or Not To Bead


Last week, my mother came to me with a plastic bag full of loose and partially strung beads. I recognized it immediately: it was a necklace I had made for her a few years ago, broken in multiple places and hemorrhaging seed beads into the bottom of the bag. The damage was bad enough that I had to remove and restring the entire necklace in order to repair it. While I’m confident that the repair job will last, I’m certain that Mom will come to me with another bag of beads not long from now, and another, and another. It’s not because she’s careless with jewelry, far from it. It’s because I was careless with how I strung the necklaces in the first place.


The material you use to string your beaded jewelry is incredibly important, though it may not always be evident while you’re making the piece. Some advantages and drawbacks can only be seen years down the line, once the piece has been subjected to considerable wear and tear. I’ve made a lot of choices in this department, both good and bad, so allow me to give you a rundown of the common stringing materials for beads and how they are best used.

Sewing Thread

If you’re completely new to beading, this is likely the material you had on hand for your first project. Sewing thread comes in a million different colors and comes in a range of materials and thicknesses as well. However, it’s not usually the best thing to make a necklace with. Sewing thread is fairly delicate, and it breaks easily under the strain of heavy beads and frequent usage. Quilting thread fares a bit better, as it is sturdier, but similar problems apply.

I would only ever recommend using sewing thread for a project if you need to pass a great number of threads through a single bead. Bead weaving and bead netting are examples. Having multiple threads and anchor points somewhat mitigates the weakness of the thread. Use quilting thread if you can, and never use quilting/sewing thread with medium or heavy weight beads, or with single-stranded beadwork. It will break, and you will be unhappy.

Uncoated Wire

Another material that may have other uses around the house, thin uncoated wire can also be used to string beads. Usually made of steel, these wires are composed of a single strand of metal that has been drawn out to a fine gauge. They can be shaped and twisted, but they easily sag under the weight of heavier beads. Wire like this is good for bead weaving if you want the resulting piece to be firm and not very flexible. Thread is better for pieces that need to drape.

While uncoated wire can be very strong, it has some weaknesses that make it unsuitable for many types of beadwork. If you’re not very careful while working with it, wire will kink, and this kink will remain as a point of weakness in the wire even after you straighten it out. Long, unanchored strands of beaded wire can also kink as a part of daily wear, and that results in breakages. Additionally, depending on the type of metal that has been used, wire may rust or develop a patina that can discolor the insides of transparent beads. I saw this on the necklace I just repaired: the light blue seed beads that had been in contact with the wire had a dark grayish residue on the inside of the hole.

Beading Thread

Now we’re getting into materials that are made specifically with beading in mind. Beading threads are often made of nylon or polyester, and are much stronger than sewing thread. Depending on the brand, they can come in a wide variety of colors. It is usually thin enough to thread on a needle and pass through a seed bead multiple times, making it suitable for bead weaving .

Beading thread is really a great all-purpose choice for making beaded jewelry. It is strong enough to hold up to heavier beads (though unevenly distributed weight may cause the necklace to hang oddly), but drapes nicely even when used with delicate seed beads. My only gripe about this stuff is the price: it can get pretty expensive to bead with specialty thread, especially if you’re working on a project that requires a lot of yardage.

Nylon Filament

Much like wire, nylon filament is one continuously drawn piece of material. Only instead of metal, it’s... nylon. I sure hope you didn’t expect it to be made of something else! These filaments have multiple uses, from fishing line to ukulele strings, but they can also be used for beading!

Nylon is incredibly strong, so it can safely be used for stringing even very heavy beads. It tends to have a bit of stiffness to it, so delicate beaded pieces may not drape as nicely as with something like thread. Nylon is usually only available in while, clear, or a small range of other colors, so it may not be suitable for projects where the threading material will be very visible. It is also difficult to knot or tie, so supplemental materials such as crimp beads are a necessity for a lasting piece of jewelry.

Coated Beading Wire

A distant cousin of the uncoated wire, coated beading wire should be saved for your heavy-duty projects. It’s composed of a multi-stranded twisted or braided wire, covered in a polymer coating. Unlike a single stranded wire, this beading wire doesn’t kink and won’t discolor your beads. It’s incredibly strong and difficult to break: it will hold up to even the heaviest of beads. However, this strength comes at a price. I’ve only ever seen beading wire in one color (steel), so you don’t have many options there. It’s also very stiff, more so than nylon. If you don’t have any heavy beads to weight it down, it’s not going to hang correctly on a necklace. And because beading wire is so thick, you won’t be able to do bead weaving or any delicate beadwork that requires multiple passes through a single bead.

You can use virtually any string-like material to make beaded jewelry, but these materials are the ones I’ve used the most. If you’re looking to start beading, I hope this guide will help you pick the best thread for your project!

Monday, July 15, 2019

Swift Sweeping

Another week, another craft! And this time, it's home-centric. You see, I'll be moving into a new apartment at the end of the summer. It's going to be my first time with a place entirely to myself: no family, no roommates, nothing. To be honest, I'm a little nervous for the change, but also pretty excited!

Having a place to yourself also means having the chores all to yourself, though, which I'm... shall we say, less enthused about. I don't hate chores, I just don't love them. I also don't love throwing out lots of disposable cleaning wipes and Swiffer mop pads and whatnot every time I clean: it just feels wasteful.

Well. A few minutes of searching on Ravelry and I found a solution to at least one of those problems: reusable swiffer pads! These are super easy to make, they teach you a couple of fun weird stitches, and they're useful to boot!

Here's the finished duster pad. I personally think it looks like a mossy forest floor!


And the mop pad, which is a bit reminiscent of hard candy!


I had three skeins of worsted weight cotton yarn, and that was enough to make two of each kind of pad, with just a tiny bit of yarn left over.


Because they're made of cotton, these pads can just be tossed into the washing machine when they're dirty. I love projects that are easy to maintain too!

Expect more projects for around the home in the coming months. Like I said, this is my first time with an apartment entirely to myself, which means I need to fill it with stuff. From practical projects like this one, to decoration, to things that are a bit of both, I've got my work cut out for me. Stay tuned if you want ideas for your own projects, and as always, stay crafty!

Tuesday, July 9, 2019

Puppy Present

Puppies are a lot of work! I don't know if you all know that. I didn't, because the last time I was in a house with puppies, I was about 6 years old and not super involved in the whole process. Honestly, I don't know how my parents managed to deal with me, my younger brother, and a puppy at the same time.

That being said, puppies are cute. Very very cute.

I wanted to make something for the new puppies, to show them some love. Even though I'm sure they don't understand the significance of a handmade gift, it's something I like to do for others! The trick was just finding a puppy-appropriate gift to make.

These puppies like tearing into things and chewing up fluff, so anything stuffed was right out. Nobody needs a trip to the vet because a pup ate a bunch of polyester filling. I settled instead on this frisbee by Gracie Castillo. It's a simple disc with a curved edge, perfect for playing fetch and tug of war! I had some plain cotton yarn lying around as well, which I figured would be the most durable for puppy-teeth (and least dangerous should they manage to swallow some fibers). It was quick and simple to whip up, too!


I don't have any photos of the frisbee in action, so you'll have to trust me when I say it flies well. A slightly larger version would probably work well for some indoor frisbee games between humans! As for this one, the pups seem to enjoy it well enough.


Maybe it'll keep them busy enough for me to sneak some time for a new project. Until that happens, stay crafty!

Sunday, June 30, 2019

Argyle Adventures

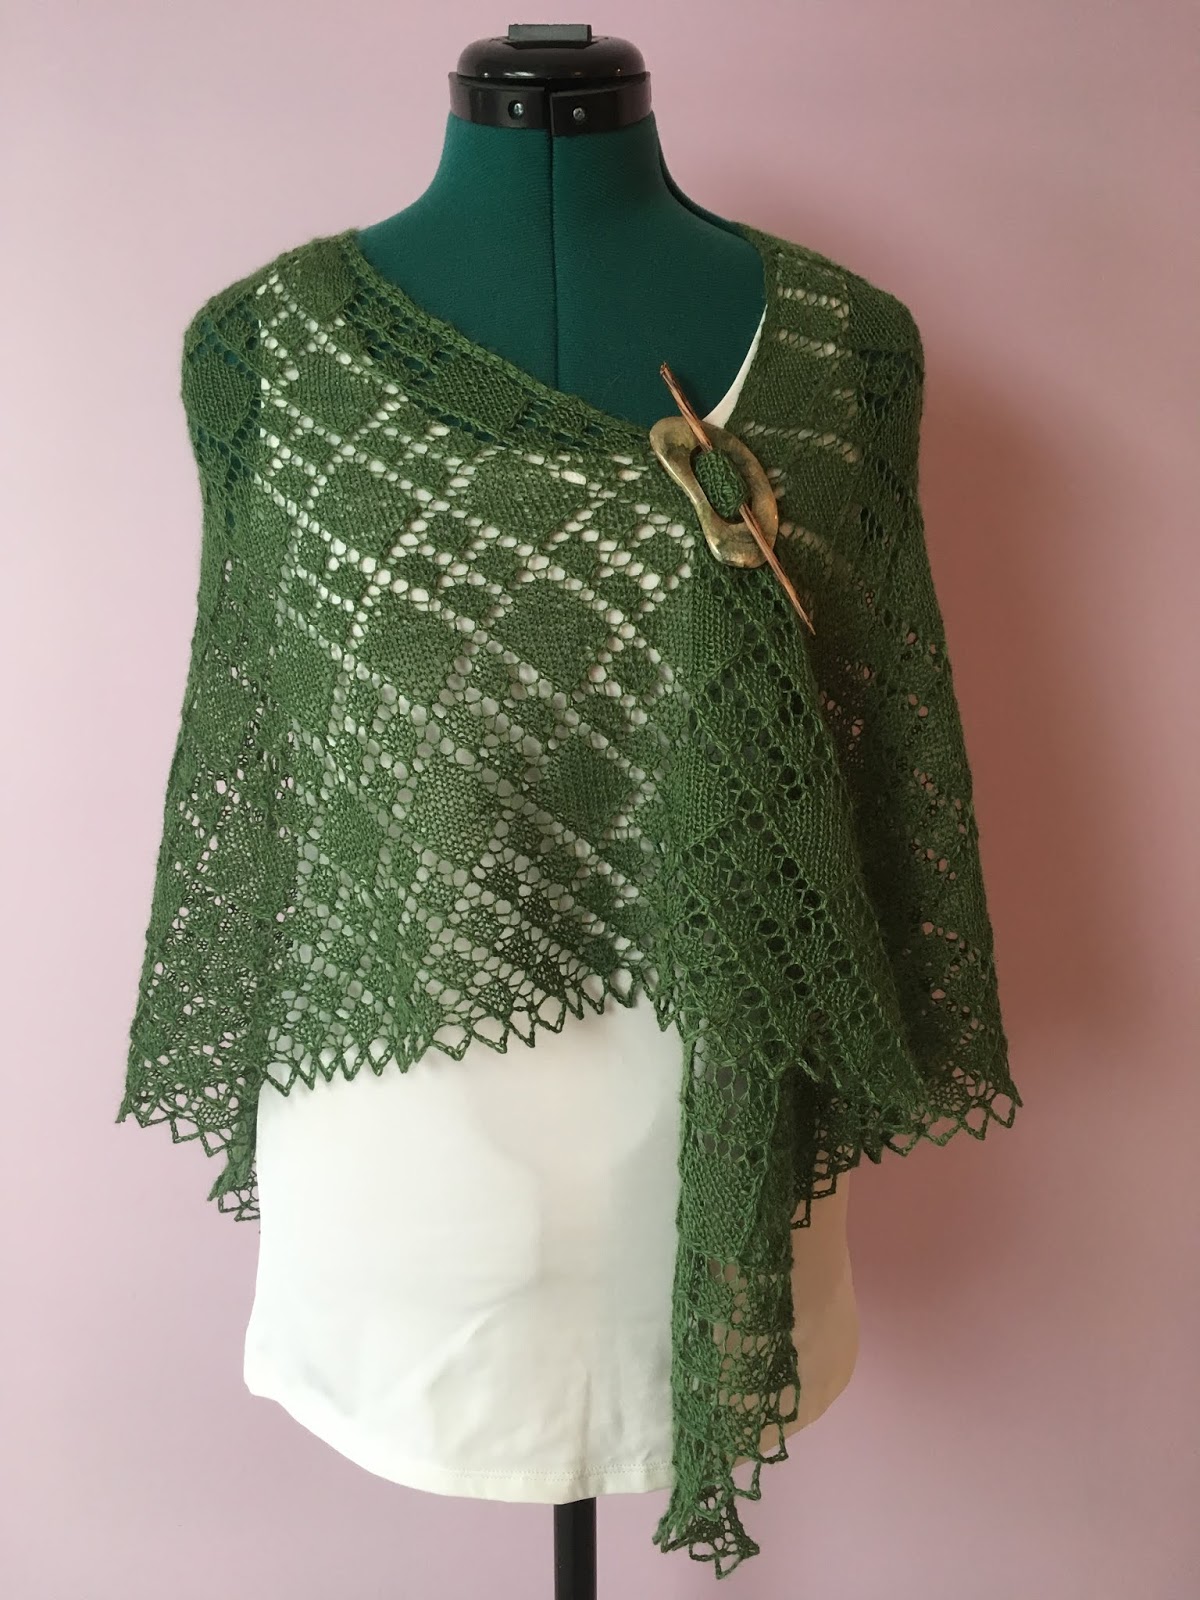
Hello hello! Today I come to you with a finished project: my argyle lace shawl! It's been knit, it's been blocked, and now it's ready for the spotlight! I've already introduced this project and shared my work in progress pictures, so let's cut to the chase and get to the main event, shall we?


Lovely, isn't it? I really couldn't be happier with how this shawl turned out. The argyle-esque pattern works so well in lace, and I love the way it looks in this color yarn, too! It drapes beautifully and looks good open in front or held closed with a shawl pin.

I will say, the shawl is a lot bigger than I imagined it would be. Its wingspan is probably close to six feet, though I haven't measured it precisely: that's a lot for a triangle shawl! When I put it on, the point at the bottom reaches to the back of my thighs! It's definitely a full-coverage type of shawl, and given that the yarn is alpaca, it should prove to be quite warm in the fall months. I think that doing one fewer repeats of the main lace pattern would also make a good shawl that's just a bit smaller. 

My final verdict on the pattern itself is a bit mixed. Although I love the way the shawl looks when it's done right, it was tricky to figure out what "right" meant given the instructions. As I mentioned before, the pattern starts out with a vague comment on how the chart only shows "half" of each row, and that seven stitches are omitted from each row. I also had some trouble with the bind-off instructions, though when I went back to figure out exactly what I had trouble with, the instructions seemed clear enough. I'm not sure whether it's a case of hindsight being 20/20 or me misreading something the first time through. In either case, though, I'd recommend putting in a lifeline before attempting the bind off. You never know when your dad is going to sit on your project and pull out 30 stitches! Overall, I'd recommend it only to practiced knitters who already know their way around a shawl pattern. That way, you'll be able to make sense of murky instructions without tearing your hair out. 

Now that this big project is out of the way, I want to make a smaller item or two before moving onto the next big thing. And I do have to get started on the Taako costume as well. So many crafts, so little time! Join me next week and I'm sure to have something new to show you. But until then, stay crafty!

Thursday, June 27, 2019

This is Halloween!

...Or this will be Halloween, anyway. It's still a ways off. But in my annual tradition, I've begun thinking about the holiday far too early.

I had a lot of ideas for this year's costume. If I wanted to stay low-key and wearable all day, I could try for something like Carole King. I've been told on multiple occasions that I look quite like her, and so all it would take is a bit of 70's fashion to complete the look. If I wanted to go bigger, there were plenty of pieces of media that I enjoyed this year, and might want to pay tribute to. I could play to the classic fantasy and be an elf or fairy. I could be Cecil from Welcome to Night Vale. I could even dip my toe into some of the anime series I've enjoyed lately, like My Hero Academia, or Mob Psycho 100. There are so many options!

...and then I learned that the creators of The Adventure Zone would be going on tour in my area in the fall. They'd be doing a show near me mere weeks from Halloween. Of course I had to get a ticket. I've never been to one of their live shows before, but the recordings make them sound like great fun! And the recordings also reveal that many of the fans come in costume.

Ah. Well. Decision made, then. I'm not going to go in a year-old costume when I could make a new one of a different character. The only question was: who?

There are many excellent choices of character for cosplay in TAZ, especially now as they're wrapping up their second season. I did Aubrey Little of their second season last year, so this time I felt like it would be fun to get back to season one with some classic Balance characters. I conferred with other friends who were planning to go to the event in costume and settled on Taako for my cosplay/Halloween costume.

Taako Tacco. The elven wizard member of Tres Horny Boys. This is going to be fun.

I love Taako. He's such a ridiculous character in many ways, and yet he has a lot of depth to him that comes to the surface in tense moments. Between that and the off-the-walls outfits he's sometimes described as wearing, I know this will be a fun ride!

Okay, back to business: what do we need for the costume? True to TAZ tradition, not much information is given about the characters' physical appearances. Taako is an elf, so we can assume he has pointed ears. We also know he has a wizard hat and the umbrastaff (an umbrella that doubles as a concealed wand). That's about it. In one arc he wears a skirt, and in another, we know he wears a robe and jacket combo, but other than that there's not much to go on. Therefore, we have pretty much absolute freedom on how to design this costume! I took a dive into the ample fan art for inspiration and set to work sketching out my concept.


And there he is! I could've gone more flamboyant, but I wanted something that could reasonably be thought of as practical adventurer's gear. Taako, Magnus, and Merle get into a lot of hairy situations, after all!

Now for a summary of all the items needed:

  • Black boots with salmon laces
  • Blue jeans/pants
  • Light blue button-down shirt
  • Blue capelet with red lining
  • Bureau of Balance arm bracer
  • Red umbrella (umbrastaff)
  • Salmon corset-belt with embroidered details
  • Black wizard hat with embellishments
  • Long blonde wig
  • Prosthetic elf ears
Whew, that's a long list! Fortunately, not everything has to be made by hand. I already have black boots and blue jeans, and I can acquire a red umbrella and a button-down shirt fairly easily (though I might try to make the latter just for fun). The wig will also have to be purchased. 

That leaves the capelet, hat, bracer, belt, and ears to make. All I can say to that is I'd better get started!


P.S. Sorry for putting this post out later than usual. My parents just got two puppies (miniature poodles), and I've been helping to take care of them. They're a lot of work! But they're absolutely adorable as well, so you can't really stay mad at them. 


Saturday, June 15, 2019

Prideful!

Hello everyone! As you may be aware, it's Pride Month, and I wanted to celebrate with a craft. I actually had this idea a year ago, but it didn't materialize in time. Fortunately, June comes around just about every year, so I had another chance to make it happen.

I like sewing, and I like making the most of my scraps. Oftentimes, this means stuffed animals. This time, I used my collection of vibrant fleeces and felts to make a veritable rainbow of little friends!


Little mouse friends, to be exact! I don't usually care for mice roaming around my home, but I'll make an exception for these guys.


They come in every color of the rainbow, and then some! I love how each one is a bit different, even though I cut them from the same pattern. Just like people, the mice have their own quirks and unique traits!


Green Mouse was willing to be a model so you all can see the details of the construction. The pattern comes from the book Countryside Softies by Amy Adams. She's got a whole host of adorable, scruffy-looking critters to sew. I'm seriously considering making a set of animals in as many pride flag palettes as I can manage! Maybe that'll be my annual pride project.

For now, I'm going to get back to my ongoing projects. It's about time I start thinking about Halloween, too...

Well, until then, stay crafty!

Monday, June 10, 2019

Argyle Lace Adventures

I think it's high time for an update on this particular project. For those who don't remember, I started a lace shawl using the pattern Argyle a few months ago, right in the middle of one of the busier times of year. Why, you might ask, would I attempt this? That's a very good question.

...Moving on.

Naturally, I had to bench the project when other obligations got too much, but I've since picked it back up. Like any top-down shawl, the rows have gotten longer, and longer... and longer...

Needless to say, it's been slow going for a while. I finally finished the main pattern, though, which is exciting!


Like any piece of lace, it's not much to look at before blocking. It's good to keep that in mind while selecting your yarn: some fibers are harder to block than others! Acrylics in particular can be difficult to block, so be careful about trying to knit lace with those.


I tried to get an idea for what the lace will look like when completed and blocked by stretching out a section. It seems to be coming along nicely! I really like the idea of using lace stitches to make something reminiscent of the colorwork argyle pattern. Hopefully, it'll turn out just as good as those traditional patterns.

I still have the edging to work, though, so I'll get on that. Until next time, stay crafty!